Showing posts with label greeting card. Show all posts

Thursday, February 19, 2015

Handmade Card for a Wedding: The Happy Couple

Hello crafty friends!
Today I'm sharing an embossed white, silver and black card that I embellished using stickers and ribbon.

During the month of December I won a prize for a challenge I entered and included with the awesome rubber stamp set I received were a couple of sheets of foil stickers. I hadn't used stickers much before, aside from adhesive backed gems, but the foil stickers were so pretty I began incorporating them into my projects. 


Now when I go to the craft store I look at the stickers too and that is how I found the gorgeous silver butterflies by Jolee's Boutique that I used on my card. In fact one thing I realized while looking at the 3 dimensional stickers is that I can learn what steps to take to make specific embellishments and when I need a card quickly, I can make a beautiful one without having to produce every detail myself.
I used Recollections Adhesive Rhinestones to make the butterfly trails.

To make the sentiment I used Sticko stickers and I added a rhinestone to the engagement ring. To make the label shape I used Spellbinders Labels Eleven (S4-246). After making my die-cut I used black Rubber Stampede ink around the edges and then to get a very deep black defined line around the edge I finished it off with Ranger Archival Ink in Jet Black. 

I used the Darice Butterflies embossing folder to make the decorative background and on the other side of the card I used Cuttlebug's Polka Dots Page embossing folder.
Since the theme of my card is butterflies I decided to add a bow that also gave that feeling. The white bow in the background is actually two bows hot glued together and then I glued a small bow on to the front of them.

Supplies List
Click on photo to enlarge
Happy crafting and thanks for stopping by!
post signature

Tuesday, February 10, 2015

Handmade Greeting Card: Celebrate You Today

Hello crafty friends!
This has been a heck of a week, but I managed to make at least one card in some pretty colors with a lot of bling. My favorite color combinations involve green (pink and green, blue and green, purple and green) so this card, with it's bright yellow-green accents and shades of purple, is right up my alley.
The gorgeous paper is from the DCWV Violet Leaf tablet. To make the sentiment I used one of the Spellbinders Valiant Honor Card Creator dies, made two die-cuts (one on purple paper and the other on white) then I cut some of the edges off the white die cut, used two green inks to color it and adhered it to the purple one. 
For the pretty purple ribbon flowers running up the left side I cut the mesh off the back of a pre-made dimensional ribbon and only left mesh were the ribbon flowers attach.
Supplies List

Happy crafting and thanks for stopping by!
post signature

Monday, December 8, 2014

Handmade Card: A Joyful Blue and Silver Christmas

Hello everyone!
 
I'm working with one of my favorite papers today from the DCWV Winter Solstice Stack. I was constantly skipping over this particular sheet of paper because I love it so much that I didn't want to use it. I just like looking at it. That probably sounds ridiculous, but since I usually add a lot of layers to my cards or at least a lot of die-cuts and embellishments, I didn't want to cover this paper up.

Well today I bit the bullet and you will probably notice that I left this card quite plain compared to my norm.
The scene is just too cute and the on rest of the 12'x12" sheet that this came from is a snowman with a sled. He's being used to make another card as I try to produce them quickly.
 
Instructions to make this card:
1. Cut your paper
Two pieces of white cardstock
  • 6 1/2"w x 11"h (Fold at 5 1/2")
  • 5 1/2"w x 4 3/4"h
Two pieces of dark blue cardstock
  • 6 1/4"w x 5 1/4" h
  • 5 1/4"w x 4 1/2"h
Two pieces of decorative cardstock
  • 6"w x 5"h
  • 5"w x 4 1/4"h (Cut out the area that you want as your scene)
2. Tape and stack your cardstock (biggest to smallest piece) centering each on the one below it.
  1. 6 1/2"w x 11"h (Fold at 5 1/2")
  2. 6 1/4"w x 5 1/4" h
  3. 6"w x 5"h
  4. 5 1/2"w x 4 3/4"h
  5. 5 1/4"w x 4 1/2"h 
  6. 5"w x 4 1/4"h 
3. Add your embellishments 
  • Bow - I used hot glue to attach my bow)
  • Rhinestone Mesh - One strip of rhinestone mesh at the bottom of the card (I used Glossy Accents to glue this into place)
  • Cut a small piece of the rhinestone mesh to hang your sentiment from. I hot glued mine in place just at the very bottom of the center of the bow.
  • Sentiment - I made my sentiment by using a pre-made cardboard sentiment from an old gift tag I got on clearance, but you can use a die, make a small label, or stamp your sentiment on. The sky's the limit. To color my sentiment I used light blue embossing powder that has a little sparkle in it.


Supplies


 Happy crafting and thanks for stopping by!
post signature

Saturday, November 8, 2014

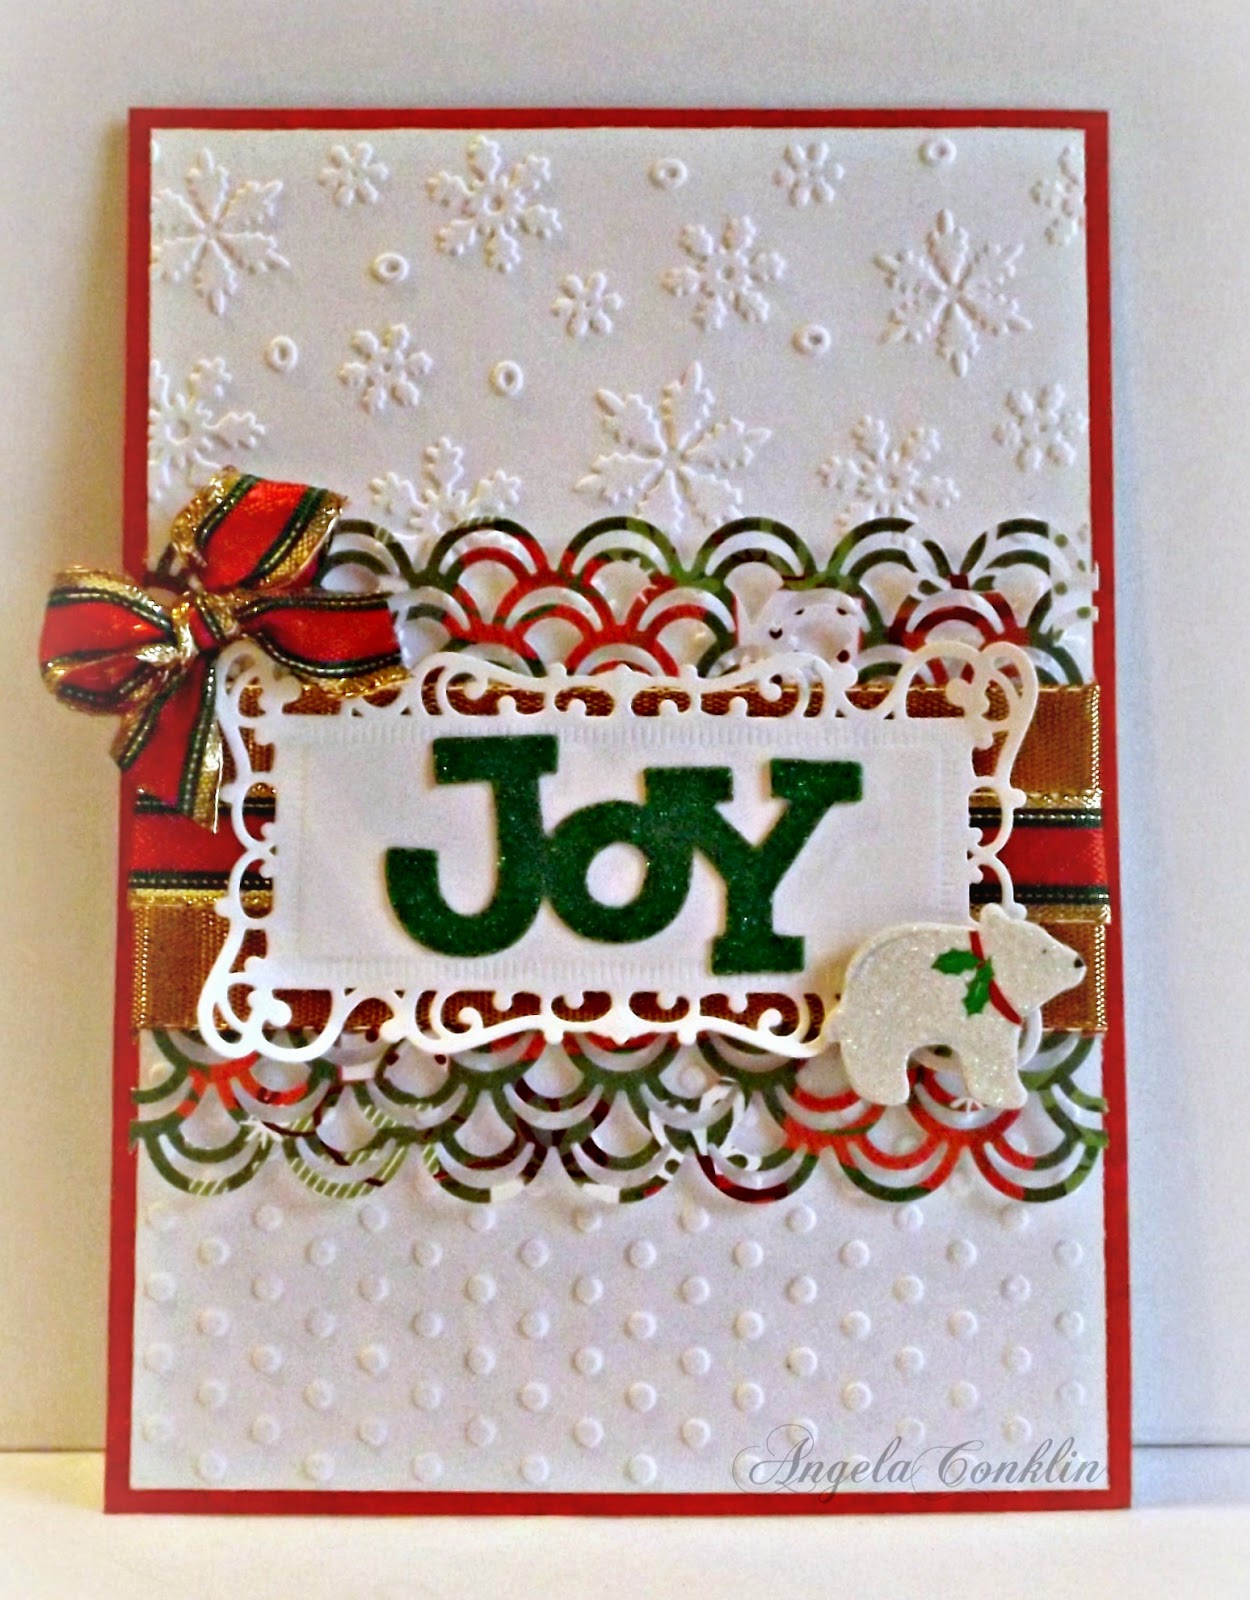
Handmade Joy Christmas Card in Traditional Colors

Hello Everyone!
 
Did you ever have one of those days when things that you normally ignore, suddenly strike you as funny? I was taking photos of cards I made and my camera kept telling me it detected a blink. This has happened other times too, but for whatever reason it cracked me up and I could barely hold my camera still. I could have used my tripod, but I had to be at uncomfortable angles to catch the little bit of light from outside. It's a gloomy overcast day today. I couldn't even hold my breath to stay still. It would just make me laugh. Thank goodness I'm alone because my family would have thought I was going crazy. Maybe I am? Maybe they do? LOL!

Anyway, I'm sharing a simple Christmas card today. There's some glitter on this one and I like that only the center is decorated with all the snowflakes in the background. I decided to make just the front of the card so that later I can decide if  I want it to be a normal side-fold card or something different. Without a card base holding it up, I had to lean it against the background.
 I cut two white panels for my card and embossed one with the Darice Snowflakes folder and the other I used the Cuttlebug Polka Dot Page folder. Then I cut a strip (about 2 inches) of Christmas paper from the DCWV Holiday Cheer stack and used the Martha Stewart Double Arches, border punch on both sides.

I then embellished the middle of the strip with wide shiny ribbon and a smaller Christmas ribbon. To make the sentiment stand out I backed JOY with a white die cut from the Spellbinders Card Creator, Reflective Moment set. Then I just added a bow and a polar bear.

A very simple card to make.


Happy Crafting! 
post signature

Sunday, September 14, 2014

Flowers For My Mom Greeting Card

Hello everyone!
It's been a little while since I've been able to post on here. Life is looking up and I'll have an update to that part of it in a couple of weeks. Thank you for the kind words that continue to come in, it really has helped me stay strong.

Today I decided to make a greeting card. Sometimes I like to use people for inspiration and this time I reflected on my mother who passed away 5 years ago tomorrow. Her favorite color was green, she had a colorful personality and had told me how much she liked all the flowers that line the highways in Virginia. I made the card simple because in daily life everything can be so hectic, but when you lose someone you love, everything that was hectic goes away and you simply just miss them.


I used Core'dinations celery green cardstock for the base of the card and flower stems and matted the front with Core'dinations white textured cardstock. 
 
 
The flowers are also made from the same white cardstock of which I used a Tim Holtz Alterations die called Mini Paper Rosettes to cut them out. I colored the paper with Tim Holtz Distress Ink in the color Tumbled Glass and Rubber Stampede ink in Fuschia. 
 
 
The banner was made from left over white cardstock and edged with the inks mentioned above. The sentiment is a rub-on transfer.
 
 
Supplies ListCore'dinations Cardstock
  • Textured white 
  • Smooth light green
Tim Holtz Alterations Die - Mini Paper Rosettes
Tim Holtz Distress Ink - Tumbled Glass 
Rubber Stampede ink - Fuschia
Plaid Mod Podge Rub-on Transfers 

Happy Crafting!
 
 post signature

Thursday, July 24, 2014

Scrapbook Layout and Greeting Card Sketches to Have Fun With

I hope you're all enjoying your summer. I'm leaving for a two week camping trip this weekend with my family and friends and can't wait! This will be a much needed break after my craft room makeover, trying to clean out our shed and organizing my main living spaces. I'm always amazed at how much "stuff" my family accumulates.
 
This week I decided to make some sketches for future projects. I had certain borders and flowers in mind, but after making the sketches I realized that many different looks can be created from them.
 
  If you decide to use a sketch or more than one I would love to see your interpretation when I return from vacation. I welcome you to place the number(s) of the sketch you used and the URL to your project in the comment section as a reply to "Links". There is an example below. Have fun!
 
 1) Scrapbook Layout Sketch
 
2) Scrapbook Layout Sketch
with rolled corners and border punched edges
 
 
3) Greeting Card Sketch
 
  4) Greeting Card Sketch
 
5) Greeting Card Sketch
Example for sharing your project in comments
Happy Crafting!
post signature

Monday, May 26, 2014

Greeting Card - Butterfly Kisses

Hello everyone! 

We're having beautiful weather here in Pennsylvania for Memorial Day today. Nice of the sun to come out so I could take some photographs. :)

I'm still in the midst of a craft room makeover, but I had to fit a little crafting in since I'm really missing it. I'm finding some great little items to use in crafts as I open boxes I had stuck in a corner months ago. Many of the things I've found have inspired me to get back to doing some mixed media canvas collages, layouts, and altered items that I also miss doing. For today though, with my room still in disarray, I decided to do a simple card with my border punches.

I've never done a card before with just black and white. I always had to stick a little color in somewhere, but this time I decided to stop, and strangely I struggled with that a little. I used white card stock to punch the borders out and then placed them on a black card stock mat. I then attached the mat to a white base-card and used a border punch on the back page to give it some interest on the inside.
 
I used a butterfly stamp that I only applied ink to once for the darkest butterfly and then kept stamping to create ghost images so the sentiment would show up. One of these days I'm going to have to get all my stamps and ink out and start designing my own craft paper.


Materials:

  1. Rangwer Archival Ink in black
  2. Premium Cardstock by Core'dinations (Great white and Black Cat)
  3. Martha Stewart Crafts Punch Around the Page - Double Arches
  4. Martha Stewart Crafts Punch Around the Page - Blooming Vines
  5. Sizzix Stamp and Die Cut - 657773
  6. Fiskars Border Punch - Double Bubble
  7. Spellbinders Nestabilites Eleven -S4-246
  8. Fiskars Clear Stamps - Butterfly Magic
  9. Ek Success Border Paper Punch - Pointed Flower


Happy Crafting!

Copyright © 2014 Angela Conklin - Heartedly Handcrafted
All Rights Reserved

Tuesday, May 6, 2014

Mother's Day Card - Flowers for My Mom

Good day everyone!

Today I'm sharing a Mother's Day card I was inspired to make after seeing all the pretty spring flowers blooming outside. I chose the sentiment while remembering my mother and the good times we had. She would have loved this card.

I decided to keep a white background so the colors would pop.

For the background I used Core'dinations Premium Cardstock in white. The base layer was done by using a die cut flower as a mask to stamp around. This gave me the shape of petals between the blended colors. I used Rubber Stamped Acid Free Dye Based ink in yellow, light orange and bright pink. I made sure to overlap each ink application with a makeup sponge so the colors would blend. The next layer is the first mat and was white cardstock again.To make the sentiment I used a Spellbinder's Shapeabilities - Fancy Tags die. The die was not large enough for my sentiment so I decided to combine two by overlapping them and then placed my sentiment over them.

Then for the embossed background I used a third layer of white cardstock of which I embossed with the Darice - Flower Power Embossing Folder and edged in orange ink.  

Behind the flowers I used three pieces of quilling strips. They're handy for more than just quilling :) I used a Tim Holtz Alterations - Tattered Flower Garden die to make the flowers. I blended the yellow, orange, and bright pink ink on each flower layer making sure to do each layer a bit different so it would show up on the one behind it. Then I went around the edges of every petal with ink to define them.

Note: Don't miss the chance to use that scrap paper. I usually use a piece of white cardstock behind the paper I'm putting ink on. In this case I used it to protect my desk surface as I placed ink on my flowers. In the end it turned out to be the perfect background for my sentiment.


Materials


Happy Crafting!
Copyright © 2014 Angela Conklin - Heartedly Handcrafted
All Rights Reserved