Showing posts with label Handmade card. Show all posts

Saturday, January 30, 2016

Shabby Chic Handmade Valentines Day Card - Love Bird

Happy Saturday! Today I have a Shabby Chic Valentines Day card to share. When I finished this greeting card I noticed that it's embellished in such a way that would be fitting for many occasions, such as a wedding anniversary or Mother's Day. How cool is that? I'd like to say I planned it that way, but I didn't.

I used my Kirby Teesdale Paper Pack from the Paper Studio, DCWV Neutrals and K&Company 4"x6" Recycled Berry Pinks. My card measures 6"x6" so to make a mat with the smaller paper I cut 4 berry strips and taped them into place. Due to the style of my card I was able to blend those strips where they came together. 


I love the rose paper from the Kirby Teesdale paper pack, it's very elegant. I used the oval die from Spellbinders 3 Fancy Tags and Sizzix Thinlits Handwritten Love to make my sentiment and then attached it using brown ribbon. The tag is edged in Victorian Velvet Distress Ink and embellished with two pink adhesive-backed pearls.


To add some overall softness I pulled pieces from a used dryer sheet. There is a very faint fragrance left in the dryer sheet that makes this card smell really good, but it's not overwhelming at all and actually has to be held close to smell it. To make the large light pink and dark pink heart I used pink heart doilies colored with white ink and Victorian Velvet Distress ink.


I cut the bird from a page from the Kirby Teesdale paper pack and covered it in Glossy Accents


To give the bird some dimension I cut a wing from another page of the same bird, placed thick glue dots on the backside of it and then placed it directly over the other wing.


To make the flowers I used the Recycled Berry Pinks paper and the Tim Holtz Alterations - Tattered Flower Garland Die. I then chose one style of flower in 3 sizes. To shape each layer of flower I dipped them in a cup of water for just a moment, dried them off and shaped the softened paper by pinching the petals and pushing the back of a pen down into the middle of the flower while the flower sat on thick craft foam. I then used my heat tool to dry the flowers to make them stiff and hold their shape. I love that the paper I used has a white core because the flower edges were automatically outlined. 


To make the small hearts, I used the waste paper hearts from a Sizzix Border die. The hearts are very tiny so I placed them all the way around the edge of the card.

Materials:


If you like this card using the Kirby Teesdale Paper Pack you may like the card below as well

 Butterfly Card


Thanks for stopping by and for your wonderful comments! Come back again for new projects :)

Friday, January 30, 2015

Handmade Valentine's Day Card with a Modified Border Punched Edge

TGIF craft lovers!
I'm sharing a card with a modified border punched edge. I decided to bring attention to this simple modification because it opens up new possibilities that I didn't even realize I had until I needed to change the size of my card border. As I sit here studying the rest of my border punches, I see that I can cut them to not only make them my own, but to make new things. The modification description can be found further down in this post.
To make this card I used two border punches, one embossing folder and some ready-made Valentines Day themed embellishments. Oh, and I can't forget to mention those cute little foam flower stickers made to decorate flip flops, but found their way to my house during a clearance sale one day. 

To make this card...

NOTE: After cutting all of your cardstock pieces and BEFORE adhering the pieces together remember to border punch your edges and add your ribbon.

Special NOTE: I modified one of the border punched pieces, details below.
Paper Measurements
5" x 7" White base card
5" x 7" Pink plaid mat
5" x 8" White cardstock mat
5" x 6" Pink with white polka-dot cardstock mat
5" x 4" White cardstock mat

Border Punch - the modification
5" x 8" White cardstock mat - Use the Martha Stewart Crafts Around The Page Double Arches Large Punch. After punching the top and bottom of the cardstock, cut the two outer rows of arches off, leaving only one row of arches remaining. 
Cut where you see the red lines
5" x 6" Pink with white polka-dot cardstock mat - Use the Ek Success Pointed Flower Border punch on the top and bottom and then attach your ribbon.

To complete your card
Place a doily heart on the back of your foam glitter heart and a couple of flat backed adhesive pearls on the top and bottom and your finished!

 Supplies List
Happy crafting and thanks for stopping by!
post signature

Friday, January 23, 2015

Handmade Valentine's Day Card: Brown and Blue Masculine Old-West Valentine

Hello crafty friends!
Today I'm sharing a card that fulfills one of the challenges over at Sketches4All. I decided to try making a masculine Valentine's Day card with a bit of an old-west feel. The challenge is to use blue and brown and incorporate at least one heart. If you would like to take part in it you can find it here...
Fia's January Color Combo

The paper
The light brown and deep brown paper I used for the base of my card as well as the corners is from Core'dinations "Chocolate Lovers" paper pack. The striped paper I used is from the DCWV "The Basics Stack". There are a lot of cute papers in this 6"x 6" tablet.
The sentiment was a breeze to put together.
I just colored a pre-made white paper doily with Rubber Stampede blue ink and cut out a sentiment from the DCWV "The Basics Stack" and adhered it to the heart.
I used the same blue ink to edge my striped paper on all sides.

To dress up the corners of my card 
I used Tim Holtz Distress Ink in Vintage Photo to color white cardstock and then used the Spellbinders Moroccan Accents cutting die to make four corner designs.

I decided to use ink instead of just the light brown paper I was already using because I wanted the designs to have a leather look which unfortunately doesn't show well in the photos, but looks great in person.

I then adhered each one to deep brown cardstock and cut them out using decorative edged craft scissors. 
I hope you will join us over at S4All for the challenge.

Have a wonderful day :)

Supplies List
Happy crafting and thanks for stopping by!
post signature

Wednesday, January 21, 2015

Handmade Valentine's Day Card: Love in Blue and Green

Happy Hump Day friends!

For the remainder of the month I've challenged myself to do as many of the January challenges over at Sketches4All as possible. Inspiration, motivation and direction are wonderful to have and that's exactly what S4All challenges provide. This specific card was made for 
Stacy's - Something New or Blue, Card Challenge.


I always like to try and make my own embellishments, but these little cream colored paper roses and green translucent ribbon flowers were just too cute to pass up. 

My card is made up of a 6"x6" base-card with a heart that extends above the top by approximately 1 and 1/4 ".


To make the heart 
I do not have any measurements for this heart because I used a paper heart doily to cut around leaving a margin to make the larger heart. Then I used an extra doily to cut the middle out and use as a template for my smallest sentiment heart. 
  • I layered polka-dotted paper and white cardstock that I cut into heart shapes using decorative edge craft scissors. 
  • Between those two hearts I placed a paper heart doily.
  • I wanted the inner heart to show up so I inked the edge of it with VersaMagic Chalk Ink in Sea Breeze. 
  • I used a clear stamp and silver ink to make my sentiment. 
  • For the blue decorative edge at the top of my card I used a waste piece from the die-cuts I made for the bottom of my card.
The patterned papers all came from DCWVs "The Basics Stack". I cut them with Spellbinders Card Creator "A2 Bracket Borders One" and then layered them. I used white lace to cover and finish off the upper exposed edge of the paper and I think the lace adds a nice touch.
Supply List
Happy crafting and thanks for stopping by!
post signature

Wednesday, December 10, 2014

Repurposed Jar Craft: Winter Landscape Card and Candle Gift Set

Hello everyone!
 
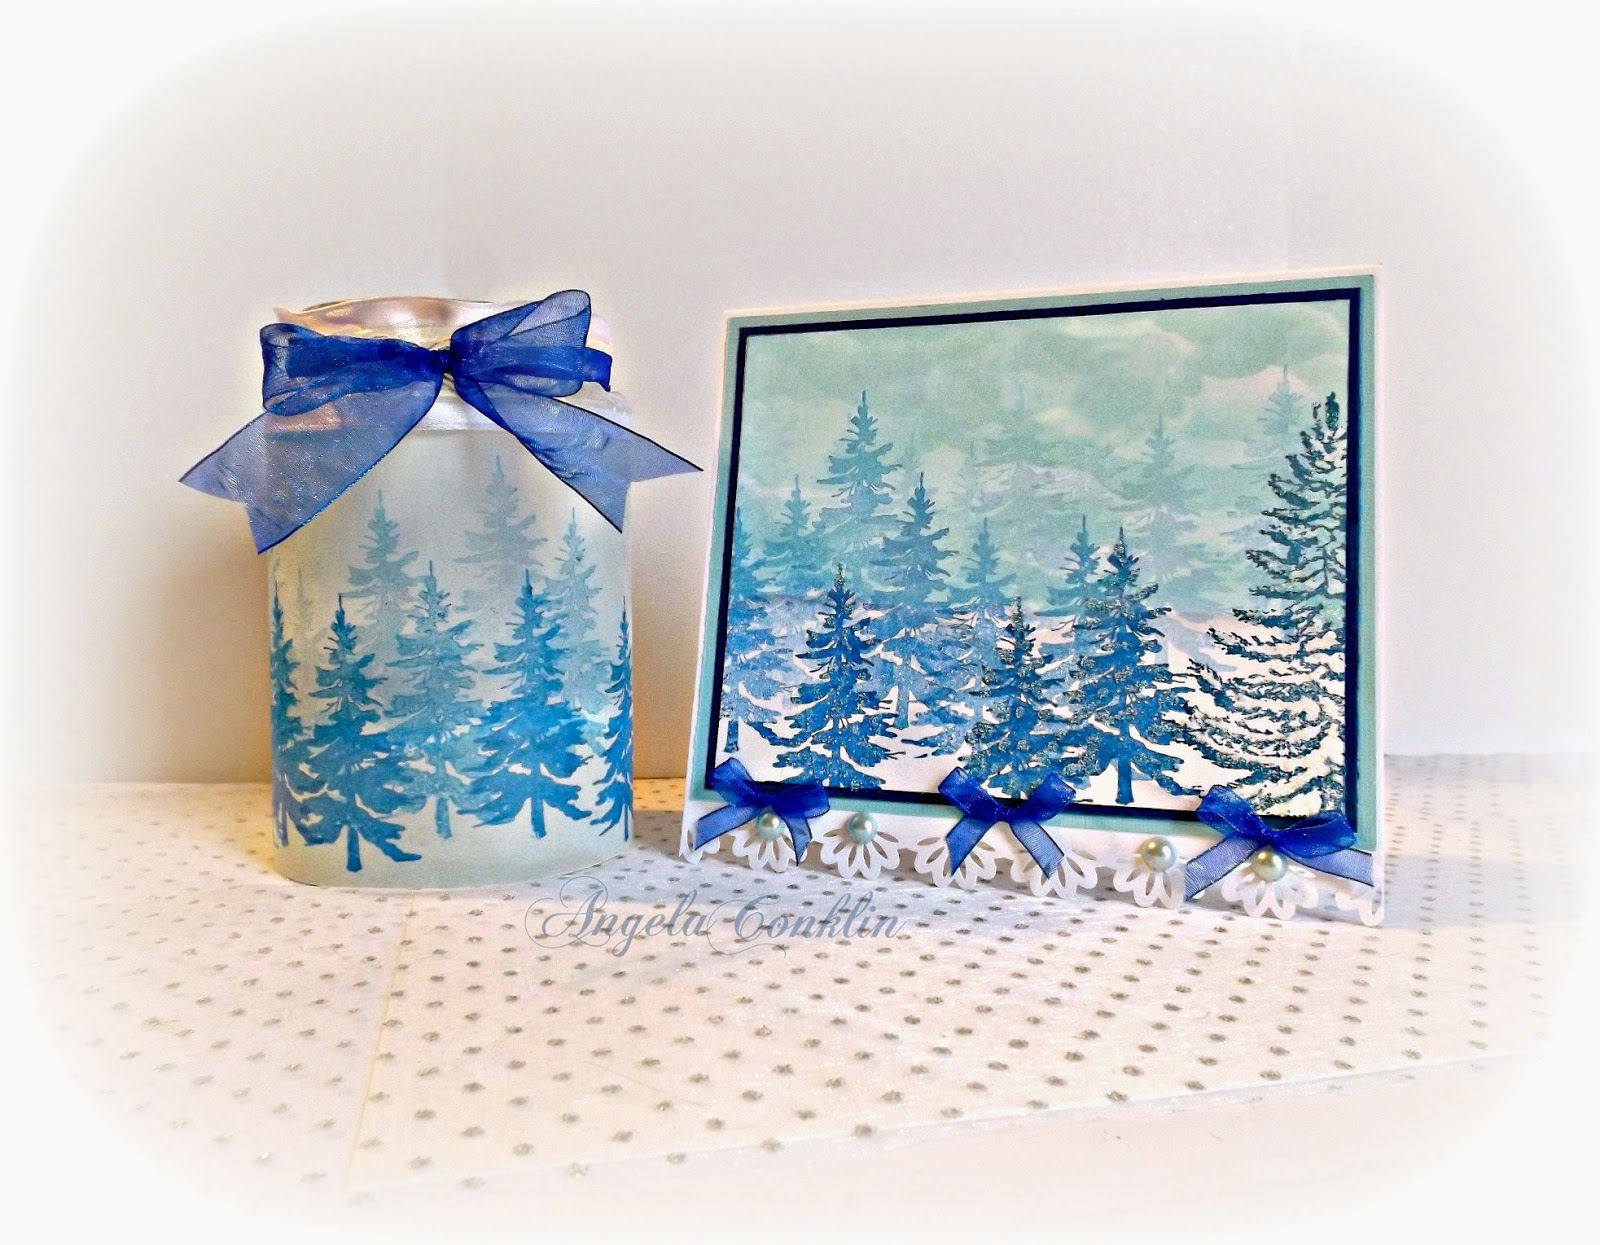
Today I'm sharing a card and candle gift set that I made using a spaghetti jar, some translucent paper, white cardstock, two of my favorite pine tree stamps, and blue and turquoise ink.
 
I love trees, so working with these stamps put me in my happy place. I also enjoyed the challenge of making the sky look heavy and wintery. 
When the candle is lit is gives a beautiful glow, like the sun is shining through the faded trees in the distance. 
 
How to make the candle

1. Gather your translucent paper, pine tree stamps, and blue ink.
2. Measure your jar and cut your paper to wrap around it.
3. Take your small tree stamp and perform Generation Stamping with your blue ink. If you don't know what Generation Stamping is, the videos below will show you how it works. Make sure to overlap your trees a little to give them depth. To get the best look make your darkest trees closest to you and toward the bottom of your paper and the trees should become lighter as they move further away.
 (beginning at 5:00 for the tree stamping)  

4. Adhere your finished paper to your jar. I used Mod Podge on the back of the jar right where the paper comes together to hold it in place.
5. Using (1 1/2" wide) sheer white ribbon with wire edges, measure to see how much you need to go around the neck of the jar.
6. Once you have the correct size piece of ribbon cut, use a needle and thread to do a running stitch down the center of the ribbon leaving a couple inches of thread hanging out at both sides. The running stitch does not have to be even or neatly done. You will not see it in your finished project.
The extra thread you left hanging on each end of the ribbon is what you will use to tie your ribbon tightly to your jar to keep it in place. I decided to use ribbon in this way because it covers the top edge of the translucent paper and adds to the overall look of the candle.
7. Take your blue (3/4" wide) sheer ribbon, fold it in half, and tie it around the neck of the jar. You will unfold the ribbon just at the front to make the bow.

 How to make your card

I made my card a size that is not common so if it were to be placed as a set on a mantel or table, the card would look balanced with the size of the candle. There are some odd measurements, but each measurement can easily be rounded to the nearest quarter inch.

1. Gather your white, light turquoise, and deep blue cardstock.
Measurments of Cardstock
White 
6 10/16"w x 12"h
6"w x 4 12/16"h
Light Turquoise
6 1/2"w x 5 1/4"h
Dark Blue
6 3/16"w x 5"h 

2. You will be using the same blue ink for the trees that you used on the candle as well as a light turquoise ink for the sky.
3.Start by taking a scrap piece of cardstock and ripping two pieces from it. Mine were about 6 inches wide. Don't try to be neat about it since these will be used as your mask for sponging your sky and clouds, therefore hills and valleys are good.
4. Using your 6"w x 4 12/16"h white cardstock, take your ink and sponge, and make a swirling motion along the edge of the paper. Always start on your ripped piece with your sponge and work into the actual image your making. This will keep you from getting gobs of ink that are too dark on your card. Repeat, changing the position of your paper and leaving some lighter spots that will become the clouds. Take the sky about half way down your paper.

The video shows how to make snowbanks, but it's the same technique I used to make the sky.  


5. When your sky is done it's time to start placing your trees. Refer to the directions above for the candle on how to utilize Generation Stamping.
6. Once you're finished with your trees, place little dabs of Glossy Accents on your darkest trees in the front and then add some glitter to them to make them stand out.
7. Fold your 6 10/16"w x 12"h white card base in half (6" mark).
8. Border punch the front and back bottom edges of your card. 
9. Adhere your light turquoise mat on your white card base then your dark blue mat on top of the turquoise one.
10. Add your new image centered on your dark blue mat.
11. Add flat back pearls to your scalloped edge and blue bows


Supplies
Happy crafting and thanks for stopping by!
post signature

Thursday, December 4, 2014

Repurposed Can - Winter Wonderland Tree Ornament Card and Clothespin Candle Gift Set

Hello everyone!
 
Thank you Sketches4All       
 Hope all of you are doing well as many made the mad dash for Black Friday shopping this past weekend and continue the shopping frenzy this week. I've only been out during one Black Friday and that was because I worked in retail that Christmas. I was standing guard at a pallet of Baby Cabbage Patch Dolls and after a few customers peaked under the plastic, before I knew it I was surrounded by people who were determined that their child was going to get one.

Shortly before it was time to allow customers access the crowd had gotten so large that I had to hold my arms out in front of me just to make room to breathe and a few in front of me were protecting me by making people back up.

It was a crazy early morning, but kind of fun too.
 
One customer overheard me say that I would have liked a doll for my own child. I didn't think there was any possible way I could buy one as the dolls would be gone in a matter of minutes.

The next thing I knew my husband approached me and said that a woman had found him in the store to give him a Baby Cabbage Patch Doll that she had snagged for me when she got hers. It wasn't imperative that I got one, but what a sweetheart. Not only did she get me one, but she went to the trouble of hunting down my husband. She knew who he was because he had stopped in the store to see how I was doing and he was curious about what Black Friday was like.


That was our first and last. Now we do any needed shopping earlier in the year and online. In fact I shop online more and more these days and only really go out to see the Christmas decorations and get stocking-stuffers. I hear about people waiting in line for 2 days just to get the latest cell phone or game console. Now those are serious shoppers!
A gift for the candle lover
Today I'm sharing a candle and card set. I don't know why I never thought to make a set like this before, because it would make a really cute gift. I suppose everything has it's time.
 
I made the candle from a short tin can (similar, but smaller than a tuna can) and wooden clothes pins. I got the idea from Savvy Mod Living which provides a tutorial. I was very excited, because there were so many ideas going through my head as I looked at it that I had to write them down.
After I made my candle holder I decided to make a card to match. Then as I was making my card it hit me that I could use one of the wooden snowflakes I used on the candle holder and make it into a Christmas ornament. So basically this is a three in one gift and very inexpensive to make and the candle holder can be used in a variety of different ways such as a pot for a small plant or desk organizer.


Note: There is texture on the face of my large wooden snowflakes which I did not create. I got these snowflakes second hand and they already had glitter on them. I like the look the glitter created under the white paint, so if you want the same look just apply some glue and a thin sparse layer of medium to large glitter. Then paint over it when it's dry.
 
How to make the candle holder
Supplies

A package of wooden clothes pins
5 wooden snowflakes (1 extra for the card)
4 small wooden snowflakes
Burlap
Lace

1. Before assembling your candle holder. Paint your can, clothes pins and snowflakes with white acrylic craft paint. I just used a thin layer of paint and didn't worry about full coverage for a more white washed look.
2. Stamp your script onto your large snowflakes.
3. Ink the edges of your large snowflakes so they stand out from the white of the clothes pins.
4. Use ink to cover your small snowflakes
5. Stamp an image of a snowflake onto the front of the small wooden snowflakes.


 Assembling and decorating your candle holder
6. Clip your clothes pins on the side of your can. I placed mine together as closely as I could.
7. Wrap your clothes-pinned can with a strip of burlap
8. Center lace ribbon on the burlap and wrap it around the candle holder
9. Hot glue your large snowflakes in place on four side of your can (one across from another)
10. Hot glue your small snowflakes in place (center between the large snowflakes, but higher up)
11. Add bows to the top of your large snowflakes. I just pulled string from the burlap I was using to make my bows.

How to make your card - Completed card measures 5 1/2"w x 5 1/4"h

Supplies
Cardstock
Wooden Snowflake (directions above for snowflake)
Embossing folder
Dies
Ink
Burlap
Lace
Sentiment

Light Brown Cardstock - You will need two pieces
Cut your cardstock 11"w x 5 1/4"h.  Fold at 5 1/2".
Cut another piece at 5 1/4"w x 3"h (This will be used for making your decorative bottom piece)

White Cardstock - You will need 3 pieces

Cut at 5 1/4"w x 5 1/2"h
Cut at 5 1/4" x 2 1/4"h

1. Emboss the 5 1/4"w x 5 1/2"h piece with your snowflake embossing folder.
2. Apply ink to the edges of your embossed paper and the bottom half inch. This is the turquoise color you see at the bottom of the card.


3. Die cut the long edge of your 5 1/4" x 2 1/4"h white cardstock with two dies from Spellbinders Bracket Borders One. Choose one that will just punch out a pattern in your cardstock and one that will shape the edge.
4. Die cut  your 5 1/4"w x 3"h brown cardstock along the long edge with the edge die you used on your white cardstock. Not the one you used to punch-out a design).
5. Line the two smaller pieces (brown under white) and adhere them together 
6. Adhere your fancy cut bottom piece to the lower half of the embossed piece. Don't worry about any line that is visible it will be covered with the burlap and lace.
7. Wrap your burlap and ribbon over the area where the fancy cut pieces end (about the center of your card)
8. I chose to print out a sentiment I made at Picmonkey.com and then wrap that sentiment like a ribbon around the card, but you can just stamp your card with a sentiment if you wish.
9. Add your wooden snowflake ornament to the top of your card. I used a spot of Hot Glue so it could be removed without tearing the card to pieces.

You're done!
 
Supplies List


This project has been featured at S4All

 Happy Crafting and thanks for stopping by!
post signature

Friday, November 28, 2014

Handmade Greeting Card - Season's Greetings in Red and White Snowflakes

Hope everyone is doing well.
 
If you've stopped by for the Sketches4All 5th Anniversary Party, click here and it will take you right to it :)

Western Pennsylvania got snow again last night and in about an hour it went from ugly and gray outside to white and bright. I love it! Snow makes everything look beautiful.
 
 I'm still working on my Christmas cards and in about a week and a half they will be in the mail. I'm calling this period of time the Christmas Card Crunch.
 
Today I'm sharing my latest card. I've made many cards with snowflakes on them, but they're usually blue and white. So I'm changing it up a bit. I can have red snowflakes, right? :) I was inspired to make a red and white card as I was removing candy canes from their box. Now if I could just make my card smell like candy canes, that would be something. If you're interested in making this card you'll find the instructions and supplies list below. 


 To make this card
 
Measurements
First things first. Print out your sentiment so that you can center it when cutting your label.
 
White cardstock
  • 10" x 6 1/2" - Base card (score it in the middle at 5" for the fold)
    4 1/2" x 6" - Mat
  • 2" x 4 3/4 - Embossed strip
  • (2) 4 3/4" - Border punched strips that you'll tape along the back edges of your wide red strip.
  • Die-cut label - Used Spellbinders Card Creator Reflective Moments die

Red cardstock
  • 4 3/4" x 6 1/4" - Large mat
  • 4 1/4" x 5 3/4" - Embossed small mat
  • 2 1/8" x 4 3/4 - Strip
  • Die-cut label - Used Spellbinders Card Creator Valiant Honor die
Order of placing the main card section together from bottom to top
1. White base card
2. Large red mat
3. White mat
4. Embossed small red mat
  
To make the embossed strip down the middle
1. Adhere white border punched strips to the back edges (sides) or your red strip.
2. Center and adhere embossed white strip onto the red strip
3. Adhere it to your base card, lining up the top and bottom with the edge of the red outer mat.
To make the sentiment
NOTE: If you have been thinking about making your own sentiments, you can make them for free at Picmonkey.com. As much as I like other people's digital greetings, sometimes it's nice to be able to make my own when I can't find one that says what I want, want different color options or want one custom made to go with a card or specific label.
1. Use ink on the outer edges of your small label to make it stand out.
2. Center and adhere your small label to the top of your large label.
3. Add some flat backed pearls to the border strips of your card.
4. Use thick dimensional glue dots or thick tape to make the label stand away from the card.

You're Finished!
Supplies
  
Happy Crafting!
post signature