Showing posts with label tutorial. Show all posts

Tuesday, December 8, 2015

Bring Nature Indoors with these DIY Wood Slice Snowflake Ornaments

These do-it-yourself ornaments are fun, simple and inexpensive to make and will give your tree a rustic touch. They also make great gifts, wintry tags, and name plates for a winter wedding.  

Tools and Materials:
  • Wood slices (2 1/2" diameter)
  • Drill (to make the holes for the twine in the wood slices)
  • Bag of wooden snowflakes
  • Rubber Stampede Ink in Fresh Mint (any light bluish color will do)
  • Colorbox Ink in Frost White (to lightly sponge over the Fresh Mint color)
  • Glossy Accents (to cover the snowflake once it's colored)
  • Strong glue to attach the snowflake to the wood slice
  • Twine to hang the ornament

Directions:
  1. Use a sponge to apply a coat of Fresh Mint colored ink to one side of your snowflake. 
  2. Sponge the white ink over the top of your Fresh Mint ink. Don't try to completely cover the bluish ink, you're just trying to give the snowflake an icy appearance.
  3. Add a coat of Glossy Accents over the ink to give the snowflake a shine. You may notice the white ink begin to swirl which is just an added bonus. Allow to dry.
  4. Place glue onto the unfinished back of your snowflake, center on your wood slice and adhere. Let dry overnight.
  5. Use your twine to hang your ornament.


Note: If you don't have ink or want to make this a family project with smaller children you can easily substitute markers or acrylic paint to color your snowflakes. The ink just gives your snowflakes more depth in color and has a softer appearance.

Check back for more projects and tutorials.

Happy Crafting and thanks for stopping by!
post signature

Tuesday, February 24, 2015

Heartedly Handcrafted Inspiration Sticks

Hello crafty friends!
I started a project recently to help myself with future projects. Yes, you read that correctly. We can all use a little help from time to time with coming up with ideas and even when we do have an idea it doesn't always carry us to the very end. I have found myself staring at a sheet of paper to make a card while not having a clue where to start. I've also had those moments when there just seems to be something missing and this can help with that too.

A crafty friend shared this video

Inspiration Sticks Challenge - Art Journal Ideas - Mixed Media

and I just love it! The video is from +Claudia Rossi and she talks about a challenge her and her friend is doing/did with what she is calling "Inspiration Sticks". Under that video is a link to how to make them and she provides a link to a list of what to write on your sticks to get you started. Claudia's list idea is for art journaling, but can be easily carried over to other types of projects. My list will consist of things that I do specifically for cardmaking and therefore be different, so what it comes down to is, YOUR list can be for anything you want. When I've completed my list I will be sure to share it right here.

UPDATE: List for card-making

Scroll down for another project using this idea, "Spontaneity Sticks".

Here are some of the sticks I've made so far. I haven't decided yet how I want to store my sticks or if I want to further embellish them.
To make mine I used large tongue depressors that I coated with pastel chalk ink by VersaMagic. Then I used rubber and clear stamps with Rubber Stampede ink in the color Wheat to make designs on them. 
Once the ink was dry I used a fine tipped, black, permanent marker to write with. I had a little trouble with bleeding, but unless I were to use a magnifying glass or hold it close to my face the bleeding is really not noticeable. I would suggest experimenting with what you have and see what works best for you.
The great thing about the idea of "Inspiration Sticks" is that they can be used for anything, even outside of crafting. How often do we skip over all the sightseeing opportunities, museums, etc. in our own towns or regions. You could write down all the places to visit on sticks and then randomly pick one on a nice day. Maybe in this case you might call them "Spontaneity Sticks"  and as you accomplish each one, you might frame, or place in a scrapbook, your stick as your title with the photos you took. The possibilities are endless :)
post signature

Monday, February 2, 2015

Handmade Valentine's Day Card: Love is in the Air

Happy Groundhog Day!

Today I'm sharing a Valentine's Day card and a link to the challenge I made it for, then on to what Punxsutawney Phil had to say this morning.

First things first. There's a lot of inspiration over at Sketches4All. I made the card below for the February DT Challenge from a sketch. If you prefer to do scrapbook layouts, there's a sketch for that too, so come join us and have some fun. 

There's nothing that says Valentine's Day to me more than seeing the colors red and pink together and roses and hearts together. So once I saw the sketch I wanted to incorporate those ideas as well.  

To get that pink striped paper to look like it's part of the white paper beneath it I used a border punch on the bottom edge of it and then taped it in place before embossing it with the heart embossing folder.

The red stripe is made from the same red cardstock I used to mat the front. To dress it up I placed silver, vine shaped, tape on it.

To make the pink border on the doily heart I cut off the edge of a pink colored heart and glued it onto a white one. 

Supplies List 

Punxsutawney Phil says we have 6 more weeks of Winter. From the way it looks right outside my front door and all the snow coming down I would have to agree with him this year.

Pictured below is right out my front door. There should be a sidewalk and a road. You can see where my husband shoveled the sidewalk recently and it's being covered back up, but the road has vanished and has been gone for quite a while. My home is marked as a historical house and the wooden sign out front is half under snow. Love it!  
 
Happy crafting and thanks for stopping by!
post signature

Saturday, December 13, 2014

Handmade Christmas Card: Pink and Gray Peace

Hello Everyone! 
Today I'm sharing a Christmas card in colors not normally associated with Christmas for one of the challenges over at Sketches4All. 

There are EIGHTEEN challenges so far this month with more coming soon and prizes galore! So make your way over and have fun with us. :)

If you would like to make this card, here is a tutorial.

Cardstock preparation
~Light pink~
10"w x 7"h (Fold card in half at the 5" mark)
5"w x 7"h mat
3 3/4" x 5" smallest die from Spellbinders Grand Ovals

~Plaid and brownish-gray solid~
4 3/4"w x 6 3/4"h
3 5/8" w x 4 5/8"h smallest die from Spellbinders Grand Scalloped Ovals
To make your tree

1. Stamp your tree image on your brownish-gray scalloped oval with VersaMark ink
2. Use the light pink Hampton Art embossing powder that has the sparkle in it
If you have never embossed before, the video below will show you how.
How to Emboss using embossing powders and a heatgun
3. Once your tree is done, place the scalloped oval die over it, center your tree and die cut it. 
Note: I wanted the embossing powder to be thick on this card so as soon as I was done heating the first layer of powder I added two more layers of powder. There is no need to use ink in the additional layers because the heated embossing powder will be sticky for as long as it remains heated and will hold the new powder. If your tree cools down and some areas aren't sticking well, use your heat tool to heat it back up.

To make your card


1. Adhere your plaid mat to your pink mat
2. Adhere you scalloped oval onto the center of your pink oval
3. Place tape onto the back of your pink oval
4. Lay your ribbon on the back of the pink oval, centering it from top to bottom and making sure that you made it long enough to go around the back of the mats
5. Add tape to the back of your ribbon and adhere your ovals and ribbon to your mat.

6. Add the face of your card to your card-base.


Sentiment
For my sentiment I used the word from a Holiday Time Gift Tag since I have a bunch of them that I had gotten free. If you don't have these, you can use a die-cut sentiments. There are plenty of them out there and you can buy them from companies like Top Dog Dies and Spellbinders.

To make my sentiment match, I embossed it with the same embossing powder I used on the tree. I also added three layers of embossing powder because I wanted the letters to be thick and run together more.
You're finished!


Supplies List
The plaid cardstock was bought as a single sheet at Joann Fabrics, but any gray, plaid cardstock will do. Unfortunately it did not come with a name or referral number on it.

  Happy crafting and thanks for stopping by!
post signature

Wednesday, December 10, 2014

Repurposed Jar Craft: Winter Landscape Card and Candle Gift Set

Hello everyone!
 
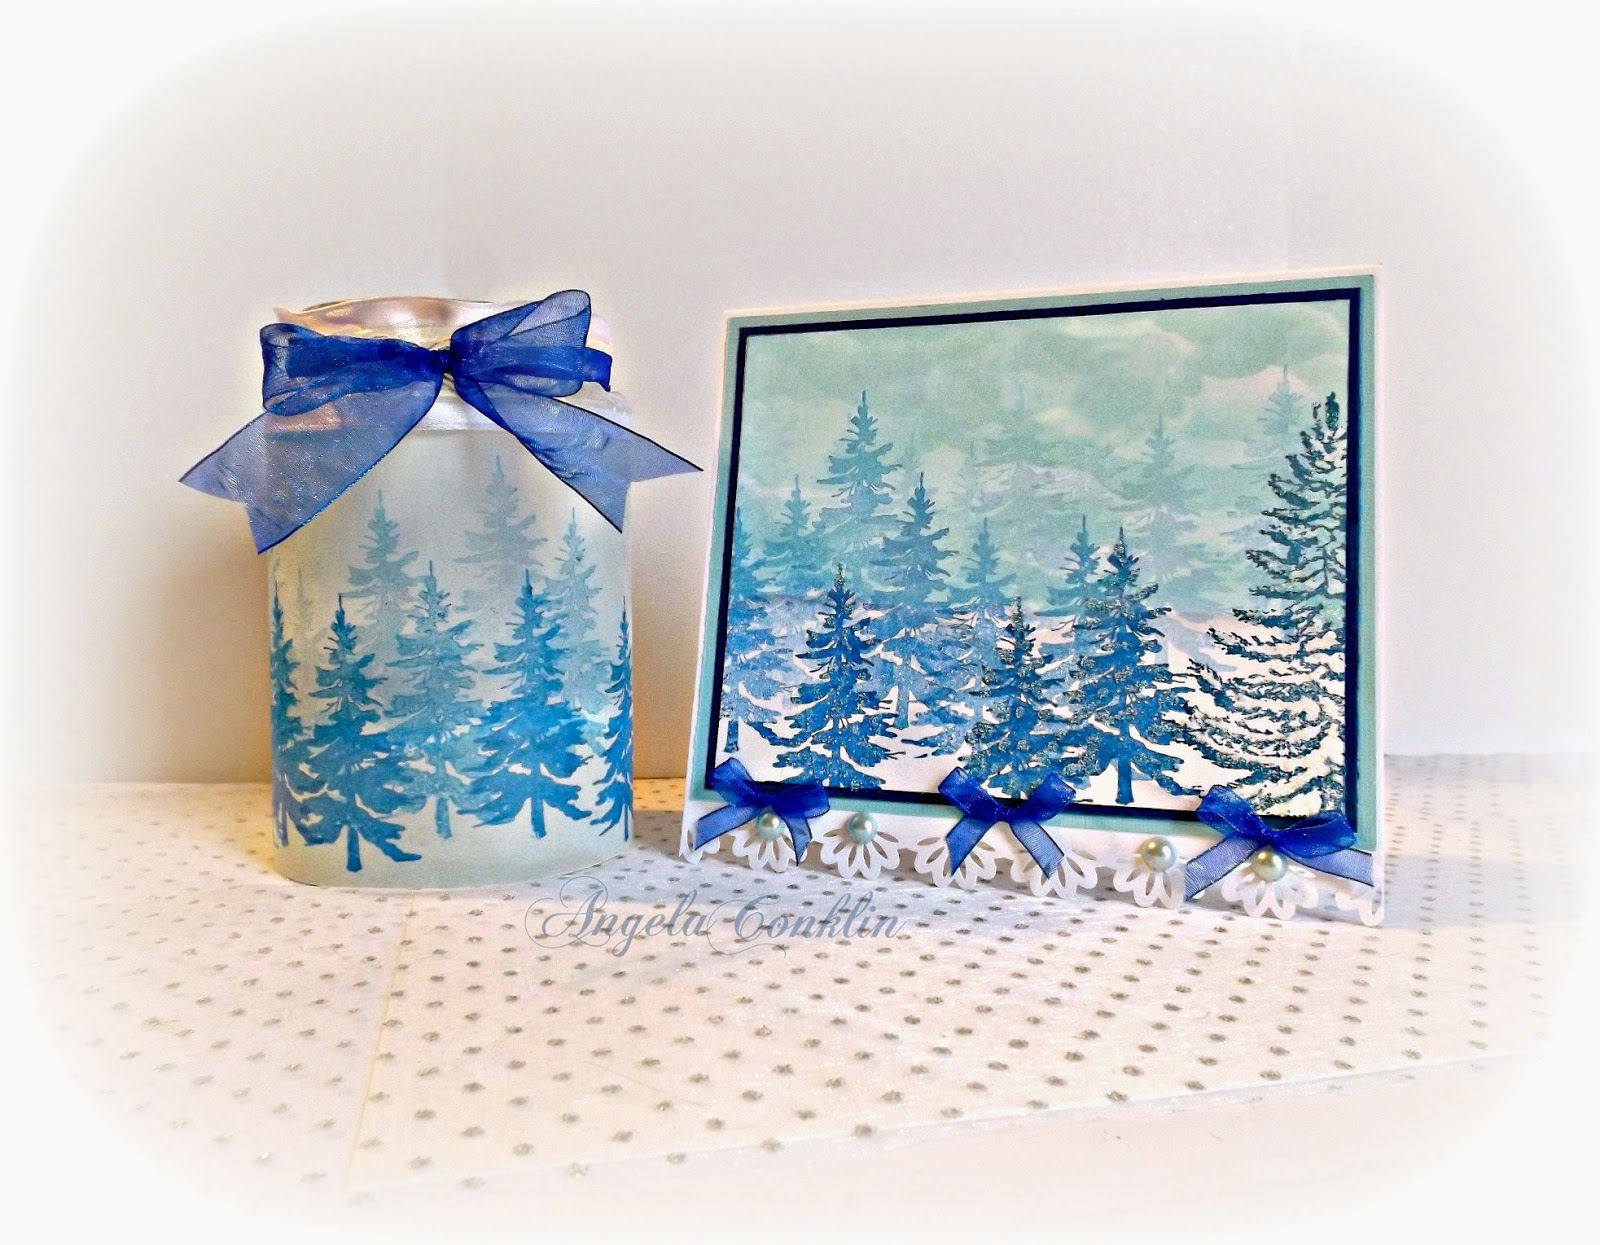
Today I'm sharing a card and candle gift set that I made using a spaghetti jar, some translucent paper, white cardstock, two of my favorite pine tree stamps, and blue and turquoise ink.
 
I love trees, so working with these stamps put me in my happy place. I also enjoyed the challenge of making the sky look heavy and wintery. 
When the candle is lit is gives a beautiful glow, like the sun is shining through the faded trees in the distance. 
 
How to make the candle

1. Gather your translucent paper, pine tree stamps, and blue ink.
2. Measure your jar and cut your paper to wrap around it.
3. Take your small tree stamp and perform Generation Stamping with your blue ink. If you don't know what Generation Stamping is, the videos below will show you how it works. Make sure to overlap your trees a little to give them depth. To get the best look make your darkest trees closest to you and toward the bottom of your paper and the trees should become lighter as they move further away.
 (beginning at 5:00 for the tree stamping)  

4. Adhere your finished paper to your jar. I used Mod Podge on the back of the jar right where the paper comes together to hold it in place.
5. Using (1 1/2" wide) sheer white ribbon with wire edges, measure to see how much you need to go around the neck of the jar.
6. Once you have the correct size piece of ribbon cut, use a needle and thread to do a running stitch down the center of the ribbon leaving a couple inches of thread hanging out at both sides. The running stitch does not have to be even or neatly done. You will not see it in your finished project.
The extra thread you left hanging on each end of the ribbon is what you will use to tie your ribbon tightly to your jar to keep it in place. I decided to use ribbon in this way because it covers the top edge of the translucent paper and adds to the overall look of the candle.
7. Take your blue (3/4" wide) sheer ribbon, fold it in half, and tie it around the neck of the jar. You will unfold the ribbon just at the front to make the bow.

 How to make your card

I made my card a size that is not common so if it were to be placed as a set on a mantel or table, the card would look balanced with the size of the candle. There are some odd measurements, but each measurement can easily be rounded to the nearest quarter inch.

1. Gather your white, light turquoise, and deep blue cardstock.
Measurments of Cardstock
White 
6 10/16"w x 12"h
6"w x 4 12/16"h
Light Turquoise
6 1/2"w x 5 1/4"h
Dark Blue
6 3/16"w x 5"h 

2. You will be using the same blue ink for the trees that you used on the candle as well as a light turquoise ink for the sky.
3.Start by taking a scrap piece of cardstock and ripping two pieces from it. Mine were about 6 inches wide. Don't try to be neat about it since these will be used as your mask for sponging your sky and clouds, therefore hills and valleys are good.
4. Using your 6"w x 4 12/16"h white cardstock, take your ink and sponge, and make a swirling motion along the edge of the paper. Always start on your ripped piece with your sponge and work into the actual image your making. This will keep you from getting gobs of ink that are too dark on your card. Repeat, changing the position of your paper and leaving some lighter spots that will become the clouds. Take the sky about half way down your paper.

The video shows how to make snowbanks, but it's the same technique I used to make the sky.  


5. When your sky is done it's time to start placing your trees. Refer to the directions above for the candle on how to utilize Generation Stamping.
6. Once you're finished with your trees, place little dabs of Glossy Accents on your darkest trees in the front and then add some glitter to them to make them stand out.
7. Fold your 6 10/16"w x 12"h white card base in half (6" mark).
8. Border punch the front and back bottom edges of your card. 
9. Adhere your light turquoise mat on your white card base then your dark blue mat on top of the turquoise one.
10. Add your new image centered on your dark blue mat.
11. Add flat back pearls to your scalloped edge and blue bows


Supplies
Happy crafting and thanks for stopping by!
post signature

Monday, December 8, 2014

Handmade Card: A Joyful Blue and Silver Christmas

Hello everyone!
 
I'm working with one of my favorite papers today from the DCWV Winter Solstice Stack. I was constantly skipping over this particular sheet of paper because I love it so much that I didn't want to use it. I just like looking at it. That probably sounds ridiculous, but since I usually add a lot of layers to my cards or at least a lot of die-cuts and embellishments, I didn't want to cover this paper up.

Well today I bit the bullet and you will probably notice that I left this card quite plain compared to my norm.
The scene is just too cute and the on rest of the 12'x12" sheet that this came from is a snowman with a sled. He's being used to make another card as I try to produce them quickly.
 
Instructions to make this card:
1. Cut your paper
Two pieces of white cardstock
  • 6 1/2"w x 11"h (Fold at 5 1/2")
  • 5 1/2"w x 4 3/4"h
Two pieces of dark blue cardstock
  • 6 1/4"w x 5 1/4" h
  • 5 1/4"w x 4 1/2"h
Two pieces of decorative cardstock
  • 6"w x 5"h
  • 5"w x 4 1/4"h (Cut out the area that you want as your scene)
2. Tape and stack your cardstock (biggest to smallest piece) centering each on the one below it.
  1. 6 1/2"w x 11"h (Fold at 5 1/2")
  2. 6 1/4"w x 5 1/4" h
  3. 6"w x 5"h
  4. 5 1/2"w x 4 3/4"h
  5. 5 1/4"w x 4 1/2"h 
  6. 5"w x 4 1/4"h 
3. Add your embellishments 
  • Bow - I used hot glue to attach my bow)
  • Rhinestone Mesh - One strip of rhinestone mesh at the bottom of the card (I used Glossy Accents to glue this into place)
  • Cut a small piece of the rhinestone mesh to hang your sentiment from. I hot glued mine in place just at the very bottom of the center of the bow.
  • Sentiment - I made my sentiment by using a pre-made cardboard sentiment from an old gift tag I got on clearance, but you can use a die, make a small label, or stamp your sentiment on. The sky's the limit. To color my sentiment I used light blue embossing powder that has a little sparkle in it.


Supplies


 Happy crafting and thanks for stopping by!
post signature

Saturday, December 6, 2014

How to Get More Out of the Cutting Dies You Already Own: Making an Assymetrical Die-cut, Symetrical

Hello everyone!
 
Just a quick tip as I race the clock to get Christmas gifts made. I hope this post finds you well and enjoying the season.
 
 Today I'm sharing how I used my die-cuts for a card a few weeks ago and one I'm still working on currently, which may help you look at your dies a little differently.
 
In past post I've mentioned how much I love my Spellbinders Card Creator dies and showed how to make a fancy symmetrical rectangular shape into a square to fit an image.

How to Make Die-cuts a Different Shape to Match Your Image

This time I will make an asymmetrical shape symmetrical using the large die from the Spellbinders, Card Creator Reflective Moment pack as the example. This specific die is the basis for many beautiful cards all over the web, but one thing you don't see, at least I haven't, is the die turned sideways or upside down. It just looks odd.
 
So if you're feeling stuck with it always going one direction there is a way to change it. 
 
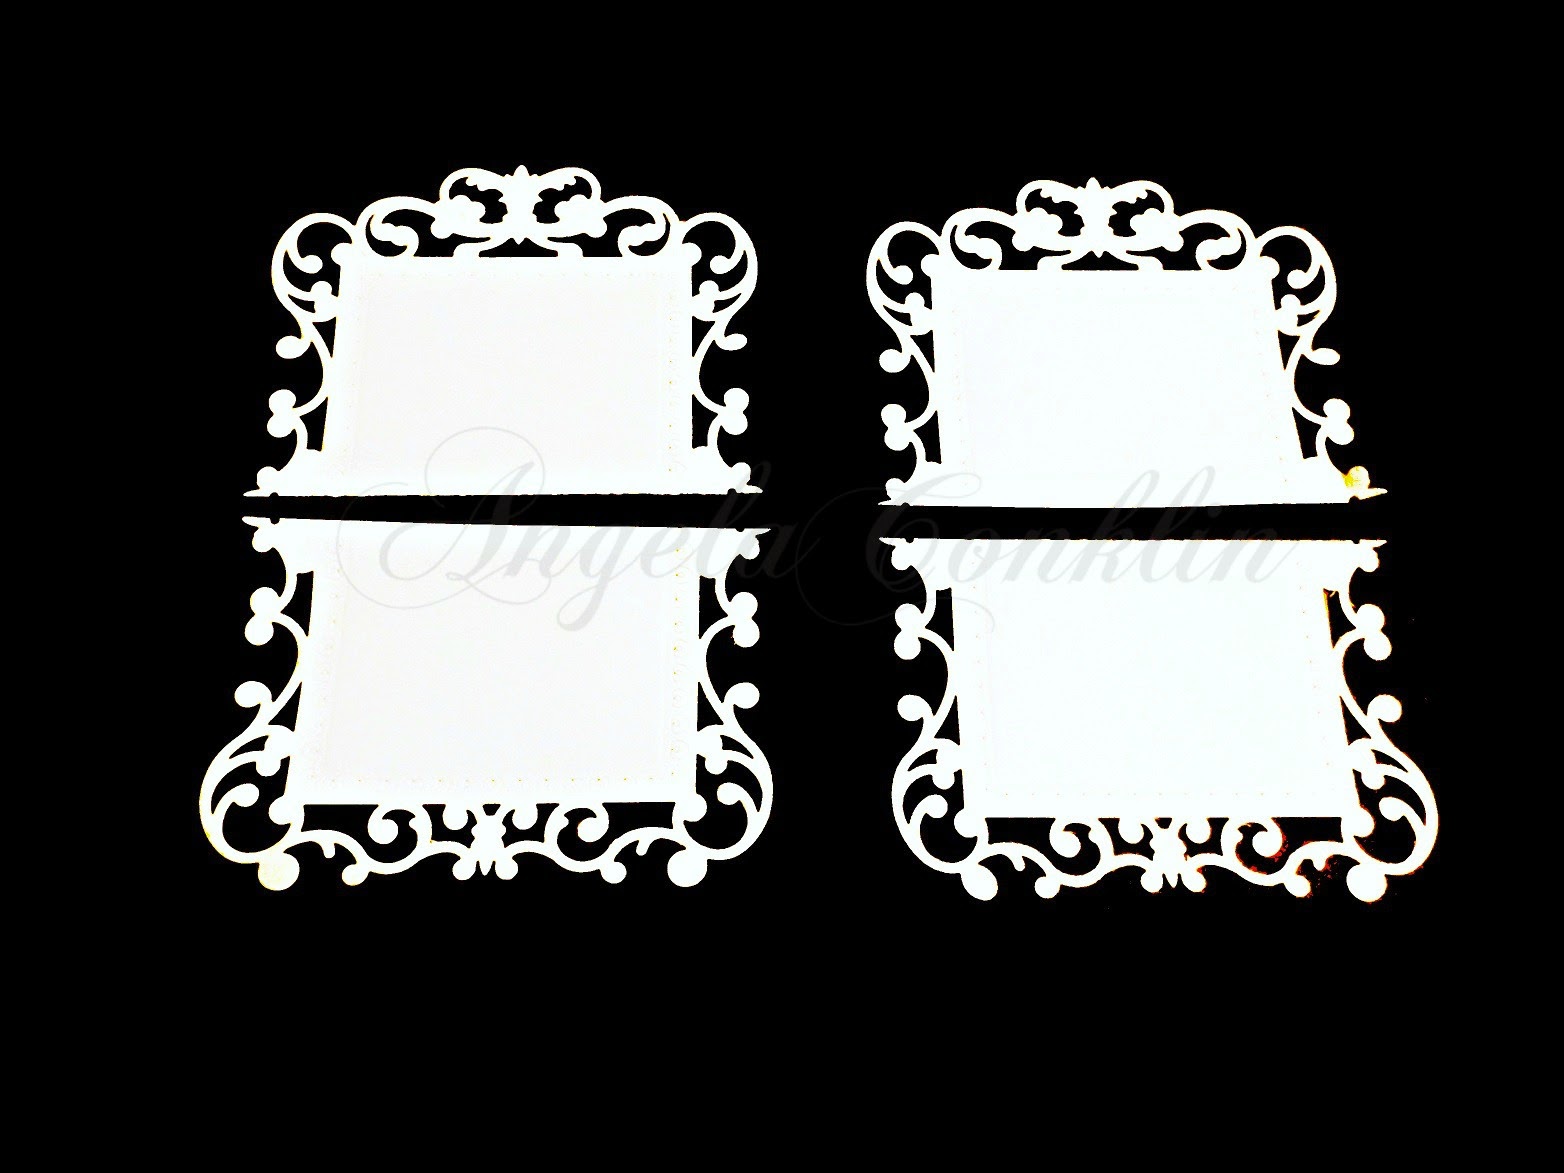
You can get at least 3 totally different die-cut shapes from this one die.
 
Here's how:  
Make two die-cuts of the same shape.
 
Cut them in half

To finish, match the bottoms together and the tops together to make symmetrical shapes and then run tape down the back of the seams.
The upper shape is using the bottoms and the one below is using the tops.

Now you not only have your gorgeous original shape, but two beautiful new shapes to work with :)

Here is an example when the bottoms were used to make a card a few weeks ago.
There are many ways to use your dies, you just have to play with them to see what you can come up with. This latest discovery left me pleasantly surprised and excited about the options I have from a die that I initially thought would only go so far.
 
Happy Crafting!
post signature

Monday, December 1, 2014

Repurpose or Alter an Old Candle Jar and a Soup Can

Hello crafty peeps!
I was just thinking about how much I love this time of year and it's about the only time I will pay any attention to television commercials. I think one of my favorite commercials last year was the one put out by Glade with Jordin Sparks singing This is My Wish, Holiday AnthemShe has a beautiful voice and the song is very uplifting both in its words and notes. I went to Glade's YouTube channel and couldn't find the "Jordin" version anywhere. Kind of weird, but fortunately I found it somewhere else and could listen to it.  
 
I did my Christmas shopping earlier this year so I'm concentrating on finishing up my Christmas cards and doing some projects for small favors and gifts. My daughter's 18th birthday is coming up in a couple of weeks too. December is always a crazy, but exciting month.
 
I've got two projects to share with you today. Both were done for the Sketches4ALL 5th Anniversary Challenge Party. If you're interested in an altered/repurposed challenge, I just started one over at S4All today. The challenge will run until December 31st. There are also many other fun challenges from our design team members that are going on right now and an awesome prize for the winner of the 5th Anniversary Challenge Party. So don your creative energy and come on over!
 
I started out with an empty candle jar for my first project. This particular jar has a nice shape, so I didn't want to cover it all up. It also has a wide and straight area around the center so it was perfect for adding paper to.  
 
 
1. Measure the surface of the jar where you want the paper to cover (find the width and height) and cut your clear cardstock. 
I chose to use the clear cardstock so the light from the candle would show through better than regular craft paper, but either will work. 
2. Emboss your paper.
My cut piece was about 10" long which posed an issue since the embossing folder I wanted to use (Darice - Snowflake) is only 5" long. Then it hit me to just do one end of my vellum and then do the other end. Since the snowflakes of the embossing folder are randomly placed, I could do it in two steps and there is no seam or cut off point. It worked perfectly.

3. Adhere your paper to your jar
I didn't add adhesive all the way around, but instead only along the seam on the back. I chose to use a little Mod Podge, because it dries clear and won't be affected by the heat of a candle-flame like tape or hot glue would be.

4. Embellish the jar.
I chose to use my pine branch die by Impression Obsessions. The pine branch gives a nice holiday touch and is intricate and pretty enough to stand on its own. I like a lot of embellishments, but for this particular project I wanted as much candle light to get through as possible and I didn't want to cover up the pretty embossed snowflakes.

My candle looks so beautiful lit up! In person, the clear cardstock looks just like frosted glass.
-

I ran into a problem
After I cut my pine branches I coated them with Tim Holtz Adirondack Silver Mixative, which was a mistake. While I was giving them shape by bending the branches around a knitting needle and fluffing the needles themselves the mixative began to flake off.

I chose the mixative because it's gorgeous and very reflective. I've loved it with other projects, but since it sits on the surface you cannot bend it without losing some of it. I decided not to concern myself, because any white showing just makes my branches look snowy, but I will be careful to stay aware when deciding whether it's the right choice for my next project.

To add more reflectivity and some sparkle I ran two rows of Darice rhinestone mesh around the bottom. I had considered placing ribbon here and it looked nice, but once I had the rhinestones in place there was no question that it was the best choice for this candle.

I also added a bow and a tag that says JOY. I got the sentiment from The Cutting Cafe

I love the way it turned out.
 
My second project is a tin can that will hold Hershey's Kisses. The colors I used are teal, aqua and brown which break away from colors normally associated with Christmas and winter.
 
Find a can
I raided my recycling bin and found a La Choy Chicken Chow Mein can. The label came off easily after I ran it under hot water for a minute or two and then rubbed it off with my fingers, but the blue tape on this particular can was another story. Fortunately it scraped off of the very top quite easily and I just left the rest because I knew it wouldn't show from under all the layers I would be placing over it.
 
1. Measure the can.
Begin by measuring the circumference of the can and cutting your piece of white craft cardstock to wrap around it. 
2. Emboss your paper.
I needed exactly 12" of cardstock so to make embossing easy I decided to use my 12" Cuttlebug, Polka Dot embossing folder. 

3. Adhere your paper to your can. 
I used tape. 
4. Embellish your can

 How I embellished mine:
This first step was more involved and honestly I'm not sure that I'm going to do it the same way again.
1. Make the trim for the top edge
I cut the edges (the thicker part) off of two colors of burlap. Then I placed them together so I would have a reasonably smooth edge at the top and bottom of the trim line. I got the look that I was after, but it was labor intensive and the hot glue was not kind to my fingers as I struggled to get all the little pieces to stick down. 
2. Wrap burlap around the center of your can.
I wrapped mine so the fibers were at an angle.
3. Color a 4" paper doily.
Tim Holtz Distress Ink in Tumbled Glass
4. Adhere your doily to the front of your can to frame your label.
5. Print out your sentiment
I got the sentiment from The Cutting Cafe
6. Die cut your label
Spellbinders Card Creator-Reflective Moment die pack.
7. Edge the label with ink
Tim Holtz Distress Ink in the color Vintage Photo. 
8. Add twine to the bottom edge of your white craft cardstock and decorate your lid.
I decorated the top by using another 4" doily that I colored with ink. I also added a snowflake that I got from The Cutting Cafe. It's the same snowflake that I used to make my tag (below).

9. The finishing touch
To finish the edge of the lid of the can as well as the bottom edge of the can I hot glued twine to it. I added a pine cone wrapped in some twine to make lifting the lid off easy. 

This was a very enjoyable project to do because I just went with whatever came to mind at that moment. To be creative in that way is freeing.
I can't wait to put the chocolate kisses in.

Project 1 Supplies List

Project 2 Supplies List

Thanks for stopping by and have a great day :)
  Happy Crafting!
post signature