Showing posts with label DIY. Show all posts

Monday, November 30, 2015

Make Your Own Rustic and Adorable Country Inspired Wood Slice Ornament


Make use of those broken branches other than in the bonfire! :)

Crafting your own holiday decorations allows you to personalize your decor and gives you the opportunity to create inexpensive gifts and keepsakes to be treasured for years to come. The holiday season can become quite stressful and research shows that being creative and finding a craft to enjoy is not only a natural way to relax, but it's great for brain health. 

So take some time for yourself this busy season, roll up your sleeves, create and relax.

This is just the beginning of the ideas for making your own wood-slice ornaments and other projects.

Stick around for more!

Below, you will find a Materials List, detailed Project Instructions, and a Sneak Peak of some of the future projects coming up. 
Please read through the instructions prior to starting your project.


NOTE: If you do not have all the materials and tools used in this project you may be able to substitute things you already have on hand. For example, if you do not have clear stamps and ink you can always use a black permanent marker to draw the plaid lines on the elk and use craft paint or markers to color in the squares. If you don't have any wood to use, you can find pre-sliced wood online, but it can be expensive. Check with your friends, family and neighbors. 

Materials and Tools List:
- Ranger Archival Ink in Jet Black for plaid on elk
- StazOn Ink in Timber Brown for sentiment
- Rubber Stampede Ink in Green for elk's plaid coat
- Rubber Stampede ink in Scarlett for elk's plaid coat
- Tim Holtz Distress Ink in Vintage Photo for elk fur
Tim Holtz Distress Ink in Peeled Paint for trees
- 4" wood-round
- Creatology Christmas Wood Stickers in trees and elks 24 piece sets
- Glossy Accents
- White acrylic Craft Paint
- A thin tool or paperclip opened up
- A strong glue made for crafting
- Pine Trees Hampton Art Stamp and Die Set (SCO718)
- Snowman Hampton Art Stamp and Die Set (SCO703)
- Recollections blender pen to fill in plaid on elk with ink
- Clear stamp block
- Twine

Preparation 
- Make sure to sand your wood-round smooth
- Drill a hole into the top of your wood slice, but be careful not to get too close to the edge where you can break through.

Project Instructions

Step 1 - Stamp your wooden trees with the patterned tree stamp set. The stamps will not cover perfectly and this is fine, just line them up the best you can. When you're done stamping, take the same green ink and a sponge to darken the edges of the tree. This will blend in where the stamp and wooden tree didn't match up. After doing the edges lightly color the rest of the tree green. Use brown ink for the trunk of the trees.


Step 2 - Stamp your wooden elk with the plaid tree stamp. Use a piece of paper to cover the legs. Place the tree sideways with the top of the tree facing your left hand. The elk should be facing left as well. Use the black archival ink or an ink like StazOn in black on your tree stamp so you don't have any smearing when you add the color to your elk later. Color the blocks on your elk and then finish up with making the head and legs brown and the antlers gold. 

Step 3 - Once your trees and elk have been colored, top coat them with Glossy Accents to seal the ink. Not only does this make the ornament easier to clean later, but it also keeps the ink from bleeding into the white that you'll be adding later as well as protects any surfaces the ornament may come in contact with. Let it dry for at least a few hours. I usually just let my pieces sit overnight.

Step 4 - Sit your trees and elk onto you wood base where they will be glued. DO NOT glue them on now. This is just to make sure you line up your sentiment (Let It Snow) correctly in the open space between the trees. Place ink on your sentiment stamp, move the trees and the elk with your other hand and then place your sentiment.

Step 5 - Place glue on the back of each tree and glue into place. Since the tree behind the elks face is sitting partly on the tree behind it I glued a couple of small pieces of wood to the back of the front tree to make it lay flat. Then I glued some stabilizing wood on the elks buttocks too. This keeps everything flat and much easier to glue. Craft foam or thick glue dots could also work.


Step 6 - Use the tip of a small tool, paintbrush handle or paperclip to paint the snow on your ornament. Dip just the tip into your white acrylic paint and carefully drag along the edges of the trees and antlers of the elk. Then use the same tool to make snow dots all over your ornament and snow drifts along the bottom of your trees and elk. Let dry

Step 7 - I used strings from burlap to hang my ornament, but you can use anything such as ribbon, string, yarn or wire.


Congratulations! You just made an adorable ornament to either give as a gift or keep for your own decorating. 


Here's a glimpse of some of my other Christmas projects.


#CraftForBrainHealth  #aNaturalWayToRelax  #TheNewYoga


Happy crafting and thanks for stopping by!
post signature

Tuesday, February 24, 2015

Heartedly Handcrafted Inspiration Sticks

Hello crafty friends!
I started a project recently to help myself with future projects. Yes, you read that correctly. We can all use a little help from time to time with coming up with ideas and even when we do have an idea it doesn't always carry us to the very end. I have found myself staring at a sheet of paper to make a card while not having a clue where to start. I've also had those moments when there just seems to be something missing and this can help with that too.

A crafty friend shared this video

Inspiration Sticks Challenge - Art Journal Ideas - Mixed Media

and I just love it! The video is from +Claudia Rossi and she talks about a challenge her and her friend is doing/did with what she is calling "Inspiration Sticks". Under that video is a link to how to make them and she provides a link to a list of what to write on your sticks to get you started. Claudia's list idea is for art journaling, but can be easily carried over to other types of projects. My list will consist of things that I do specifically for cardmaking and therefore be different, so what it comes down to is, YOUR list can be for anything you want. When I've completed my list I will be sure to share it right here.

UPDATE: List for card-making

Scroll down for another project using this idea, "Spontaneity Sticks".

Here are some of the sticks I've made so far. I haven't decided yet how I want to store my sticks or if I want to further embellish them.
To make mine I used large tongue depressors that I coated with pastel chalk ink by VersaMagic. Then I used rubber and clear stamps with Rubber Stampede ink in the color Wheat to make designs on them. 
Once the ink was dry I used a fine tipped, black, permanent marker to write with. I had a little trouble with bleeding, but unless I were to use a magnifying glass or hold it close to my face the bleeding is really not noticeable. I would suggest experimenting with what you have and see what works best for you.
The great thing about the idea of "Inspiration Sticks" is that they can be used for anything, even outside of crafting. How often do we skip over all the sightseeing opportunities, museums, etc. in our own towns or regions. You could write down all the places to visit on sticks and then randomly pick one on a nice day. Maybe in this case you might call them "Spontaneity Sticks"  and as you accomplish each one, you might frame, or place in a scrapbook, your stick as your title with the photos you took. The possibilities are endless :)
post signature

Tuesday, December 16, 2014

DIY Air Freshener: Orange and Clove Pomander Balls

Hello everyone!
Today I'm sharing a quick craft to make your house smell holiday fresh without being overwhelming to sensitive noses. 

My husband is very sensitive, allergic in some cases, to strong scents like heavy perfumes and heavy indoor air scents such as sprays. Yet, even if you don't have someone in your home with a sensitivity, Pomander Balls can still be a great add-on to your holiday aroma. 
I had a few oranges left that were aged beyond wanting to eat them. So instead of throwing them out, I made them useful for the holidays.
All you need is citrus fruit, some whole cloves and a toothpick or anything to poke small holes with. I chose a knitting needle that I use for crafting and it worked great.

Just poke holes in an orange and insert a clove in each hole. You can even make a design with your cloves if you want to place them in a bowl for decoration. The oranges won't rot as the cloves will just dry them out.


After I was finished placing my cloves in the holes I wrapped my orange in some decorative tulle and added twine to tie it together.
Now I can sit them in a bowl or hang them.

Enjoy your natural air freshener!

Happy crafting and thanks for stopping by!
post signature

Wednesday, December 10, 2014

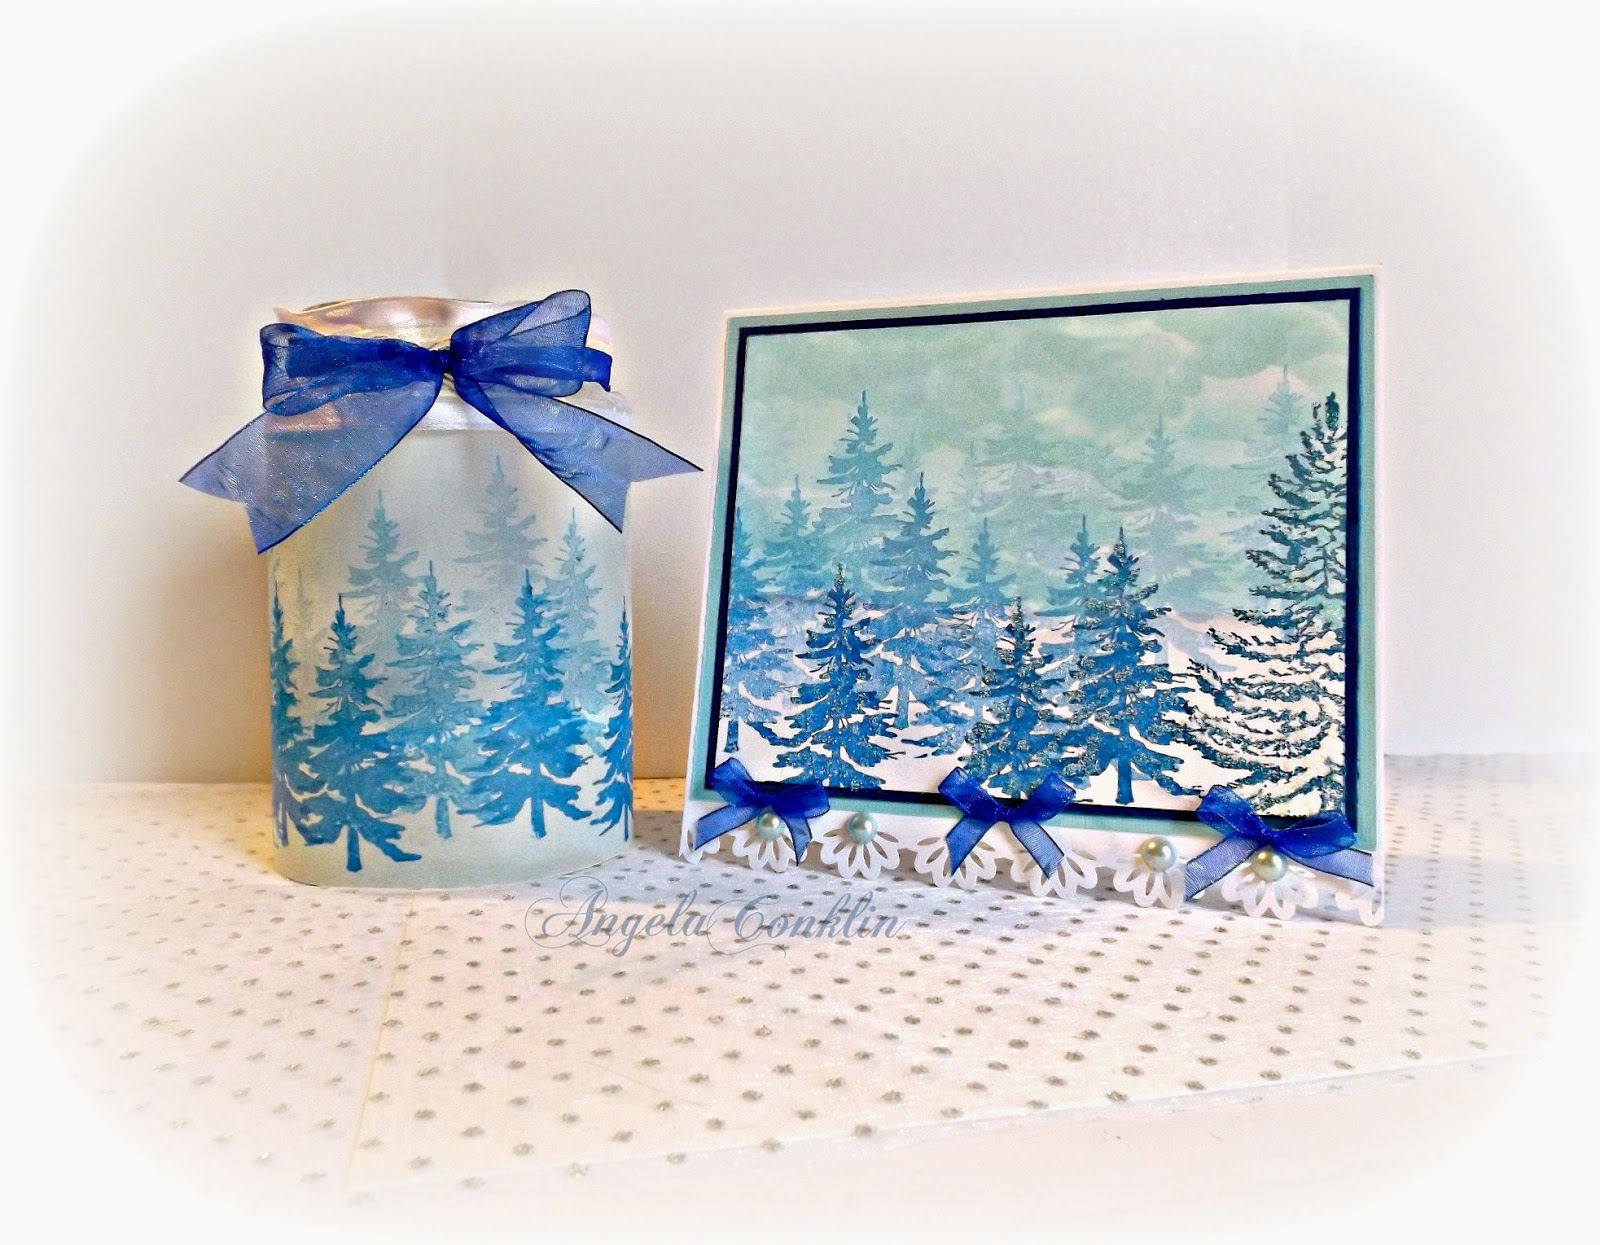
Repurposed Jar Craft: Winter Landscape Card and Candle Gift Set

Hello everyone!
 
Today I'm sharing a card and candle gift set that I made using a spaghetti jar, some translucent paper, white cardstock, two of my favorite pine tree stamps, and blue and turquoise ink.
 
I love trees, so working with these stamps put me in my happy place. I also enjoyed the challenge of making the sky look heavy and wintery. 
When the candle is lit is gives a beautiful glow, like the sun is shining through the faded trees in the distance. 
 
How to make the candle

1. Gather your translucent paper, pine tree stamps, and blue ink.
2. Measure your jar and cut your paper to wrap around it.
3. Take your small tree stamp and perform Generation Stamping with your blue ink. If you don't know what Generation Stamping is, the videos below will show you how it works. Make sure to overlap your trees a little to give them depth. To get the best look make your darkest trees closest to you and toward the bottom of your paper and the trees should become lighter as they move further away.
 (beginning at 5:00 for the tree stamping)  

4. Adhere your finished paper to your jar. I used Mod Podge on the back of the jar right where the paper comes together to hold it in place.
5. Using (1 1/2" wide) sheer white ribbon with wire edges, measure to see how much you need to go around the neck of the jar.
6. Once you have the correct size piece of ribbon cut, use a needle and thread to do a running stitch down the center of the ribbon leaving a couple inches of thread hanging out at both sides. The running stitch does not have to be even or neatly done. You will not see it in your finished project.
The extra thread you left hanging on each end of the ribbon is what you will use to tie your ribbon tightly to your jar to keep it in place. I decided to use ribbon in this way because it covers the top edge of the translucent paper and adds to the overall look of the candle.
7. Take your blue (3/4" wide) sheer ribbon, fold it in half, and tie it around the neck of the jar. You will unfold the ribbon just at the front to make the bow.

 How to make your card

I made my card a size that is not common so if it were to be placed as a set on a mantel or table, the card would look balanced with the size of the candle. There are some odd measurements, but each measurement can easily be rounded to the nearest quarter inch.

1. Gather your white, light turquoise, and deep blue cardstock.
Measurments of Cardstock
White 
6 10/16"w x 12"h
6"w x 4 12/16"h
Light Turquoise
6 1/2"w x 5 1/4"h
Dark Blue
6 3/16"w x 5"h 

2. You will be using the same blue ink for the trees that you used on the candle as well as a light turquoise ink for the sky.
3.Start by taking a scrap piece of cardstock and ripping two pieces from it. Mine were about 6 inches wide. Don't try to be neat about it since these will be used as your mask for sponging your sky and clouds, therefore hills and valleys are good.
4. Using your 6"w x 4 12/16"h white cardstock, take your ink and sponge, and make a swirling motion along the edge of the paper. Always start on your ripped piece with your sponge and work into the actual image your making. This will keep you from getting gobs of ink that are too dark on your card. Repeat, changing the position of your paper and leaving some lighter spots that will become the clouds. Take the sky about half way down your paper.

The video shows how to make snowbanks, but it's the same technique I used to make the sky.  


5. When your sky is done it's time to start placing your trees. Refer to the directions above for the candle on how to utilize Generation Stamping.
6. Once you're finished with your trees, place little dabs of Glossy Accents on your darkest trees in the front and then add some glitter to them to make them stand out.
7. Fold your 6 10/16"w x 12"h white card base in half (6" mark).
8. Border punch the front and back bottom edges of your card. 
9. Adhere your light turquoise mat on your white card base then your dark blue mat on top of the turquoise one.
10. Add your new image centered on your dark blue mat.
11. Add flat back pearls to your scalloped edge and blue bows


Supplies
Happy crafting and thanks for stopping by!
post signature

Thursday, November 20, 2014

Lessons Learned: Ideas and Tips for Your Budget Friendly Craft Room Makeover

Hello everyone! 

If you've stopped by for the Sketches4All Challenge Celebration, click here. 

Grab a cup of coffee or hot chocolate and relax with some ideas and tips for taking your craft room from drab to fab!

If you're on a tight budget I may be able to help you move more easily through the process. You don't have to have a large craft space, in fact what I'm sharing is all about using what you already have.
 
Since posting my Craft Room Makeover in July, the pulse of activity and all the wonderful comments tell me that there are a lot of people looking to, at the very least, get organized and some wanting to completely redo their craft rooms. One particular question has popped up time and time again with a few repetitive questions right behind it. So today I would like to address them and share some of the things that I've learned along the way.
 
If you haven't viewed my video yet and would like to you can click here or find it at the top of my blog sidebar :)

Question:
"How did you make such big changes to your room and spend under $100.00"?

The simplest answer to why I didn't have to spend a lot of money is,
I didn't make big changes, but rather many small changes that made a big impact. 
 
Instead of buying new furniture or repainting the entire room I focused on what I already had and how I could change it to make it work for me. As much as the improvements I made were about the need for storage and organization, I also put my energy into working toward a room that was light and bright for taking photos and comfortable to be in.
 
There are many simple fixes and little details that can make a world of difference and require no money.

Preface:
I did not have an actual plan for redoing my room, but more of just an idea of the look that I wanted. So to save money I took the things that I already had or bought very inexpensively (such as my chair and clock) and made them fit that look.


After completing a couple of projects and knowing that I was not going to be repainting my grayed-green walls I realized the picture below encompassed the feeling, color and look that I wanted. So I used it to inspire and lead me. Having an object that you can build a room around is definitely a bonus. This was a picture that my daughter no longer wanted in her room. You can see how the green on the wall can be found in the painting and you will see the other colors in the painting used throughout my room.

My craft supplies remained in my craft room as I worked since I had to continue to craft and blog. For the makeover to go smoothly I did one area or piece of furniture at a time.

The total time it took me to redo my craft room was two months. If I were to count in days how long it took me to paint my large pieces of furniture, arrange them and make the table skirts, I would say it didn't take any longer than two weeks. All of my small projects such as shopping at yard sales, painting my mirror and chair, and spray painting small containers is what drew that timeline out, aside from trying to live life too.

My Learning Curve and answers to other questions  
1. Hidden storage can really impact the look of a room
2. Make some things stand out cohesively so things you don't want noticed fade into the background  
3. Paint can become your new best friend
4. Good furniture arrangement is a must, getting it right can make your furniture look more impressive
5. Little added touches have a big impact too 
6. Not everything needs to be exposed to remember you have it. In fact it's a bad idea.

In the photo on the left you can see that I started out with a very similar layout to what I have now. At the time of the first photo I hadn't thought through everything. I had storage and convenience on the brain instead of seeing the whole picture that would include, making the most of natural light and making my space comfortable and feel good to be in.
 
To add storage I brought in two bookcases, but after finishing I was not happy with my room. It felt cluttered and uninspiring. There was nothing pretty to look at and nowhere for my eyes to rest.
 
Even though my materials were organized, my containers themselves weren't organized and they didn't match. This made my shelves look very messy.

At this point I realized what was wrong and what I needed to change.
My room lacked cohesiveness and a focal point.
The numerous colors, textures, shapes, sizes and styles of my containers, furniture and craft materials overwhelmed my room.  
 
1. Making hidden storage is easy and can really impact the look of a room.
    The storage area under my desk was ugly, but necessary. I don't sit at this desk, but just use it for cutting, die cutting, scoring and filing.
     
    Covering the open area was a small change that made a huge impact, because it not only hid my storage, it also softened the harsh lines of my desk and brought color into my space. This one change was very motivating.
    Start small and it may help you along.
    Money saving tip: I took curtains and material I already had, plus picked up at a yard sale and cut them up. This is not one solid curtain, but rather random-sized strips hanging beside one another. Strips make access easy. I hung them on a dowel that sits in plastic closet bar cups and it can be easily removed, also making access easy. I like the look of the mixed materials and patterns.
     
    2. Make some of your craft containers stand out cohesively so the things you don't want noticed will fade into the background 
     
    You don't have to throw everything out and begin from scratch. All you have to do is trick the eye.

    I didn't have to do a lot to the shelves of my desk to improve them.
    They are the first thing the eye goes to when I enter my room because they are straight ahead and at eye level.
    The way I had my materials stashed just added to the dreariness and confusion of my room.
     
    First I removed some of the containers that didn't need to be on the shelves. To improve the look of the upper shelf and draw the eye I added some embellishments to the front of the jars and placed them in the center (pictured below).

    Embellishing the jars helped me in four ways; it gave me an attractive focal point, somewhat disguised what was in the jars without blocking my view of the contents, allowed me to bring the colors I wanted to an area that was very drab and the added embellishments united the jars with the rest of the room.

    Choose what you want to stand out and then make it special.
    The cream and light turquoise colored baskets were purchased at Family Dollar for a total of $12.00.
     
    Since I found new places (hidden storage) for some of my ugly containers I added a few pretty baskets to the lower shelf to finish off the look. The brown basket in the middle was an old basket of mine which worked nicely with the burlap on the jars, so I just added some lace and a bow to make it blend in a little and emphasize the colorful, textured baskets on the sides of it.
     
    By making some things stand out, the not-so-great things fade into the background.
     
    I didn't have to do anything to the plastic sandwich containers because they're sitting right next to a focal point.
    Did the sandwich containers draw your eye or were you drawn to the embellishments of the jars and the colorful baskets underneath?
     
    My shelves also lacked a pleasing arrangement and in the new design there is balance.

    NOTE: I know finding a container to hold craft materials can be exciting. Especially if it holds those materials perfectly. The issue is whether that perfect container works perfect in your craft space
    and if it doesn't, can you make it work? If not, don't use it, or at least don't display it.
    If you need to have it out, you can put it somewhere by itself like I did with my vase of colored pencils.
     
    The next two things I learned go hand-in-hand
    3. Paint can become your new best friend.
    A can of spray paint, a couple small bottles of craft paint and a partial gallon of paint leftover from a home improvement project can go a long way
    . That's all I used in my craft room. If you need to buy paint you can find it at Walmart or a store like it inexpensively.
    &
    4. Good furniture arrangement, is a must, can make your furniture look more impressive and is free 

    I spray painted the containers I already had and added some of them to my desk. By having the color around the room, it balanced the color scheme and the room felt brighter and cheerier.

    The dreaded furniture!
    I had mixed pieces of furniture that did not go together AT ALL.
    A simple white shelf on it's own can look fantastic, but place it next to a tall, massive, wood-stained desk and the shelf looks small and cheaply made.
    Place a thrown together desk made from filing cabinets, a bookcase-headboard, and slab of wood for the surface next to a beautifully lined Victorian piece and the desk looks hideous. In fact the Victorian piece looked horrible too next to these other things.
     
    Pay attention to the style and scale of your furniture and make any needed changes in the arrangement of them.
     
    To bring the look of my furniture together I needed the bookcases to look bigger and heavier with more details and to tone down my massive desk. Most importantly since they were the largest pieces in the room I wanted them to be similar and neutral in their overall appearance.
     
    I did not want to spend money on molding to make my pressed-wood bookcases look better. So I came up with a couple of solutions to get the same feel without having to spend the money and break out the power tools.
    First I painted stripes on the back of the shelves to give them some interest and disguise the cheap looking back panels. I used two craft paints and sponged the color on so very little paint was used. Since this is not an exposed area that will get a lot of wear, I didn't have to do any priming. No money was spent to do this. 
     
     I arranged the two bookcases close together and made them look like one large piece of furniture by adding an old wine cabinet between them and then two long pieces of wood as shelves above them that I painted white.
     
    To give my bookcases even more weight and interest I used a white window valance along the top to make them look a bit fancier and to soften the lines. This took the place of using molding. I also painted the underside of the wood to bring color to the nook.

    An old medicine cabinet was added since it has a curvy shaped top that breaks up the straight lines of everything around it. This was not absolutely necessary, but a nice added touch. The mirror (once cleaned, haha) helps spread light throughout the room by reflecting the sunlight from the windows across from it.
     
     I painted all the parts of my homemade desk white to make it look like a real desk, work with the shelves and brighten and lighten this massive piece of furniture.

    There is a noticeable difference in the amount of light 
    in my room now with all my large furniture pieces painted white.

    5. Little added touches have a big impact too 

    I wanted hints of pink in my room so I placed some pink and white striped wallpaper on the back of the desk. I used two-sided tape to adhere it so it can be easily removed down the road if I wish.
    I got the wallpaper from Goodwill about a year and a half ago and finally found a use for it, but you can use anything to add some color or pattern to a piece of furniture, including fabric, scrapbook paper or stencils. Goodwill often has brand new wallpaper rolls for around one dollar. I paid $0.86 for mine.

    I also added pink bows and labels to some of my cloth bins.
    I got the bins at Family Dollar for a total of $24.00.

    To be able to use the nightstands and not have to do anything to them I placed them together on the other side of the room between the windows. I liked their antique look with the painted flowers on the drawers and did not want to paint over them.
    Although I would have preferred to have them in separate spots, they work nicely together with a board on top to make one continuous surface. I even added a small shelf to the back to add another level. The drawers hold holiday themed embellishments and odds and ends that didn't have a place before. I can store my large plastic jars of flowers on top and this gives me a little area to decorate.
     
      To detract the eye from the fact that I used a window valance to cover the board I layered doilies in different patterns and colors.

    To give the area height I added a stylish mirror
     to the wall behind the stands that I painted white, (the mirror was an ugly fake looking gold before). This helps bounce light around, as well, for taking photos. 
     
    My furniture looks better together now and by building up I made the most of my space. I also have a lot of hidden storage, hence all the fabric. :) Now the shelf unit and my desk look like they belong together. 
    The white curtains on the bottom of the shelves match the curtains on the windows. 

    Money saving tip: To make them I took one large curtain and cut it in half. Then I measured the length I needed and cut the tops off both halves leaving room to make the hem for the rod.

     6. Not everything needs to be exposed to remember you have it
     
    A recurring statement I read/heard online was,
    "If I don't see it, I won't use it".

    These were crafters speaking about how they need things to be exposed so they don't forget about what they have. It's a misleading statement if taken as advice. The only way you will forget about something is if you're not well organized. In fact that is a great queue that you need to improve when you're forgetting you have something. Being truly organized means you know at all times, exactly what you have and where it is.
     
     If you live in an "organized mess" like I did, you probably will forget that you have it.
     
     So what did I do the first time I "organized" my space? I took what they said as advice and exposed everything I could.

    That was a HUGE mistake!!!
     
    In reality it really doesn't work well that way.
    A bunch of different and exposed craft materials together not only make a room feel cluttered and closed in, but displaying everything can actually have the opposite effect. 

    You may end up seeing nothing, at least nothing in particular.
     
    All of those new punches I got were so cool! I just had to see every one of them. All of those embellishments (buttons, beads, ribbon, lace, etc.) were so colorful and pretty I just had to keep them in view like decorations. 
     
    And what did I end up with? This. 
    Not very pretty at all when you put it all together.  
    My room looked more like it belonged to a hoarder than a crafter.

    Now your reason for having everything out may not be exactly the same. I mean it was also convenient to have everything out. At least that is what I told myself, until I was looking through my "organized mess" and couldn't find something that was right in front of my face.
     
    Think about it this way. You may have piles on your office desk of bills, junk mail, passwords, and so forth. When someone says something negative about it (spouse), you say you know where everything is. You have an "organized mess", 
    BUT who wishes for an organized mess?

    Isn't it much nicer when you walk to your desk and the surface is clean and free of clutter. When you know just by opening a drawer all of your bills are ready to go and you don't have to stare at them or worse, shift them around to get to things. The same applies to a room. Organized messes don't invoke any kind of feeling other than wanting them to go away and they certainly aren't inspiring.
     
    I craft because I like the creativity in making things that attract the eye in a positive way. I like to make pretty things and my room was not pretty.
     
    Solution:
    Only keep some of each item displayed.


    Lets use my paper punches as an example. I don't have a lot of punches, but you can substitute anything here.
     
    I display only the ones I use most often and place the rest in a storage container that is easily accessible and labeled.
     
     
     Instead of my eye randomly searching, it goes right to the labels and now I don't even have to look at the labels when retrieving a container.
     
    Having your craft materials put away removes the "organized mess" and makes it easy to find and retrieve the things you need. It also makes the area more pleasing to look at and be in.
      Crafts you no longer do and extra things you haven't used in ages can be placed in hidden storage.
     
    I went through each item I had until everything had it's space and therefore I knew what I had and where to find it.

    So to everyone watching craft videos for ideas like I did, keep in mind that the individual ideas are great, but together they may create a monster.

    The little joys of finding just the right container and furniture pieces with little to no monetary expense can cloud your judgment if you don't have an overall plan in mind.

      Side Note: I use fabric to cover one of the areas I use often too.
    I use my inks and rubber stamps at least a few times per week, but when I'm not crafting, as my room serves other purposes as well, I don't want to have to look at them and I don't want the inside of the cabinet collecting dust. Just my personal preference.
    My solution was to hang a curtain on a cafe curtain rod that sits in cup-hooks. This way I can easily remove it completely when I'm crafting and cover it up when I'm not. I used old fabric I had. You can repurpose an old tablecloth, bed linens, clothing, whatever you can find or even stitch some different fabrics together to make your own unique cover.
     
     
    Choice is a big deal. Give yourself choices.
     
    I hope answering some of the questions I've received as well as sharing some of the things that I've learned have helped you. They're things that I did not think about initially and I wish I had as it would have saved me the time and energy of doing it wrong the first few times.
    It's not the easiest process to decide what you want and figure out how to make it happen without a lot of money sitting in the bank, but it's very possible with a bit of creativity and it's an exciting and very rewarding experience that will make everyday afterward a good craft day. So put your creativity and eye for great things to work for you and make a space that you love.

    Happy crafting!
    post signature