Showing posts with label Christmas. Show all posts

Tuesday, December 8, 2015

Bring Nature Indoors with these DIY Wood Slice Snowflake Ornaments

These do-it-yourself ornaments are fun, simple and inexpensive to make and will give your tree a rustic touch. They also make great gifts, wintry tags, and name plates for a winter wedding.  

Tools and Materials:
  • Wood slices (2 1/2" diameter)
  • Drill (to make the holes for the twine in the wood slices)
  • Bag of wooden snowflakes
  • Rubber Stampede Ink in Fresh Mint (any light bluish color will do)
  • Colorbox Ink in Frost White (to lightly sponge over the Fresh Mint color)
  • Glossy Accents (to cover the snowflake once it's colored)
  • Strong glue to attach the snowflake to the wood slice
  • Twine to hang the ornament

Directions:
  1. Use a sponge to apply a coat of Fresh Mint colored ink to one side of your snowflake. 
  2. Sponge the white ink over the top of your Fresh Mint ink. Don't try to completely cover the bluish ink, you're just trying to give the snowflake an icy appearance.
  3. Add a coat of Glossy Accents over the ink to give the snowflake a shine. You may notice the white ink begin to swirl which is just an added bonus. Allow to dry.
  4. Place glue onto the unfinished back of your snowflake, center on your wood slice and adhere. Let dry overnight.
  5. Use your twine to hang your ornament.


Note: If you don't have ink or want to make this a family project with smaller children you can easily substitute markers or acrylic paint to color your snowflakes. The ink just gives your snowflakes more depth in color and has a softer appearance.

Check back for more projects and tutorials.

Happy Crafting and thanks for stopping by!
post signature

Monday, November 30, 2015

Make Your Own Rustic and Adorable Country Inspired Wood Slice Ornament


Make use of those broken branches other than in the bonfire! :)

Crafting your own holiday decorations allows you to personalize your decor and gives you the opportunity to create inexpensive gifts and keepsakes to be treasured for years to come. The holiday season can become quite stressful and research shows that being creative and finding a craft to enjoy is not only a natural way to relax, but it's great for brain health. 

So take some time for yourself this busy season, roll up your sleeves, create and relax.

This is just the beginning of the ideas for making your own wood-slice ornaments and other projects.

Stick around for more!

Below, you will find a Materials List, detailed Project Instructions, and a Sneak Peak of some of the future projects coming up. 
Please read through the instructions prior to starting your project.


NOTE: If you do not have all the materials and tools used in this project you may be able to substitute things you already have on hand. For example, if you do not have clear stamps and ink you can always use a black permanent marker to draw the plaid lines on the elk and use craft paint or markers to color in the squares. If you don't have any wood to use, you can find pre-sliced wood online, but it can be expensive. Check with your friends, family and neighbors. 

Materials and Tools List:
- Ranger Archival Ink in Jet Black for plaid on elk
- StazOn Ink in Timber Brown for sentiment
- Rubber Stampede Ink in Green for elk's plaid coat
- Rubber Stampede ink in Scarlett for elk's plaid coat
- Tim Holtz Distress Ink in Vintage Photo for elk fur
Tim Holtz Distress Ink in Peeled Paint for trees
- 4" wood-round
- Creatology Christmas Wood Stickers in trees and elks 24 piece sets
- Glossy Accents
- White acrylic Craft Paint
- A thin tool or paperclip opened up
- A strong glue made for crafting
- Pine Trees Hampton Art Stamp and Die Set (SCO718)
- Snowman Hampton Art Stamp and Die Set (SCO703)
- Recollections blender pen to fill in plaid on elk with ink
- Clear stamp block
- Twine

Preparation 
- Make sure to sand your wood-round smooth
- Drill a hole into the top of your wood slice, but be careful not to get too close to the edge where you can break through.

Project Instructions

Step 1 - Stamp your wooden trees with the patterned tree stamp set. The stamps will not cover perfectly and this is fine, just line them up the best you can. When you're done stamping, take the same green ink and a sponge to darken the edges of the tree. This will blend in where the stamp and wooden tree didn't match up. After doing the edges lightly color the rest of the tree green. Use brown ink for the trunk of the trees.


Step 2 - Stamp your wooden elk with the plaid tree stamp. Use a piece of paper to cover the legs. Place the tree sideways with the top of the tree facing your left hand. The elk should be facing left as well. Use the black archival ink or an ink like StazOn in black on your tree stamp so you don't have any smearing when you add the color to your elk later. Color the blocks on your elk and then finish up with making the head and legs brown and the antlers gold. 

Step 3 - Once your trees and elk have been colored, top coat them with Glossy Accents to seal the ink. Not only does this make the ornament easier to clean later, but it also keeps the ink from bleeding into the white that you'll be adding later as well as protects any surfaces the ornament may come in contact with. Let it dry for at least a few hours. I usually just let my pieces sit overnight.

Step 4 - Sit your trees and elk onto you wood base where they will be glued. DO NOT glue them on now. This is just to make sure you line up your sentiment (Let It Snow) correctly in the open space between the trees. Place ink on your sentiment stamp, move the trees and the elk with your other hand and then place your sentiment.

Step 5 - Place glue on the back of each tree and glue into place. Since the tree behind the elks face is sitting partly on the tree behind it I glued a couple of small pieces of wood to the back of the front tree to make it lay flat. Then I glued some stabilizing wood on the elks buttocks too. This keeps everything flat and much easier to glue. Craft foam or thick glue dots could also work.


Step 6 - Use the tip of a small tool, paintbrush handle or paperclip to paint the snow on your ornament. Dip just the tip into your white acrylic paint and carefully drag along the edges of the trees and antlers of the elk. Then use the same tool to make snow dots all over your ornament and snow drifts along the bottom of your trees and elk. Let dry

Step 7 - I used strings from burlap to hang my ornament, but you can use anything such as ribbon, string, yarn or wire.


Congratulations! You just made an adorable ornament to either give as a gift or keep for your own decorating. 


Here's a glimpse of some of my other Christmas projects.


#CraftForBrainHealth  #aNaturalWayToRelax  #TheNewYoga


Happy crafting and thanks for stopping by!
post signature

Friday, November 28, 2014

Handmade Greeting Card - Season's Greetings in Red and White Snowflakes

Hope everyone is doing well.
 
If you've stopped by for the Sketches4All 5th Anniversary Party, click here and it will take you right to it :)

Western Pennsylvania got snow again last night and in about an hour it went from ugly and gray outside to white and bright. I love it! Snow makes everything look beautiful.
 
 I'm still working on my Christmas cards and in about a week and a half they will be in the mail. I'm calling this period of time the Christmas Card Crunch.
 
Today I'm sharing my latest card. I've made many cards with snowflakes on them, but they're usually blue and white. So I'm changing it up a bit. I can have red snowflakes, right? :) I was inspired to make a red and white card as I was removing candy canes from their box. Now if I could just make my card smell like candy canes, that would be something. If you're interested in making this card you'll find the instructions and supplies list below. 


 To make this card
 
Measurements
First things first. Print out your sentiment so that you can center it when cutting your label.
 
White cardstock
  • 10" x 6 1/2" - Base card (score it in the middle at 5" for the fold)
    4 1/2" x 6" - Mat
  • 2" x 4 3/4 - Embossed strip
  • (2) 4 3/4" - Border punched strips that you'll tape along the back edges of your wide red strip.
  • Die-cut label - Used Spellbinders Card Creator Reflective Moments die

Red cardstock
  • 4 3/4" x 6 1/4" - Large mat
  • 4 1/4" x 5 3/4" - Embossed small mat
  • 2 1/8" x 4 3/4 - Strip
  • Die-cut label - Used Spellbinders Card Creator Valiant Honor die
Order of placing the main card section together from bottom to top
1. White base card
2. Large red mat
3. White mat
4. Embossed small red mat
  
To make the embossed strip down the middle
1. Adhere white border punched strips to the back edges (sides) or your red strip.
2. Center and adhere embossed white strip onto the red strip
3. Adhere it to your base card, lining up the top and bottom with the edge of the red outer mat.
To make the sentiment
NOTE: If you have been thinking about making your own sentiments, you can make them for free at Picmonkey.com. As much as I like other people's digital greetings, sometimes it's nice to be able to make my own when I can't find one that says what I want, want different color options or want one custom made to go with a card or specific label.
1. Use ink on the outer edges of your small label to make it stand out.
2. Center and adhere your small label to the top of your large label.
3. Add some flat backed pearls to the border strips of your card.
4. Use thick dimensional glue dots or thick tape to make the label stand away from the card.

You're Finished!
Supplies
  
Happy Crafting!
post signature

Tuesday, November 25, 2014

Handmade Greeting Card: Let it Snow!

Hello everyone!
 
Let it snow, let it snow, let it snow... 
This song has been going through my brain for hours. I just wish I knew more of the words so I didn't have the same few lines continuously repeating. Too funny!
 
Today I'm sharing a card that I made for Challenge 4 of the Sketches4All Anniversary Party. I love bling and this challenge called for it, so I couldn't wait to get started. I chose the sentiment "Let it Snow" because at this very moment all of the snow has melted and it's not looking very pretty outside, although it made for the perfect day to get the shiny embellishments out :)
   
To make this 5"x7"card

1. Cut a piece of white cardstock 10"w x 7"h and then score it down the middle at 5". 
2. I like my cards to be heavy-duty so I cut another piece of white cardstock at 5"x7" that was used to build my design on and then placed straight over the card base.  
3. I cut my blue cardstock mat at 4 3/4"w x 6 3/4"h. 

To make the three paper ribbons:

1. Cut a piece of white cardstock (3"x 5")
2. Ink an embossing folder with a brayer on it's debossed side
3. Emboss the cardstock 
4. Cut your embossed cardstock into three 1" strips
5. Cut each strip into five 1" squares 
6. Cut three strips of blue cardstock at 1 1/8"x 6". 
7. Space your sqaures down your strips to your desired distance apart (mine are approximately an 8th of an inch apart with only about a 16th at the very top) and adhere them in place.
8. Cut three strips of white cardstock at 1 1/4"x6", (don't worry that you have extra blue and white cardstock at the bottom, this will be cut away.
9. Adhere your three blue strips with squares onto you white strips.
10. Cut an upside down "V" into your bottom square, as shown, on all three strips.
11. Tape your strips together overlapping slightly. I decided to offset the side ribbons at a lower height.
12. Adhere your strips to your blue mat (I just centered them)
13. Then adhere your blue mat to you white mat.
14. Embellish your angled cuts with gems, pearls or whatever you would like.

To make the sentiment/label
1. I used a Spellbinder, Card Creator die called Valiant Honor for my fancy label.
2. To be able to thread my white cloth ribbon though my label I used an X-acto knife to cut out a small section of the design on each side.
3. Then I added some silver glitter Washi tape to my ribbon and threaded it through the label.
4. I used the same Washi tape and a mini Recollections snowflake punch to make my silver snowflakes.
5. Once my ribbon was threaded through my label and I applied my silver snowflakes and light blue gems I taped the label and ribbon to my card face.

Your final step is to adhere your card face to your base card and your done :)
 
What fun is this!?!
 One of the winter effects over at Picmonkey.com. It's free!
 
Supplies
Thanks for stopping by :)
 
Happy Crafting!
post signature

Saturday, November 8, 2014

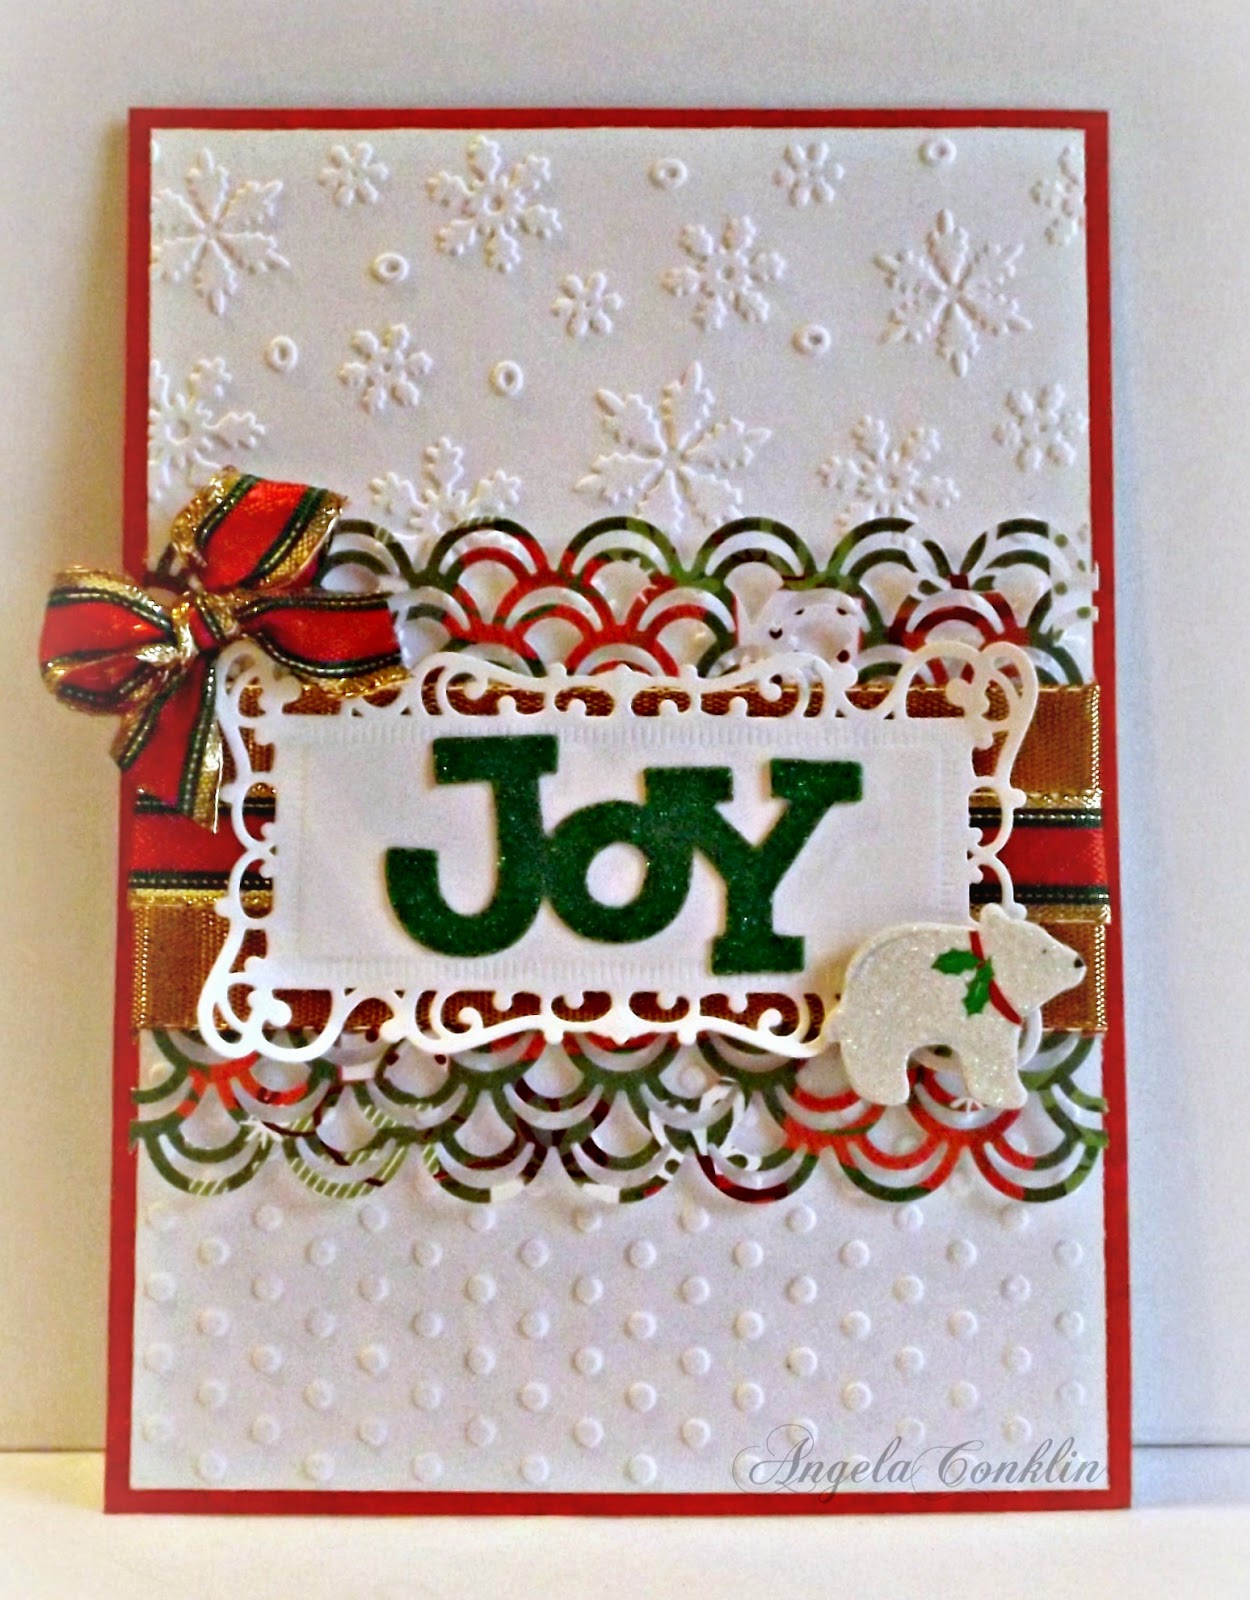
Handmade Joy Christmas Card in Traditional Colors

Hello Everyone!
 
Did you ever have one of those days when things that you normally ignore, suddenly strike you as funny? I was taking photos of cards I made and my camera kept telling me it detected a blink. This has happened other times too, but for whatever reason it cracked me up and I could barely hold my camera still. I could have used my tripod, but I had to be at uncomfortable angles to catch the little bit of light from outside. It's a gloomy overcast day today. I couldn't even hold my breath to stay still. It would just make me laugh. Thank goodness I'm alone because my family would have thought I was going crazy. Maybe I am? Maybe they do? LOL!

Anyway, I'm sharing a simple Christmas card today. There's some glitter on this one and I like that only the center is decorated with all the snowflakes in the background. I decided to make just the front of the card so that later I can decide if  I want it to be a normal side-fold card or something different. Without a card base holding it up, I had to lean it against the background.
 I cut two white panels for my card and embossed one with the Darice Snowflakes folder and the other I used the Cuttlebug Polka Dot Page folder. Then I cut a strip (about 2 inches) of Christmas paper from the DCWV Holiday Cheer stack and used the Martha Stewart Double Arches, border punch on both sides.

I then embellished the middle of the strip with wide shiny ribbon and a smaller Christmas ribbon. To make the sentiment stand out I backed JOY with a white die cut from the Spellbinders Card Creator, Reflective Moment set. Then I just added a bow and a polar bear.

A very simple card to make.


Happy Crafting! 
post signature

Sunday, October 19, 2014

Shaker Easel Card with a Note: Merry Christmas

Hello crafty peeps! Hope you are enjoying your day :)
 
I have continued to work on getting Christmas cards done and would like to share another one with you today. Shaker cards are so adorable and I'm already a fan of the easel card so I combined them. The shaker card does not open, but there is a card for a message on the easel itself.


 A place for a message, gift card, or small photo.

I made both of my scenes digitally and then printed them out on cardstock. I added white glitter with silver flecks to give it that snowy shaker feel and to build out the back for the shaker window I used two layers of thin craft foam of which I hot glued together.
 
 I like this card so much that I sat shaking it to make snowdrifts this morning. So much fun :)

I shared a tutorial in my previous post on how to make an easel card. I didn't look/watch any tutorials to make my shaker card, but I know there are plenty on YouTube if you would like to make one and don't know how to.
 
Happy Crafting!
 post signature

Friday, October 17, 2014

Christmas Easel Card with a Couple of Surprises

Hello crafty peeps!
Today I'm sharing my first easel card and boy was it a journey! I decided to try making my card with just a pair of scissors, an X-acto knife, a ruler and two paper punches and although it took me a little longer, you can make this card if you don't have any special crafting equipment such as a paper trimmer and Sizzix Die Cutting machine. I have to say though, having the tools to make a card makes it MUCH easier.

I made some mistakes, one still shows, but some mistakes and getting carried away with layers led to new ideas.
 
I used paper from the DCWV Holiday Cheers Stack.
 
 
There is a place for a wallet sized photo or gift card that can be added with a little dab of removable/temporary adhesive or you can make it a pocket for cash or a tag.


The easel card opens to reveal a section of which you can write a personal message, add a larger photo, place a stamped image or whatever you want. 

The back of my easel looked too plain so I added some color.

There are no large embellishments inside my card, so it folds flat for ease of mailing. I added a bow to the front, but it won't deform the card as easily as adding something to the inside.

  I recommend the video tutorial below for making the basic easel card. Michael of Notefolds.com tells you the exact sizes of paper you will need for construction of the easel and matting. He made it so easy I had to make one.

Video Tutorial
 
Out-Take
My background took off, dead pine needles and leaves continued to drop into the photo area and my card kept blowing shut. In fact I couldn't keep my card completely open for any shot. Funny!
Nice Fall color in the background though :)
  Happy Crafting!
 post signature