Showing posts with label Craft. Show all posts

Monday, November 30, 2015

Make Your Own Rustic and Adorable Country Inspired Wood Slice Ornament


Make use of those broken branches other than in the bonfire! :)

Crafting your own holiday decorations allows you to personalize your decor and gives you the opportunity to create inexpensive gifts and keepsakes to be treasured for years to come. The holiday season can become quite stressful and research shows that being creative and finding a craft to enjoy is not only a natural way to relax, but it's great for brain health. 

So take some time for yourself this busy season, roll up your sleeves, create and relax.

This is just the beginning of the ideas for making your own wood-slice ornaments and other projects.

Stick around for more!

Below, you will find a Materials List, detailed Project Instructions, and a Sneak Peak of some of the future projects coming up. 
Please read through the instructions prior to starting your project.


NOTE: If you do not have all the materials and tools used in this project you may be able to substitute things you already have on hand. For example, if you do not have clear stamps and ink you can always use a black permanent marker to draw the plaid lines on the elk and use craft paint or markers to color in the squares. If you don't have any wood to use, you can find pre-sliced wood online, but it can be expensive. Check with your friends, family and neighbors. 

Materials and Tools List:
- Ranger Archival Ink in Jet Black for plaid on elk
- StazOn Ink in Timber Brown for sentiment
- Rubber Stampede Ink in Green for elk's plaid coat
- Rubber Stampede ink in Scarlett for elk's plaid coat
- Tim Holtz Distress Ink in Vintage Photo for elk fur
Tim Holtz Distress Ink in Peeled Paint for trees
- 4" wood-round
- Creatology Christmas Wood Stickers in trees and elks 24 piece sets
- Glossy Accents
- White acrylic Craft Paint
- A thin tool or paperclip opened up
- A strong glue made for crafting
- Pine Trees Hampton Art Stamp and Die Set (SCO718)
- Snowman Hampton Art Stamp and Die Set (SCO703)
- Recollections blender pen to fill in plaid on elk with ink
- Clear stamp block
- Twine

Preparation 
- Make sure to sand your wood-round smooth
- Drill a hole into the top of your wood slice, but be careful not to get too close to the edge where you can break through.

Project Instructions

Step 1 - Stamp your wooden trees with the patterned tree stamp set. The stamps will not cover perfectly and this is fine, just line them up the best you can. When you're done stamping, take the same green ink and a sponge to darken the edges of the tree. This will blend in where the stamp and wooden tree didn't match up. After doing the edges lightly color the rest of the tree green. Use brown ink for the trunk of the trees.


Step 2 - Stamp your wooden elk with the plaid tree stamp. Use a piece of paper to cover the legs. Place the tree sideways with the top of the tree facing your left hand. The elk should be facing left as well. Use the black archival ink or an ink like StazOn in black on your tree stamp so you don't have any smearing when you add the color to your elk later. Color the blocks on your elk and then finish up with making the head and legs brown and the antlers gold. 

Step 3 - Once your trees and elk have been colored, top coat them with Glossy Accents to seal the ink. Not only does this make the ornament easier to clean later, but it also keeps the ink from bleeding into the white that you'll be adding later as well as protects any surfaces the ornament may come in contact with. Let it dry for at least a few hours. I usually just let my pieces sit overnight.

Step 4 - Sit your trees and elk onto you wood base where they will be glued. DO NOT glue them on now. This is just to make sure you line up your sentiment (Let It Snow) correctly in the open space between the trees. Place ink on your sentiment stamp, move the trees and the elk with your other hand and then place your sentiment.

Step 5 - Place glue on the back of each tree and glue into place. Since the tree behind the elks face is sitting partly on the tree behind it I glued a couple of small pieces of wood to the back of the front tree to make it lay flat. Then I glued some stabilizing wood on the elks buttocks too. This keeps everything flat and much easier to glue. Craft foam or thick glue dots could also work.


Step 6 - Use the tip of a small tool, paintbrush handle or paperclip to paint the snow on your ornament. Dip just the tip into your white acrylic paint and carefully drag along the edges of the trees and antlers of the elk. Then use the same tool to make snow dots all over your ornament and snow drifts along the bottom of your trees and elk. Let dry

Step 7 - I used strings from burlap to hang my ornament, but you can use anything such as ribbon, string, yarn or wire.


Congratulations! You just made an adorable ornament to either give as a gift or keep for your own decorating. 


Here's a glimpse of some of my other Christmas projects.


#CraftForBrainHealth  #aNaturalWayToRelax  #TheNewYoga


Happy crafting and thanks for stopping by!
post signature

Thursday, February 19, 2015

Handmade Card for a Wedding: The Happy Couple

Hello crafty friends!
Today I'm sharing an embossed white, silver and black card that I embellished using stickers and ribbon.

During the month of December I won a prize for a challenge I entered and included with the awesome rubber stamp set I received were a couple of sheets of foil stickers. I hadn't used stickers much before, aside from adhesive backed gems, but the foil stickers were so pretty I began incorporating them into my projects. 


Now when I go to the craft store I look at the stickers too and that is how I found the gorgeous silver butterflies by Jolee's Boutique that I used on my card. In fact one thing I realized while looking at the 3 dimensional stickers is that I can learn what steps to take to make specific embellishments and when I need a card quickly, I can make a beautiful one without having to produce every detail myself.
I used Recollections Adhesive Rhinestones to make the butterfly trails.

To make the sentiment I used Sticko stickers and I added a rhinestone to the engagement ring. To make the label shape I used Spellbinders Labels Eleven (S4-246). After making my die-cut I used black Rubber Stampede ink around the edges and then to get a very deep black defined line around the edge I finished it off with Ranger Archival Ink in Jet Black. 

I used the Darice Butterflies embossing folder to make the decorative background and on the other side of the card I used Cuttlebug's Polka Dots Page embossing folder.
Since the theme of my card is butterflies I decided to add a bow that also gave that feeling. The white bow in the background is actually two bows hot glued together and then I glued a small bow on to the front of them.

Supplies List
Click on photo to enlarge
Happy crafting and thanks for stopping by!
post signature

Tuesday, February 10, 2015

Handmade Greeting Card: Celebrate You Today

Hello crafty friends!
This has been a heck of a week, but I managed to make at least one card in some pretty colors with a lot of bling. My favorite color combinations involve green (pink and green, blue and green, purple and green) so this card, with it's bright yellow-green accents and shades of purple, is right up my alley.
The gorgeous paper is from the DCWV Violet Leaf tablet. To make the sentiment I used one of the Spellbinders Valiant Honor Card Creator dies, made two die-cuts (one on purple paper and the other on white) then I cut some of the edges off the white die cut, used two green inks to color it and adhered it to the purple one. 
For the pretty purple ribbon flowers running up the left side I cut the mesh off the back of a pre-made dimensional ribbon and only left mesh were the ribbon flowers attach.
Supplies List

Happy crafting and thanks for stopping by!
post signature

Saturday, January 17, 2015

Handmade Birthday Card: Pretty in Pink

Hello everyone!
Amidst some recent life challenges I've managed to get back to crafting and make a card. What more can we do but move forward when hit with something and what better way to do it than relaxing with some pretty paper and embellishments. :)
I wasn't sure what I wanted to do for this months challenge over at Sketches4All and I was preparing to make a Valentines Day card when I got sidetracked by the floral paper my daughter bought me for Christmas. As soon as I saw the paper, I knew what I wanted my challenge to be and what I wanted to make. I love those moments of inspiration. Now I have a beautiful card to give someone or sell in my shop.

I only have two 6" x 6" sheets of this particular floral paper and want to use it for multiple projects so I used it sparingly as accents on my card.

I don't own an embossing folder to make a lattice background so I used my Martha Stewart Scoring Board to make a lattice look. 
I took a 6" x 6" piece of white cardstock and lined up the top left corner and bottom right corner on the 6" line on my scoring board and made lines every inch to the right and left of that center line. Then I turned my cardstock, lining up the top right corner and bottom left corner on the 6" mark and repeated the same process. 

I then cut the cardstock in half, saving the other half for a later project. 

To make my pink dots I dipped a knitting needle into light pink acrylic paint and lightly touched my paper where the scored lines cross.

I made my sentiment using a Sizzix die and white cardstock of which I used ink to color. 

Note: I've only used my phrase die on paper and only about five times and not once has it cleanly cut out the phrase for me. I'm not sure why, but even shimming it and running it through my die cutting machine multiple times before removing the paper has not worked. I end up having to cut my phrase out with an X-acto knife and that does not make me happy at all.
To make the corner a little fancy I lined the underside of the striped paper with the floral paper by just cutting a small triangle and taping it in place. Underneath, I used a piece of a die-cut shape cut from white cardstock.

Aside from a couple of bumps in the road this was an easy card to make and worthwhile.

Materials List
American Crafts Dear Lizzy's Polka Dot Party 6x6 inch
DCWV The Basics Stack (double sided) 6x6 inch
Core'dinations White Cardstock
StudioG pigment ink (WM0813)
Sizzix Phrase Happy Birthday #3
Spellbinders Die D-Lites Flutters
 Jolees Boutique Bling Stickers - Pearl Flower Gems
Cricut Cuttlebug Flourish Emblem 2002208
Offray translucent ribbon
Lace Trim
Happy crafting and thank you for stopping by!
post signature

Tuesday, December 16, 2014

DIY Air Freshener: Orange and Clove Pomander Balls

Hello everyone!
Today I'm sharing a quick craft to make your house smell holiday fresh without being overwhelming to sensitive noses. 

My husband is very sensitive, allergic in some cases, to strong scents like heavy perfumes and heavy indoor air scents such as sprays. Yet, even if you don't have someone in your home with a sensitivity, Pomander Balls can still be a great add-on to your holiday aroma. 
I had a few oranges left that were aged beyond wanting to eat them. So instead of throwing them out, I made them useful for the holidays.
All you need is citrus fruit, some whole cloves and a toothpick or anything to poke small holes with. I chose a knitting needle that I use for crafting and it worked great.

Just poke holes in an orange and insert a clove in each hole. You can even make a design with your cloves if you want to place them in a bowl for decoration. The oranges won't rot as the cloves will just dry them out.


After I was finished placing my cloves in the holes I wrapped my orange in some decorative tulle and added twine to tie it together.
Now I can sit them in a bowl or hang them.

Enjoy your natural air freshener!

Happy crafting and thanks for stopping by!
post signature

Wednesday, December 10, 2014

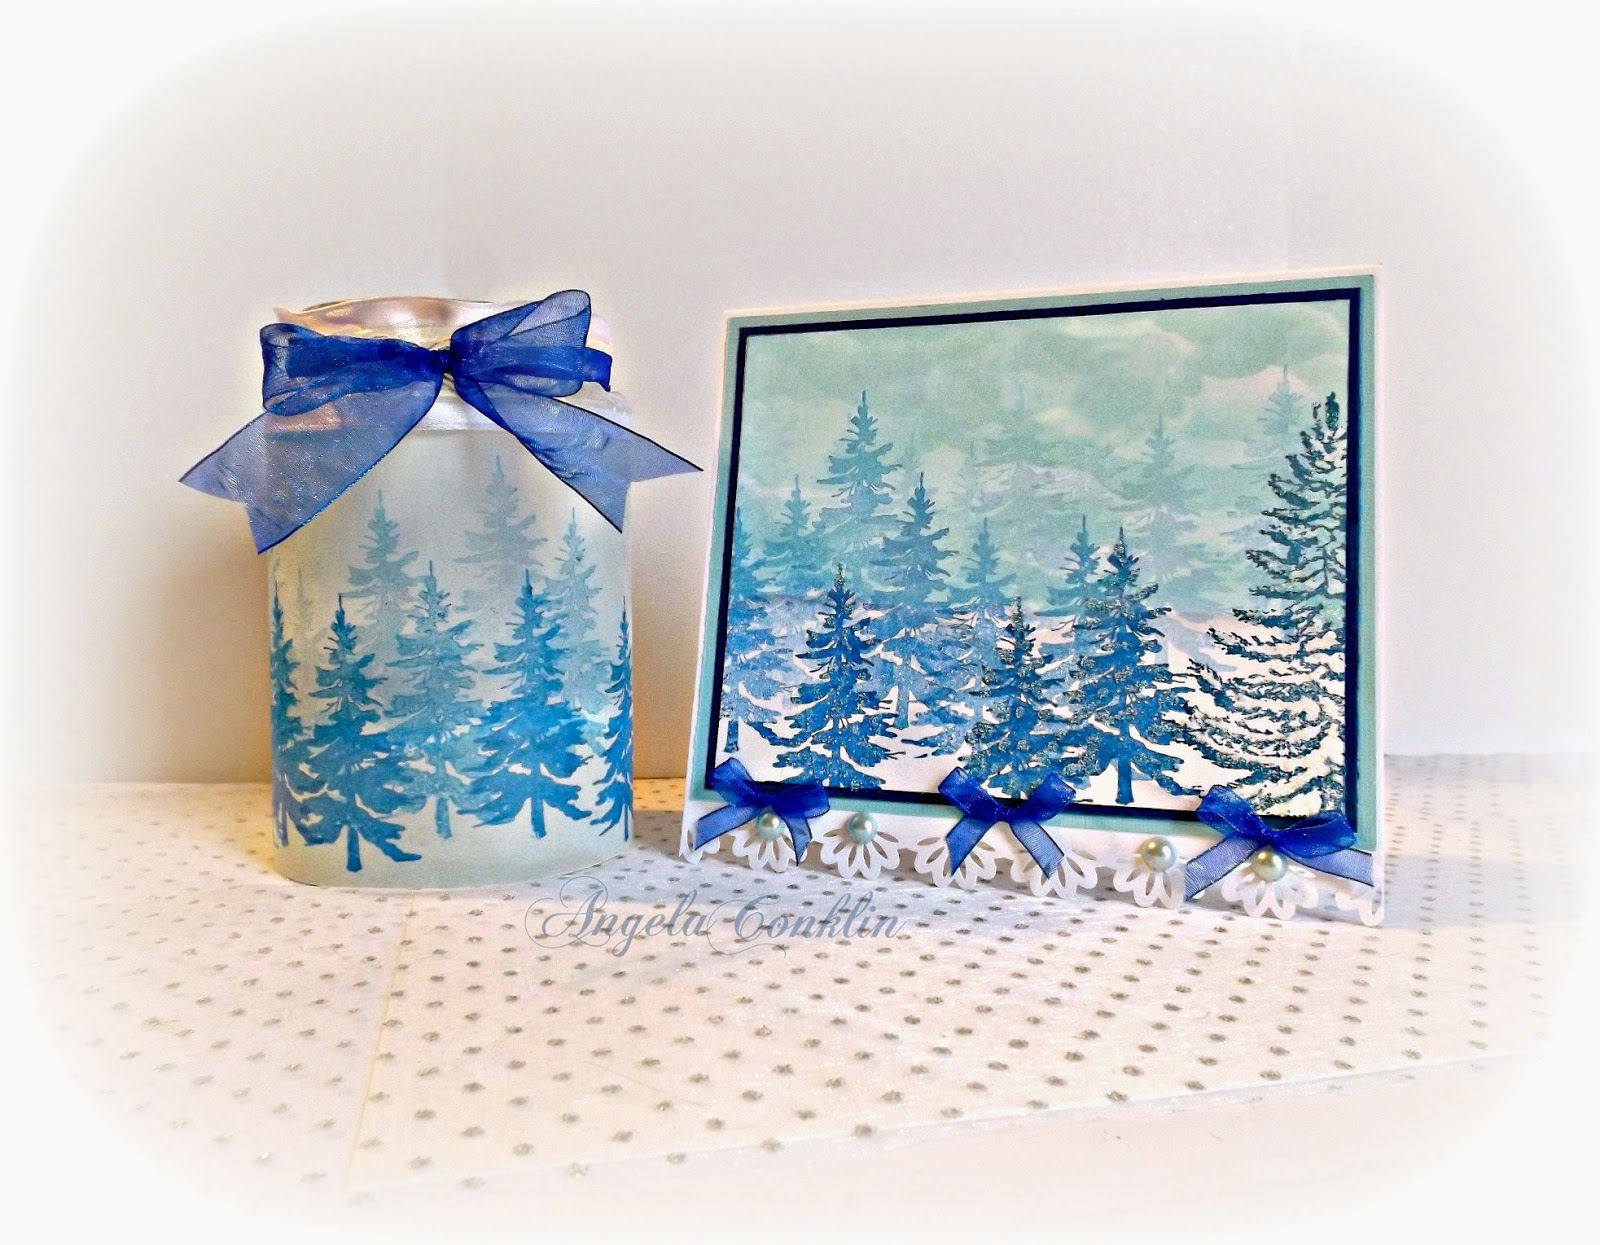
Repurposed Jar Craft: Winter Landscape Card and Candle Gift Set

Hello everyone!
 
Today I'm sharing a card and candle gift set that I made using a spaghetti jar, some translucent paper, white cardstock, two of my favorite pine tree stamps, and blue and turquoise ink.
 
I love trees, so working with these stamps put me in my happy place. I also enjoyed the challenge of making the sky look heavy and wintery. 
When the candle is lit is gives a beautiful glow, like the sun is shining through the faded trees in the distance. 
 
How to make the candle

1. Gather your translucent paper, pine tree stamps, and blue ink.
2. Measure your jar and cut your paper to wrap around it.
3. Take your small tree stamp and perform Generation Stamping with your blue ink. If you don't know what Generation Stamping is, the videos below will show you how it works. Make sure to overlap your trees a little to give them depth. To get the best look make your darkest trees closest to you and toward the bottom of your paper and the trees should become lighter as they move further away.
 (beginning at 5:00 for the tree stamping)  

4. Adhere your finished paper to your jar. I used Mod Podge on the back of the jar right where the paper comes together to hold it in place.
5. Using (1 1/2" wide) sheer white ribbon with wire edges, measure to see how much you need to go around the neck of the jar.
6. Once you have the correct size piece of ribbon cut, use a needle and thread to do a running stitch down the center of the ribbon leaving a couple inches of thread hanging out at both sides. The running stitch does not have to be even or neatly done. You will not see it in your finished project.
The extra thread you left hanging on each end of the ribbon is what you will use to tie your ribbon tightly to your jar to keep it in place. I decided to use ribbon in this way because it covers the top edge of the translucent paper and adds to the overall look of the candle.
7. Take your blue (3/4" wide) sheer ribbon, fold it in half, and tie it around the neck of the jar. You will unfold the ribbon just at the front to make the bow.

 How to make your card

I made my card a size that is not common so if it were to be placed as a set on a mantel or table, the card would look balanced with the size of the candle. There are some odd measurements, but each measurement can easily be rounded to the nearest quarter inch.

1. Gather your white, light turquoise, and deep blue cardstock.
Measurments of Cardstock
White 
6 10/16"w x 12"h
6"w x 4 12/16"h
Light Turquoise
6 1/2"w x 5 1/4"h
Dark Blue
6 3/16"w x 5"h 

2. You will be using the same blue ink for the trees that you used on the candle as well as a light turquoise ink for the sky.
3.Start by taking a scrap piece of cardstock and ripping two pieces from it. Mine were about 6 inches wide. Don't try to be neat about it since these will be used as your mask for sponging your sky and clouds, therefore hills and valleys are good.
4. Using your 6"w x 4 12/16"h white cardstock, take your ink and sponge, and make a swirling motion along the edge of the paper. Always start on your ripped piece with your sponge and work into the actual image your making. This will keep you from getting gobs of ink that are too dark on your card. Repeat, changing the position of your paper and leaving some lighter spots that will become the clouds. Take the sky about half way down your paper.

The video shows how to make snowbanks, but it's the same technique I used to make the sky.  


5. When your sky is done it's time to start placing your trees. Refer to the directions above for the candle on how to utilize Generation Stamping.
6. Once you're finished with your trees, place little dabs of Glossy Accents on your darkest trees in the front and then add some glitter to them to make them stand out.
7. Fold your 6 10/16"w x 12"h white card base in half (6" mark).
8. Border punch the front and back bottom edges of your card. 
9. Adhere your light turquoise mat on your white card base then your dark blue mat on top of the turquoise one.
10. Add your new image centered on your dark blue mat.
11. Add flat back pearls to your scalloped edge and blue bows


Supplies
Happy crafting and thanks for stopping by!
post signature

Monday, December 8, 2014

Handmade Card: A Joyful Blue and Silver Christmas

Hello everyone!
 
I'm working with one of my favorite papers today from the DCWV Winter Solstice Stack. I was constantly skipping over this particular sheet of paper because I love it so much that I didn't want to use it. I just like looking at it. That probably sounds ridiculous, but since I usually add a lot of layers to my cards or at least a lot of die-cuts and embellishments, I didn't want to cover this paper up.

Well today I bit the bullet and you will probably notice that I left this card quite plain compared to my norm.
The scene is just too cute and the on rest of the 12'x12" sheet that this came from is a snowman with a sled. He's being used to make another card as I try to produce them quickly.
 
Instructions to make this card:
1. Cut your paper
Two pieces of white cardstock
  • 6 1/2"w x 11"h (Fold at 5 1/2")
  • 5 1/2"w x 4 3/4"h
Two pieces of dark blue cardstock
  • 6 1/4"w x 5 1/4" h
  • 5 1/4"w x 4 1/2"h
Two pieces of decorative cardstock
  • 6"w x 5"h
  • 5"w x 4 1/4"h (Cut out the area that you want as your scene)
2. Tape and stack your cardstock (biggest to smallest piece) centering each on the one below it.
  1. 6 1/2"w x 11"h (Fold at 5 1/2")
  2. 6 1/4"w x 5 1/4" h
  3. 6"w x 5"h
  4. 5 1/2"w x 4 3/4"h
  5. 5 1/4"w x 4 1/2"h 
  6. 5"w x 4 1/4"h 
3. Add your embellishments 
  • Bow - I used hot glue to attach my bow)
  • Rhinestone Mesh - One strip of rhinestone mesh at the bottom of the card (I used Glossy Accents to glue this into place)
  • Cut a small piece of the rhinestone mesh to hang your sentiment from. I hot glued mine in place just at the very bottom of the center of the bow.
  • Sentiment - I made my sentiment by using a pre-made cardboard sentiment from an old gift tag I got on clearance, but you can use a die, make a small label, or stamp your sentiment on. The sky's the limit. To color my sentiment I used light blue embossing powder that has a little sparkle in it.


Supplies


 Happy crafting and thanks for stopping by!
post signature