Showing posts with label handmade. Show all posts

Friday, January 22, 2016

Make a Beautiful 3D Butterfly for Your Handmade Greeting Card

Happy Friday morning!
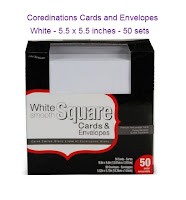
Today I have a greeting card made from the gorgeous Kirby Teesdale Paper Pack by The Paper Studio and Core'dinations Cards and Envelopes set. I have also included, a short tutorial to show how to make the 3D butterfly, and a materials list so that you can make your own card, but first things first.

Hope everyone is warm. It's freezing here in Western Pennsylvania and my furnace hasn't stopped running. Although, I have really enjoyed the beautiful snowflakes floating past my windows. Just as long as I don't have to go out into the snow, I can appreciate how lovely it looks. 

Speaking of looking lovely, below is paper that I will be adding to my "All-Time Favorite Papers" list. The colors are very soft and the designs are beautiful. I love the look of the paper so much that I wanted to bring an element of it to life. 

Card measures 5.5in x 5.5in and is decorated with paper from
Paper Studio's Kirby Teesdale Paper Pack
Matching paper was added to the inside of the envelope. The paper goes about half way down the inside and is only adhered at the top. Anything more is not necessary. I used a corner rounding punch and placed the top edge of the paper just under the glue strip of the envelope.


To give the white cardstock and sentiment a little color I lightly sponged them with Tim Holtz Distress Ink in the colors Victorian Velvet and Tea Dye. Glossy Accents was used on the sentiment and on both large butterflies to further accentuate them.


Adhering a three dimensional butterfly and a swirl of adhesive pearls was the last touch.


Materials List
Kirby Teesdale Paper Pack by the Paper Studio
Core'dinations White, Smooth, Square Cards and Envelopes sets

Tools List
Paper-cutter
X-Acto Knife
Adhesive
Black Sharpie (fine tip) 
Sizzix Thinlits Sentiments (660218)
Martha Stewart corner rounding punch
Glossy Accents

Card Assembly
White base card (5.5in x 5.5in)
Pink mat (Just 1/8 of an inch bigger than the front of the card)
Front of card (5.25in x 5.25in)
Instructions for Butterfly (This is your last step when making this card)

1) Use an X-Acto knife to cut out the same butterfly from another sheet of paper. You'll want to be careful to keep the butterfly's head intact, but there is no need to cut out the antenna. Just leave them behind.

2) I decided to draw over the black lines of the butterfly's wings with a black Sharpie marker to make the lines darker and stand out more.


3) Keeping the body of your butterfly flat, bend the wings into the shape that you would like them to be in when your card is finished. 

4) Now flatten out the wings a little bit so you can put your Glossy Accents on without it sliding off the wings. Bending the wings now will make it easier to move and shape them once the Glossy Accents is dry.

5) When the butterfly is completely dry go ahead and very gently shape the wings. Be careful not to crack the shiny coat by bending them too much.

6) Place adhesive only on the butterfly's body and adhere it right on top of the same butterfly that is on the front of your finished card. 


That's it!


NOTE: There is another way to achieve the 3D look. Before assembling your card, just cut around the wings of the butterfly you want to stand out. Then shape the wings and add Glossy Accents. No need for a second butterfly. Here is a card that I did using that technique.


You can find this card here.

Happy crafting and thanks for stopping by. Stop back again for new projects!

Tuesday, December 8, 2015

Bring Nature Indoors with these DIY Wood Slice Snowflake Ornaments

These do-it-yourself ornaments are fun, simple and inexpensive to make and will give your tree a rustic touch. They also make great gifts, wintry tags, and name plates for a winter wedding.  

Tools and Materials:
  • Wood slices (2 1/2" diameter)
  • Drill (to make the holes for the twine in the wood slices)
  • Bag of wooden snowflakes
  • Rubber Stampede Ink in Fresh Mint (any light bluish color will do)
  • Colorbox Ink in Frost White (to lightly sponge over the Fresh Mint color)
  • Glossy Accents (to cover the snowflake once it's colored)
  • Strong glue to attach the snowflake to the wood slice
  • Twine to hang the ornament

Directions:
  1. Use a sponge to apply a coat of Fresh Mint colored ink to one side of your snowflake. 
  2. Sponge the white ink over the top of your Fresh Mint ink. Don't try to completely cover the bluish ink, you're just trying to give the snowflake an icy appearance.
  3. Add a coat of Glossy Accents over the ink to give the snowflake a shine. You may notice the white ink begin to swirl which is just an added bonus. Allow to dry.
  4. Place glue onto the unfinished back of your snowflake, center on your wood slice and adhere. Let dry overnight.
  5. Use your twine to hang your ornament.


Note: If you don't have ink or want to make this a family project with smaller children you can easily substitute markers or acrylic paint to color your snowflakes. The ink just gives your snowflakes more depth in color and has a softer appearance.

Check back for more projects and tutorials.

Happy Crafting and thanks for stopping by!
post signature

Thursday, February 19, 2015

Handmade Card for a Wedding: The Happy Couple

Hello crafty friends!
Today I'm sharing an embossed white, silver and black card that I embellished using stickers and ribbon.

During the month of December I won a prize for a challenge I entered and included with the awesome rubber stamp set I received were a couple of sheets of foil stickers. I hadn't used stickers much before, aside from adhesive backed gems, but the foil stickers were so pretty I began incorporating them into my projects. 


Now when I go to the craft store I look at the stickers too and that is how I found the gorgeous silver butterflies by Jolee's Boutique that I used on my card. In fact one thing I realized while looking at the 3 dimensional stickers is that I can learn what steps to take to make specific embellishments and when I need a card quickly, I can make a beautiful one without having to produce every detail myself.
I used Recollections Adhesive Rhinestones to make the butterfly trails.

To make the sentiment I used Sticko stickers and I added a rhinestone to the engagement ring. To make the label shape I used Spellbinders Labels Eleven (S4-246). After making my die-cut I used black Rubber Stampede ink around the edges and then to get a very deep black defined line around the edge I finished it off with Ranger Archival Ink in Jet Black. 

I used the Darice Butterflies embossing folder to make the decorative background and on the other side of the card I used Cuttlebug's Polka Dots Page embossing folder.
Since the theme of my card is butterflies I decided to add a bow that also gave that feeling. The white bow in the background is actually two bows hot glued together and then I glued a small bow on to the front of them.

Supplies List
Click on photo to enlarge
Happy crafting and thanks for stopping by!
post signature

Tuesday, February 10, 2015

Handmade Greeting Card: Celebrate You Today

Hello crafty friends!
This has been a heck of a week, but I managed to make at least one card in some pretty colors with a lot of bling. My favorite color combinations involve green (pink and green, blue and green, purple and green) so this card, with it's bright yellow-green accents and shades of purple, is right up my alley.
The gorgeous paper is from the DCWV Violet Leaf tablet. To make the sentiment I used one of the Spellbinders Valiant Honor Card Creator dies, made two die-cuts (one on purple paper and the other on white) then I cut some of the edges off the white die cut, used two green inks to color it and adhered it to the purple one. 
For the pretty purple ribbon flowers running up the left side I cut the mesh off the back of a pre-made dimensional ribbon and only left mesh were the ribbon flowers attach.
Supplies List

Happy crafting and thanks for stopping by!
post signature

Monday, February 2, 2015

Handmade Valentine's Day Card: Love is in the Air

Happy Groundhog Day!

Today I'm sharing a Valentine's Day card and a link to the challenge I made it for, then on to what Punxsutawney Phil had to say this morning.

First things first. There's a lot of inspiration over at Sketches4All. I made the card below for the February DT Challenge from a sketch. If you prefer to do scrapbook layouts, there's a sketch for that too, so come join us and have some fun. 

There's nothing that says Valentine's Day to me more than seeing the colors red and pink together and roses and hearts together. So once I saw the sketch I wanted to incorporate those ideas as well.  

To get that pink striped paper to look like it's part of the white paper beneath it I used a border punch on the bottom edge of it and then taped it in place before embossing it with the heart embossing folder.

The red stripe is made from the same red cardstock I used to mat the front. To dress it up I placed silver, vine shaped, tape on it.

To make the pink border on the doily heart I cut off the edge of a pink colored heart and glued it onto a white one. 

Supplies List 

Punxsutawney Phil says we have 6 more weeks of Winter. From the way it looks right outside my front door and all the snow coming down I would have to agree with him this year.

Pictured below is right out my front door. There should be a sidewalk and a road. You can see where my husband shoveled the sidewalk recently and it's being covered back up, but the road has vanished and has been gone for quite a while. My home is marked as a historical house and the wooden sign out front is half under snow. Love it!  
 
Happy crafting and thanks for stopping by!
post signature

Saturday, January 17, 2015

Handmade Birthday Card: Pretty in Pink

Hello everyone!
Amidst some recent life challenges I've managed to get back to crafting and make a card. What more can we do but move forward when hit with something and what better way to do it than relaxing with some pretty paper and embellishments. :)
I wasn't sure what I wanted to do for this months challenge over at Sketches4All and I was preparing to make a Valentines Day card when I got sidetracked by the floral paper my daughter bought me for Christmas. As soon as I saw the paper, I knew what I wanted my challenge to be and what I wanted to make. I love those moments of inspiration. Now I have a beautiful card to give someone or sell in my shop.

I only have two 6" x 6" sheets of this particular floral paper and want to use it for multiple projects so I used it sparingly as accents on my card.

I don't own an embossing folder to make a lattice background so I used my Martha Stewart Scoring Board to make a lattice look. 
I took a 6" x 6" piece of white cardstock and lined up the top left corner and bottom right corner on the 6" line on my scoring board and made lines every inch to the right and left of that center line. Then I turned my cardstock, lining up the top right corner and bottom left corner on the 6" mark and repeated the same process. 

I then cut the cardstock in half, saving the other half for a later project. 

To make my pink dots I dipped a knitting needle into light pink acrylic paint and lightly touched my paper where the scored lines cross.

I made my sentiment using a Sizzix die and white cardstock of which I used ink to color. 

Note: I've only used my phrase die on paper and only about five times and not once has it cleanly cut out the phrase for me. I'm not sure why, but even shimming it and running it through my die cutting machine multiple times before removing the paper has not worked. I end up having to cut my phrase out with an X-acto knife and that does not make me happy at all.
To make the corner a little fancy I lined the underside of the striped paper with the floral paper by just cutting a small triangle and taping it in place. Underneath, I used a piece of a die-cut shape cut from white cardstock.

Aside from a couple of bumps in the road this was an easy card to make and worthwhile.

Materials List
American Crafts Dear Lizzy's Polka Dot Party 6x6 inch
DCWV The Basics Stack (double sided) 6x6 inch
Core'dinations White Cardstock
StudioG pigment ink (WM0813)
Sizzix Phrase Happy Birthday #3
Spellbinders Die D-Lites Flutters
 Jolees Boutique Bling Stickers - Pearl Flower Gems
Cricut Cuttlebug Flourish Emblem 2002208
Offray translucent ribbon
Lace Trim
Happy crafting and thank you for stopping by!
post signature

Friday, January 2, 2015

Scrapbook Layout: New Year's Goals

Happy New Year everyone!
We have our January DT Challenge posted at Sketches4All and would love you to join us. For the challenge I decided to make a layout that would represent what is going on in my life right now and my thoughts for the new year.

I've had some health problems that are still being worked out which is why I haven't posted since right before Christmas. Although on a good note I was released from the hospital so I could be with my family for the holidays. My recent experiences are the basis for my focus on health. I've already made major changes in my lifestyle so my goals-list is centered around being as strong as I can and to keep pushing forward while enveloped in the love and support of my family. 

All the paper I used for my layout is from the Colorbok Rosewood 12"x12" tablet. I think this paper is so pretty and it was very inexpensive at Walmart.
The health challenge I'm encountering right now has to do with my heart so of course I had to make a pretty heart. 

The first paper of the Colorbok Rosewood tablet is pre-made letters and numbers which were perfect to use for my layout.

To make the word "health" pop as well as the numbers for my square 2015 sign...
1) I was careful to cut out letters/numbers that would be a different color from the letter(s) next to it
2) I adhered each letter to a reddish strip of paper. 

3) I drew sewing stitch marks on the edges with my Sakura White Gel Pen that I excitedly received for Christmas.
4) To decorate the edges of my word I used my Martha Stewart Blooming Vines border punch to make a couple of leafy sections that I adhered to the back of my strip.

I made the clock using the Sizzix Alterations Weathered Clock die, Colorbok chip board and deep green textured paper from DCWV Neutrals Cardstock Stack. 

Note: The easiest way to add the green layer to your chipboard is to glue or tape the chipboard and paper together before running it through your die cutting machine. 

The little plastic flowers are Jolee's Boutique Bling Stickers. 

The awesome black words are epoxy stickers from Heidi Swapp.

Happy crafting and thanks for stopping by!
post signature

Monday, December 1, 2014

Repurpose or Alter an Old Candle Jar and a Soup Can

Hello crafty peeps!
I was just thinking about how much I love this time of year and it's about the only time I will pay any attention to television commercials. I think one of my favorite commercials last year was the one put out by Glade with Jordin Sparks singing This is My Wish, Holiday AnthemShe has a beautiful voice and the song is very uplifting both in its words and notes. I went to Glade's YouTube channel and couldn't find the "Jordin" version anywhere. Kind of weird, but fortunately I found it somewhere else and could listen to it.  
 
I did my Christmas shopping earlier this year so I'm concentrating on finishing up my Christmas cards and doing some projects for small favors and gifts. My daughter's 18th birthday is coming up in a couple of weeks too. December is always a crazy, but exciting month.
 
I've got two projects to share with you today. Both were done for the Sketches4ALL 5th Anniversary Challenge Party. If you're interested in an altered/repurposed challenge, I just started one over at S4All today. The challenge will run until December 31st. There are also many other fun challenges from our design team members that are going on right now and an awesome prize for the winner of the 5th Anniversary Challenge Party. So don your creative energy and come on over!
 
I started out with an empty candle jar for my first project. This particular jar has a nice shape, so I didn't want to cover it all up. It also has a wide and straight area around the center so it was perfect for adding paper to.  
 
 
1. Measure the surface of the jar where you want the paper to cover (find the width and height) and cut your clear cardstock. 
I chose to use the clear cardstock so the light from the candle would show through better than regular craft paper, but either will work. 
2. Emboss your paper.
My cut piece was about 10" long which posed an issue since the embossing folder I wanted to use (Darice - Snowflake) is only 5" long. Then it hit me to just do one end of my vellum and then do the other end. Since the snowflakes of the embossing folder are randomly placed, I could do it in two steps and there is no seam or cut off point. It worked perfectly.

3. Adhere your paper to your jar
I didn't add adhesive all the way around, but instead only along the seam on the back. I chose to use a little Mod Podge, because it dries clear and won't be affected by the heat of a candle-flame like tape or hot glue would be.

4. Embellish the jar.
I chose to use my pine branch die by Impression Obsessions. The pine branch gives a nice holiday touch and is intricate and pretty enough to stand on its own. I like a lot of embellishments, but for this particular project I wanted as much candle light to get through as possible and I didn't want to cover up the pretty embossed snowflakes.

My candle looks so beautiful lit up! In person, the clear cardstock looks just like frosted glass.
-

I ran into a problem
After I cut my pine branches I coated them with Tim Holtz Adirondack Silver Mixative, which was a mistake. While I was giving them shape by bending the branches around a knitting needle and fluffing the needles themselves the mixative began to flake off.

I chose the mixative because it's gorgeous and very reflective. I've loved it with other projects, but since it sits on the surface you cannot bend it without losing some of it. I decided not to concern myself, because any white showing just makes my branches look snowy, but I will be careful to stay aware when deciding whether it's the right choice for my next project.

To add more reflectivity and some sparkle I ran two rows of Darice rhinestone mesh around the bottom. I had considered placing ribbon here and it looked nice, but once I had the rhinestones in place there was no question that it was the best choice for this candle.

I also added a bow and a tag that says JOY. I got the sentiment from The Cutting Cafe

I love the way it turned out.
 
My second project is a tin can that will hold Hershey's Kisses. The colors I used are teal, aqua and brown which break away from colors normally associated with Christmas and winter.
 
Find a can
I raided my recycling bin and found a La Choy Chicken Chow Mein can. The label came off easily after I ran it under hot water for a minute or two and then rubbed it off with my fingers, but the blue tape on this particular can was another story. Fortunately it scraped off of the very top quite easily and I just left the rest because I knew it wouldn't show from under all the layers I would be placing over it.
 
1. Measure the can.
Begin by measuring the circumference of the can and cutting your piece of white craft cardstock to wrap around it. 
2. Emboss your paper.
I needed exactly 12" of cardstock so to make embossing easy I decided to use my 12" Cuttlebug, Polka Dot embossing folder. 

3. Adhere your paper to your can. 
I used tape. 
4. Embellish your can

 How I embellished mine:
This first step was more involved and honestly I'm not sure that I'm going to do it the same way again.
1. Make the trim for the top edge
I cut the edges (the thicker part) off of two colors of burlap. Then I placed them together so I would have a reasonably smooth edge at the top and bottom of the trim line. I got the look that I was after, but it was labor intensive and the hot glue was not kind to my fingers as I struggled to get all the little pieces to stick down. 
2. Wrap burlap around the center of your can.
I wrapped mine so the fibers were at an angle.
3. Color a 4" paper doily.
Tim Holtz Distress Ink in Tumbled Glass
4. Adhere your doily to the front of your can to frame your label.
5. Print out your sentiment
I got the sentiment from The Cutting Cafe
6. Die cut your label
Spellbinders Card Creator-Reflective Moment die pack.
7. Edge the label with ink
Tim Holtz Distress Ink in the color Vintage Photo. 
8. Add twine to the bottom edge of your white craft cardstock and decorate your lid.
I decorated the top by using another 4" doily that I colored with ink. I also added a snowflake that I got from The Cutting Cafe. It's the same snowflake that I used to make my tag (below).

9. The finishing touch
To finish the edge of the lid of the can as well as the bottom edge of the can I hot glued twine to it. I added a pine cone wrapped in some twine to make lifting the lid off easy. 

This was a very enjoyable project to do because I just went with whatever came to mind at that moment. To be creative in that way is freeing.
I can't wait to put the chocolate kisses in.

Project 1 Supplies List

Project 2 Supplies List

Thanks for stopping by and have a great day :)
  Happy Crafting!
post signature