Showing posts with label Spring Card. Show all posts

Tuesday, April 8, 2014

Tulip Birthday Card

Hello peeps! It's a gorgeous day outside here in western Pennsylvania. Just got done teaching my son to drive and I have to say although I'm excited for him and he's doing very well I can't help the need to make my seat belt a little bit tighter.

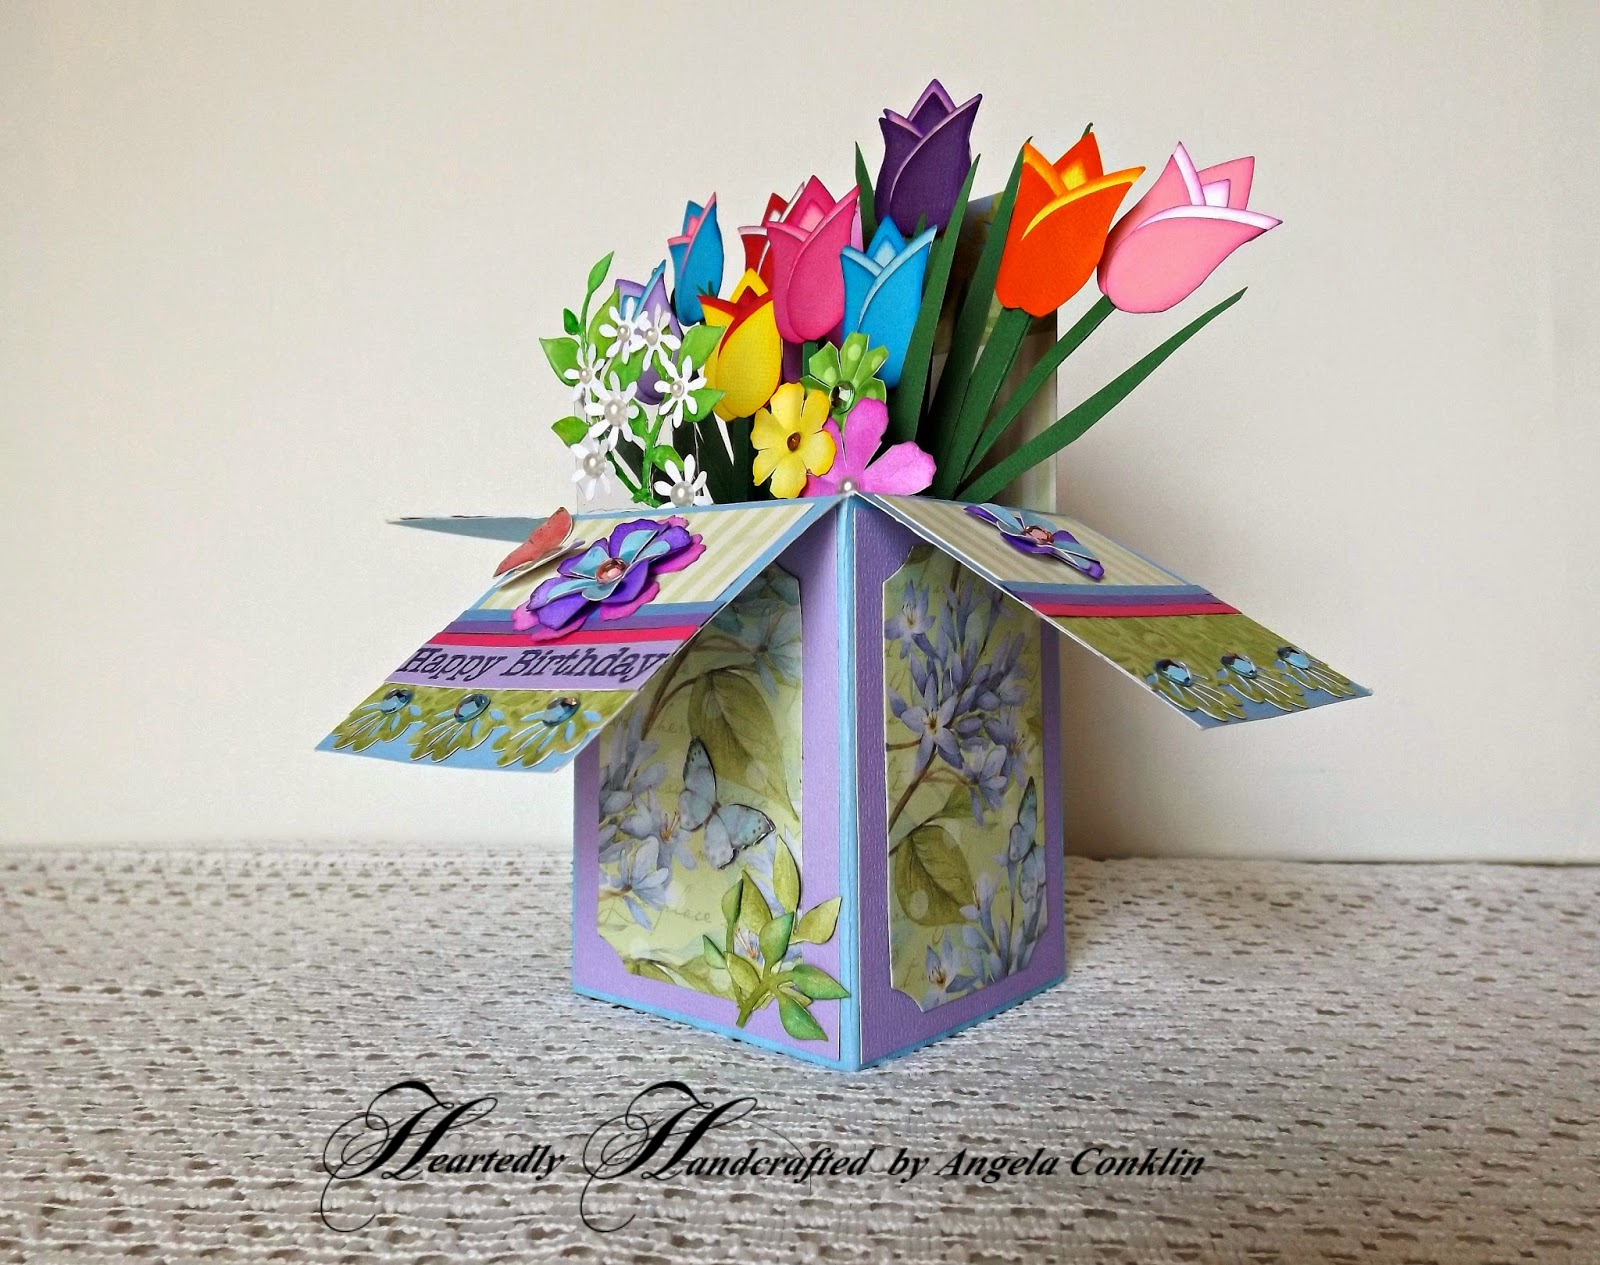
Today I want to share a card I've been working on over the past week. Each tulip has 6 petals and was hand inked. It was honestly more work than I thought it would be, but definitely worth it. I like the results of the two colors of paper used together and they're very sturdy flowers. I cut an 11 inch strip of paper and then folded them in half to make the stems. I also placed an extra inner layer of paper inside the box, basically a box in a box, so it's very solid. I free-hand cut the leaves for the tulips since in nature they would be turned different directions and would not all be the exact same shape when viewed from one direction. I wanted to place the sentiment in the bouquet, but because the flowers have stems they stick up quite high so I found that there was no where to place it without covering up flowers. My solution was to place the sentiment on the front flap which worked out quite well. This was another fun card to make and I can see myself doing quite a few more in the near future. 


#birthdaycard #cardinabox

Happy Crafting!

Tuesday, February 25, 2014

Spring Card with Watercolors

Hello Everyone! I decided to try watercolors today and colors I rarely use. Although I found it difficult to stay in the lines of the stamped image I like the effect of the bright and blended colors that I got using watercolors. I also wanted the images to pop off the page so I kept the background simple and used Glossy Accents on the flowers and butterfly and then shaped the butterfly's wings after it was dry. I didn't want the flower bouquet to lay flat so I only used tape in the middle to adhere it to the card.

I'm honestly not sure what I think of the card in general, but I do like the effect of the watercolors and Glossy Accents.


Happy Crafting with #watercolors !

Monday, February 3, 2014

Spring Center Fold Card with Quilled Dragonfly and Burlap Mat

It's all about the quilling.

Hello everyone! I want to share my funky little Spring card. A couple of weeks ago I bought a quilling tool and some quilling paper strips. I've seen some beautiful cards and jewelry online made from it and had to try it out.  The first time I tried I only made loose circles and for the second try I made some flower petals that came out all different sizes. This time the sizes were a little better so I decided to try making a dragonfly. I need quite a bit more practice getting the sizes and shapes right and it takes me about 3 minutes just to make one shape. To say the very least, I'm quite slow at it, but I like the look of it so I'm not giving up.

The quilled shapes are a little tricky to glue down since there is movement to them. So if you have any advice on how to best go about this I would greatly appreciate it. I haven't decided whether to add a sentiment to the front of my card or not, but for now it's done. 


Happy Crafting!

Saturday, February 1, 2014

Thank you Card in Chocolate and Pink

It's a dreary, cold day here in Pennsylvania, but I don't dare complain as I've been crafting away for hours already. Although I sure will be a lot happier when the sun comes out and makes picture taking easier. I took over a hundred photos of this card for a few decent ones. Thank goodness for digital cameras. I would be in big trouble if we were still dependent on rolls of film.

No sunlight in the windows led me to very tired arms; one holding the light up in the air and the other trying to steady the camera and push the button. We sure do go through a lot for a decent photo. I'm already planning on taking new photos when the sun returns one of these days, but I was too excited to wait. So here's my latest card.


 To make the tree I used the same die twice; once with the brown paper and then with the pink. I glued the two trees together slightly off center to let the pink peak out from behind on one side of it. The effect is gorgeous, especially in these two colors.

Happy Crafting!

Monday, January 20, 2014

Handmade Card for that Special Someone with Flip Down Sentiment

I can't help but laugh as I write this.
Some crafters will go to great lengths for a decent photo of their latest creation. It's very dark in my house even with the curtains open since it's a dreary, snowy day today in Pennsylvania. This afternoon I braved the cold and snow just so I could get enough light to say, "Hey, look at what I created". After freezing, because I didn't think it would take long enough to worry about putting on a coat, I slipped as I tried to move quickly back into my house. I'm fine, but the funny part was that I realized I was holding my card in the air so it wouldn't get ruined and my camera was laying on the ground (my camera is fine too). You have to have priorities. So after all that, I present to you my latest card with a flip down front to show the sentiment.

Hey, Look at what I created!


Happy Crafting!


#handmadegreetingcard 

Flower Trellis Card

There is still snow outside, but it's Spring in my craft room! After cutting out an extreme amount of gold, silver and shades of red and green over the holidays it's so refreshing to say hello to pinks, purples and the rest of the color palette. Of course you aren't stuck with any particular colors during the holidays, but those were the colors I chose to use this season and after dozens of Christmas cards I need a break. I'm also enjoying coming up with new looks using the same dies to see how much I can do with them. 


I changed my mind and replaced the button I originally used with a purple bow. Either works, but I like the softness the bow gives my card.


Materials used:
Paper
  • K&Company printed flower paper
  • Craft card-stock in deep purple, dark green, mint green and white
  • Chip-board (used under the scalloped circle to build it up)

Equipment used
Machine and Dies
  • Sizzix Big Shot
  • Sizzix "Flower, Build a Lilac" die
  • Sizzix "Branch with Leaves" die
  • Spellbinders Nestabilities dies "Lacey Circles" and "Large Circles"
Measurement for lattice was made using Martha Stewart Scoring Board Envelope Maker

Coloration
  • Rubber Stampede Ink for the flowers in blue, pink and purple
  • Leaves are edged with Rubber Stampede Ink in Dark green and colored in Tim Holtz Distress Ink "Peeled Paint"

Dry Embossing
  • Cricut Cuttlebug "Polka Dot Page" embossing folder

Embellishments and Special Effects
  • Offray craft ribbon medium purple
  • Glossy Accents to edge flower petals
  • Fabric Art Crystal Ultra Fine Glitter for lattice and flower petal edges
  • One large and one small button fitted together and tied with a string of burlap
  • Flat backed pearls were used for the center of flowers