Monday, November 10, 2014

Handmade Greeting Card - Jingle All the Way

Hello crafty peeps! Just a quickie today since I've got to get back to getting these cards and other Christmas projects done :)
 
The theme for today's post is... 
Making a card using paper that you skipped over and rejected time and time again.
So today I'm sharing my latest Christmas card with paper I skipped over. I didn't skip it because it was ugly, but just because the other papers in the stack were so much cuter, prettier or just fit the look I was going for better.
This particular paper looks so much nicer than when it was mixed with all the other papers. I may have to give this a shot with a few others. So pull one of those papers out and go for it! My supplies are listed below.
Supplies:
DCWV Winter Solstice Stack 
Darice Snowflakes embossing folder 
White Core'dination Carstock
Sizzix Snowflakes #3 Die
Fiskars Double Bubble border punch
Ribbon Trends thin, blue, sheer ribbon
Adhesive Flatbacked Pearls 
 Happy Crafting! 
post signature

Saturday, November 8, 2014

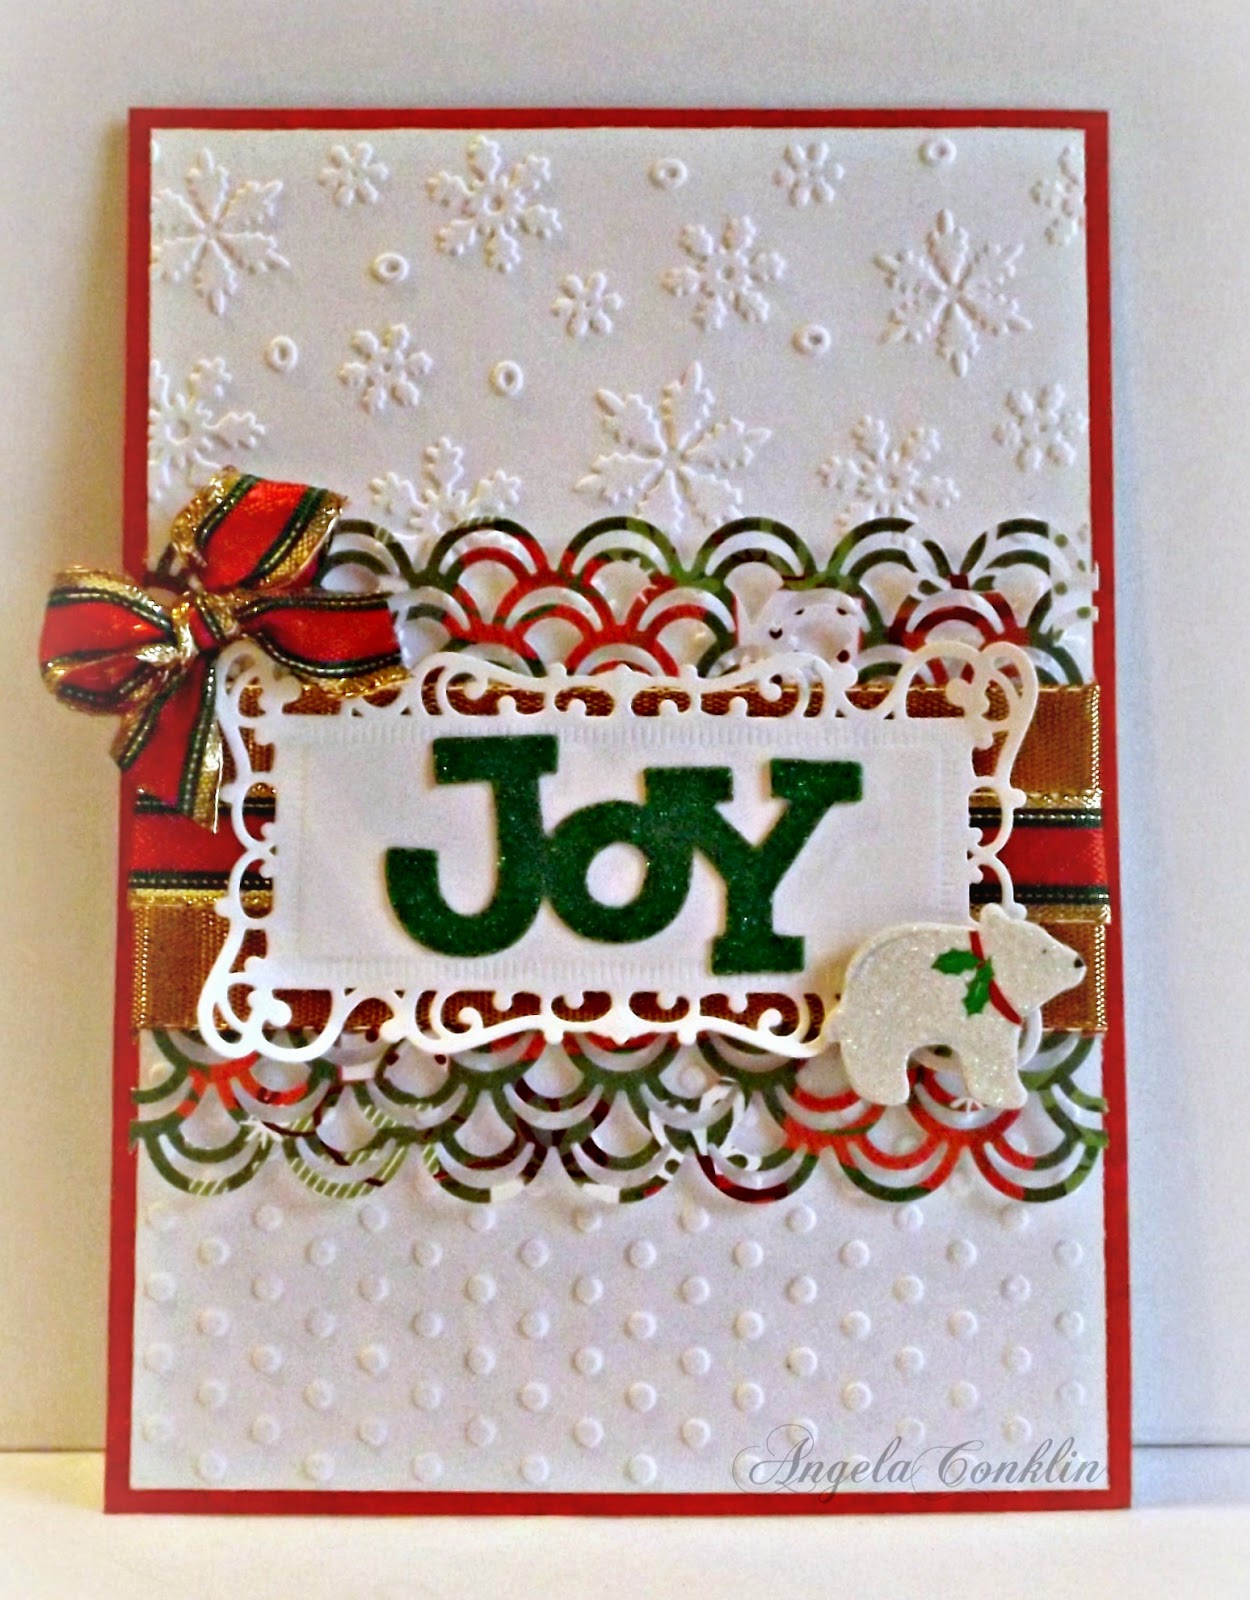
Handmade Joy Christmas Card in Traditional Colors

Hello Everyone!
 
Did you ever have one of those days when things that you normally ignore, suddenly strike you as funny? I was taking photos of cards I made and my camera kept telling me it detected a blink. This has happened other times too, but for whatever reason it cracked me up and I could barely hold my camera still. I could have used my tripod, but I had to be at uncomfortable angles to catch the little bit of light from outside. It's a gloomy overcast day today. I couldn't even hold my breath to stay still. It would just make me laugh. Thank goodness I'm alone because my family would have thought I was going crazy. Maybe I am? Maybe they do? LOL!

Anyway, I'm sharing a simple Christmas card today. There's some glitter on this one and I like that only the center is decorated with all the snowflakes in the background. I decided to make just the front of the card so that later I can decide if  I want it to be a normal side-fold card or something different. Without a card base holding it up, I had to lean it against the background.
 I cut two white panels for my card and embossed one with the Darice Snowflakes folder and the other I used the Cuttlebug Polka Dot Page folder. Then I cut a strip (about 2 inches) of Christmas paper from the DCWV Holiday Cheer stack and used the Martha Stewart Double Arches, border punch on both sides.

I then embellished the middle of the strip with wide shiny ribbon and a smaller Christmas ribbon. To make the sentiment stand out I backed JOY with a white die cut from the Spellbinders Card Creator, Reflective Moment set. Then I just added a bow and a polar bear.

A very simple card to make.


Happy Crafting! 
post signature

Simple Step by Step Instructions for How to Place a Video in the Sidebar of Your Blog

Hello bloggers and future bloggers!
 
Today I would like to show you how to place a YouTube video into the sidebar of your blog. You may have a video that you would like to showcase for techniques, ideas, or to show a little about yourself. I will also show you that you can make your video appear any size that you want.

 This is how my video appears in my sidebar.
 
First let me run through the steps, then I'll show you the step-by-step process with photos.
 
First things first.
You need to know the width of your sidebar. 
If you already know, just skip this step.
  • From your blog click on design in the upper right hand side of your blog which takes you to your dashboard.
  • Click on "Customize"
  • Click on "Adjust Widths"
  • Write down the Width of you Sidebar
  • Now you can get out of that by clicking on "Back to Blogger"

Directions for placing your video into your sidebar
  • Go to the YouTube video that you want to showcase
  • Click on Share
  • Click on Embed
  • A code box will appear. Copy that code by right clicking on it then clicking copy
  • Now go back to your blog design dashboard and click "Layout"
  • Click on "Add a Gadget"
  • Scroll down and click on "HTML/Java Script"
  • Right click and paste you code in the box
  • Change the width and height in your code to fit your sidebar (step-by-step below)
  • Save and your done!
Directions to find the width of your sidebar

On your blog, Click on "Design"

Click on "Customize"
  Click on "Adjust Widths"

Write down the Width of you Sidebar. Mine happens to be 350px
 

Okay, you got your width! Now you can get out of that by clicking on "Back to Blogger"


Directions for placing your video into your sidebar

Go to the YouTube video you want to showcase

Then click on "Share"

The screen will now look like this. Click on "Embed"

Your code that you need to right click and copy will show up in a box


Now go back to your blog design dashboard and click "Layout"


Click on "Add a Gadget"


The Gadget box will appear. Scroll down and click on "HTML/Java Script"

Right click and paste you code in the box

 Now notice the width is too large for my sidebar that is only 350px
All you have to do is change these numbers and here is how to do it so it works best.

NOTE: When I change the width to fit into my sidebar I change the height too. Otherwise my video will be a strange shape.
So to keep your video the original shape, whatever you subtract from the width must also be subtracted from the height.

My blog sidebar has a width of 350. So I will take the width from the code I copied and pasted (420) and subtract the width of my sidebar (350) from it. 
420-350=70

I can make my video the exact same size as my sidebar, but it will hang over a little on the right side. So I want to make it a bit smaller.
I subtracted 20 more from the width of my video to make it 330px instead of 350px (420-330=90).

This means that when I make the width 330px I must subtract 90px from the height in the code as well. The code shows "315 height", so I must subtract 90 from it which gives me 225px. 

My new numbers to put in will now be width "330" by height "225". So just replace the numbers in your code with your new numbers and your video will fit properly and look good.

Then click "Save"
 After you've clicked "Save", it's always best to "Preview" what you've done before clicking on "Save Arrangement" just to make sure everything worked out okay.
You're done! You have your video in your sidebar. Congratulations!!!

Happy Blogging!

post signature

Friday, November 7, 2014

Greeting Card - Happy Fall

Hello everyone!
 
Today I'm sharing a Fall themed card, although there is actually snow falling here in western Pennsylvania and it feels more like Winter. I made the card for the November DT Challenge at Sketches4ALL and liked the sketch so much that I made my card almost exactly like it. I tend to use a lot of layers, embellishments and die cut shapes so it was a nice change to just use rectangles, make my own patterned paper and use a digi from
Free Dearie Dolls Digi Stamps
.
 
 
                The Sketch
To make the brown patterned paper I used cream colored Core'dinations cardstock. I had a few clear, leaf stamps that I used to stamp leaves in different directions using Rubber Stampede Ink in orange, yellow and scarlet. Then I took Tim Holtz Distress Ink in Vintage Photo and rubbed the ink into the paper. I applied the ink generously starting from the edge and worked inward using a circular motion. Afterward I used StazOn Ink in Timber Brown and a script stamp to add words. I repeated the process to make the mat for the digital stamp, but to make it stand out a bit more I brought my leaves closer together.


To make the swirly yellow matting I used deep yellow Core'dinations cardstock in a Darice embossing folder and then lightly added Tim Holtz Distress Ink in Timber brown to make the pattern stand out. All that was left was to add some of the same ink around the edges and embellish my card. It was a fun and easy card to make and I really enjoyed making my own patterned paper.

Time to make some hot chocolate and keep warm :)

 Happy Crafting!
post signature

Tuesday, November 4, 2014

Handmade Greeting Cards - It's All About the Layers!

Hello crafty peeps! 
 
I'm so excited that I got my first challenge posted over at Sketches4All and relieved that I'm getting into the swing of things. Wow, can it be tough learning to navigate a new site, but the S4All Team is awesome and has been helping me every step of the way! Great place to share your creations!

Below are the cards I made for my challenge which is to add a lot of layers to your project.

You can find the Current S4All Challenge List here and there's a wonderful gallery to see everyone's projects.


My first card was done with my fancy die cutting frames and labels of which I love so much (materials list below).
I made the white part of the flower by taking two labels and gluing them together to make a plus sign and then I added two more of the same to fill the spaces in. I'm sure people have been doing this for quite a while and wonder why it took me so long to think of it.
 
I made my second card by using a border punch and a couple of basic cutting dies. I saw a similar card on Pinterest that inspired me and I wanted to make mine exactly like hers, because the card was so pretty, but I made it my own with some changes instead.

After matting the base card in two colors I took those same colors and cut 3 strips of each and then wrapped each one over the top and bottom of the card vertically. The size of this card is 6x6 inches, the green strips are 3/4 of an inch and the cream strips to mat the green are 1 inch wide. The punched border was added on afterward. I just lined it up with the strips.

Hope to see you and your crafty creations!

Materials:
Purple patterned paper - DCWV, Violet Leaf Stack
Green patterned paper - K&Company Susan Winget Papers
Craft Cardstock -  Core'dinations in a cream, white and light brown 
Border Punch - Ek Sucess Pointed Flower
Cutting Dies -
Spellbinders Card Creator Valiant Honor 
Spellbinders Card Creator Reflective Moment  
Spellbinders Nestabilites Lacy Circles (largest one)  
Spellbinders D-Lites Whimsical Tree 
Tim Holtz Alterations Tattered Flowers

Happy Crafting!
post signature

Saturday, November 1, 2014

Great News!

Hello crafty peeps!
Great News!
 
 
It was an unexpected and happy surprise :)

I discovered Sketches4All this past week and there are great challenges for card and layout makers. So come play along and have some fun :)
Happy Crafting!
post signature

How to Make Die Cuts a Different Shape to Match Your Image

Hello everyone! 
 
Today I'm sharing a short tutorial for those moments when you have the wrong shaped die for matting your photo, card, label, etc. Although once in a blue moon I purchase new cutting dies, I really don't want to waste my money on something I can make with dies I already have. The tutorial will show a die-cut from the Spellbinders, Card Creator - Valiant Honor pack, but you can do this with many die-cuts, even the fancy ones. I'm using a rectangular die that I want to make into a square.

Please excuse my discolored photos, I was doing this at night.
 
The first thing you want to do is make two die-cuts and then cut the inside corners out. This does not have to be precise. You just don't want a corner design sticking out from the middle of your final square. 
 
The next step is to get your photo or in this case I stamped an image onto a square piece of cardstock. It's not a perfect square since it was 4am, but it's close enough. LOL. 
 
Then sit your image below your die-cut pieces. This will give you your measurement.
 
After they match up correctly I will make a mark with a pencil in the middle of the card so it doesn't show once I'm done. By making a mark you can then remove the top die-cut and place your tape or glue on your bottom piece in the the right place and position them back together easily by lining up the edge with your mark.

Don't you hate it when you get something in the wrong position and it's stuck there forever? I do!

I made the line large and dark so you can see it. All you need is a dot.
 
Once you have your pieces connected you're ready to place your image on top and then you're done! I know where the die-cuts meet up and therefore see it and now you will too, but I showed (tested it out on) people and they never noticed. So hope this helps you out.
 
Quick tip: If you want to mat a stamped image with a solid colored paper, but don't have anything that matches, make your own. 
 
Once I'm finished with this part I can add beads, gems, rows from rhinestone mesh, etc. to fancy up the edge of the image, but you can leave it as is too. :)
 
What I used to make the image.
 
Happy Crafting!