Thursday, November 20, 2014

Lessons Learned: Ideas and Tips for Your Budget Friendly Craft Room Makeover

Hello everyone! 

If you've stopped by for the Sketches4All Challenge Celebration, click here. 

Grab a cup of coffee or hot chocolate and relax with some ideas and tips for taking your craft room from drab to fab!

If you're on a tight budget I may be able to help you move more easily through the process. You don't have to have a large craft space, in fact what I'm sharing is all about using what you already have.
 
Since posting my Craft Room Makeover in July, the pulse of activity and all the wonderful comments tell me that there are a lot of people looking to, at the very least, get organized and some wanting to completely redo their craft rooms. One particular question has popped up time and time again with a few repetitive questions right behind it. So today I would like to address them and share some of the things that I've learned along the way.
 
If you haven't viewed my video yet and would like to you can click here or find it at the top of my blog sidebar :)

Question:
"How did you make such big changes to your room and spend under $100.00"?

The simplest answer to why I didn't have to spend a lot of money is,
I didn't make big changes, but rather many small changes that made a big impact. 
 
Instead of buying new furniture or repainting the entire room I focused on what I already had and how I could change it to make it work for me. As much as the improvements I made were about the need for storage and organization, I also put my energy into working toward a room that was light and bright for taking photos and comfortable to be in.
 
There are many simple fixes and little details that can make a world of difference and require no money.

Preface:
I did not have an actual plan for redoing my room, but more of just an idea of the look that I wanted. So to save money I took the things that I already had or bought very inexpensively (such as my chair and clock) and made them fit that look.


After completing a couple of projects and knowing that I was not going to be repainting my grayed-green walls I realized the picture below encompassed the feeling, color and look that I wanted. So I used it to inspire and lead me. Having an object that you can build a room around is definitely a bonus. This was a picture that my daughter no longer wanted in her room. You can see how the green on the wall can be found in the painting and you will see the other colors in the painting used throughout my room.

My craft supplies remained in my craft room as I worked since I had to continue to craft and blog. For the makeover to go smoothly I did one area or piece of furniture at a time.

The total time it took me to redo my craft room was two months. If I were to count in days how long it took me to paint my large pieces of furniture, arrange them and make the table skirts, I would say it didn't take any longer than two weeks. All of my small projects such as shopping at yard sales, painting my mirror and chair, and spray painting small containers is what drew that timeline out, aside from trying to live life too.

My Learning Curve and answers to other questions  
1. Hidden storage can really impact the look of a room
2. Make some things stand out cohesively so things you don't want noticed fade into the background  
3. Paint can become your new best friend
4. Good furniture arrangement is a must, getting it right can make your furniture look more impressive
5. Little added touches have a big impact too 
6. Not everything needs to be exposed to remember you have it. In fact it's a bad idea.

In the photo on the left you can see that I started out with a very similar layout to what I have now. At the time of the first photo I hadn't thought through everything. I had storage and convenience on the brain instead of seeing the whole picture that would include, making the most of natural light and making my space comfortable and feel good to be in.
 
To add storage I brought in two bookcases, but after finishing I was not happy with my room. It felt cluttered and uninspiring. There was nothing pretty to look at and nowhere for my eyes to rest.
 
Even though my materials were organized, my containers themselves weren't organized and they didn't match. This made my shelves look very messy.

At this point I realized what was wrong and what I needed to change.
My room lacked cohesiveness and a focal point.
The numerous colors, textures, shapes, sizes and styles of my containers, furniture and craft materials overwhelmed my room.  
 
1. Making hidden storage is easy and can really impact the look of a room.
    The storage area under my desk was ugly, but necessary. I don't sit at this desk, but just use it for cutting, die cutting, scoring and filing.
     
    Covering the open area was a small change that made a huge impact, because it not only hid my storage, it also softened the harsh lines of my desk and brought color into my space. This one change was very motivating.
    Start small and it may help you along.
    Money saving tip: I took curtains and material I already had, plus picked up at a yard sale and cut them up. This is not one solid curtain, but rather random-sized strips hanging beside one another. Strips make access easy. I hung them on a dowel that sits in plastic closet bar cups and it can be easily removed, also making access easy. I like the look of the mixed materials and patterns.
     
    2. Make some of your craft containers stand out cohesively so the things you don't want noticed will fade into the background 
     
    You don't have to throw everything out and begin from scratch. All you have to do is trick the eye.

    I didn't have to do a lot to the shelves of my desk to improve them.
    They are the first thing the eye goes to when I enter my room because they are straight ahead and at eye level.
    The way I had my materials stashed just added to the dreariness and confusion of my room.
     
    First I removed some of the containers that didn't need to be on the shelves. To improve the look of the upper shelf and draw the eye I added some embellishments to the front of the jars and placed them in the center (pictured below).

    Embellishing the jars helped me in four ways; it gave me an attractive focal point, somewhat disguised what was in the jars without blocking my view of the contents, allowed me to bring the colors I wanted to an area that was very drab and the added embellishments united the jars with the rest of the room.

    Choose what you want to stand out and then make it special.
    The cream and light turquoise colored baskets were purchased at Family Dollar for a total of $12.00.
     
    Since I found new places (hidden storage) for some of my ugly containers I added a few pretty baskets to the lower shelf to finish off the look. The brown basket in the middle was an old basket of mine which worked nicely with the burlap on the jars, so I just added some lace and a bow to make it blend in a little and emphasize the colorful, textured baskets on the sides of it.
     
    By making some things stand out, the not-so-great things fade into the background.
     
    I didn't have to do anything to the plastic sandwich containers because they're sitting right next to a focal point.
    Did the sandwich containers draw your eye or were you drawn to the embellishments of the jars and the colorful baskets underneath?
     
    My shelves also lacked a pleasing arrangement and in the new design there is balance.

    NOTE: I know finding a container to hold craft materials can be exciting. Especially if it holds those materials perfectly. The issue is whether that perfect container works perfect in your craft space
    and if it doesn't, can you make it work? If not, don't use it, or at least don't display it.
    If you need to have it out, you can put it somewhere by itself like I did with my vase of colored pencils.
     
    The next two things I learned go hand-in-hand
    3. Paint can become your new best friend.
    A can of spray paint, a couple small bottles of craft paint and a partial gallon of paint leftover from a home improvement project can go a long way
    . That's all I used in my craft room. If you need to buy paint you can find it at Walmart or a store like it inexpensively.
    &
    4. Good furniture arrangement, is a must, can make your furniture look more impressive and is free 

    I spray painted the containers I already had and added some of them to my desk. By having the color around the room, it balanced the color scheme and the room felt brighter and cheerier.

    The dreaded furniture!
    I had mixed pieces of furniture that did not go together AT ALL.
    A simple white shelf on it's own can look fantastic, but place it next to a tall, massive, wood-stained desk and the shelf looks small and cheaply made.
    Place a thrown together desk made from filing cabinets, a bookcase-headboard, and slab of wood for the surface next to a beautifully lined Victorian piece and the desk looks hideous. In fact the Victorian piece looked horrible too next to these other things.
     
    Pay attention to the style and scale of your furniture and make any needed changes in the arrangement of them.
     
    To bring the look of my furniture together I needed the bookcases to look bigger and heavier with more details and to tone down my massive desk. Most importantly since they were the largest pieces in the room I wanted them to be similar and neutral in their overall appearance.
     
    I did not want to spend money on molding to make my pressed-wood bookcases look better. So I came up with a couple of solutions to get the same feel without having to spend the money and break out the power tools.
    First I painted stripes on the back of the shelves to give them some interest and disguise the cheap looking back panels. I used two craft paints and sponged the color on so very little paint was used. Since this is not an exposed area that will get a lot of wear, I didn't have to do any priming. No money was spent to do this. 
     
     I arranged the two bookcases close together and made them look like one large piece of furniture by adding an old wine cabinet between them and then two long pieces of wood as shelves above them that I painted white.
     
    To give my bookcases even more weight and interest I used a white window valance along the top to make them look a bit fancier and to soften the lines. This took the place of using molding. I also painted the underside of the wood to bring color to the nook.

    An old medicine cabinet was added since it has a curvy shaped top that breaks up the straight lines of everything around it. This was not absolutely necessary, but a nice added touch. The mirror (once cleaned, haha) helps spread light throughout the room by reflecting the sunlight from the windows across from it.
     
     I painted all the parts of my homemade desk white to make it look like a real desk, work with the shelves and brighten and lighten this massive piece of furniture.

    There is a noticeable difference in the amount of light 
    in my room now with all my large furniture pieces painted white.

    5. Little added touches have a big impact too 

    I wanted hints of pink in my room so I placed some pink and white striped wallpaper on the back of the desk. I used two-sided tape to adhere it so it can be easily removed down the road if I wish.
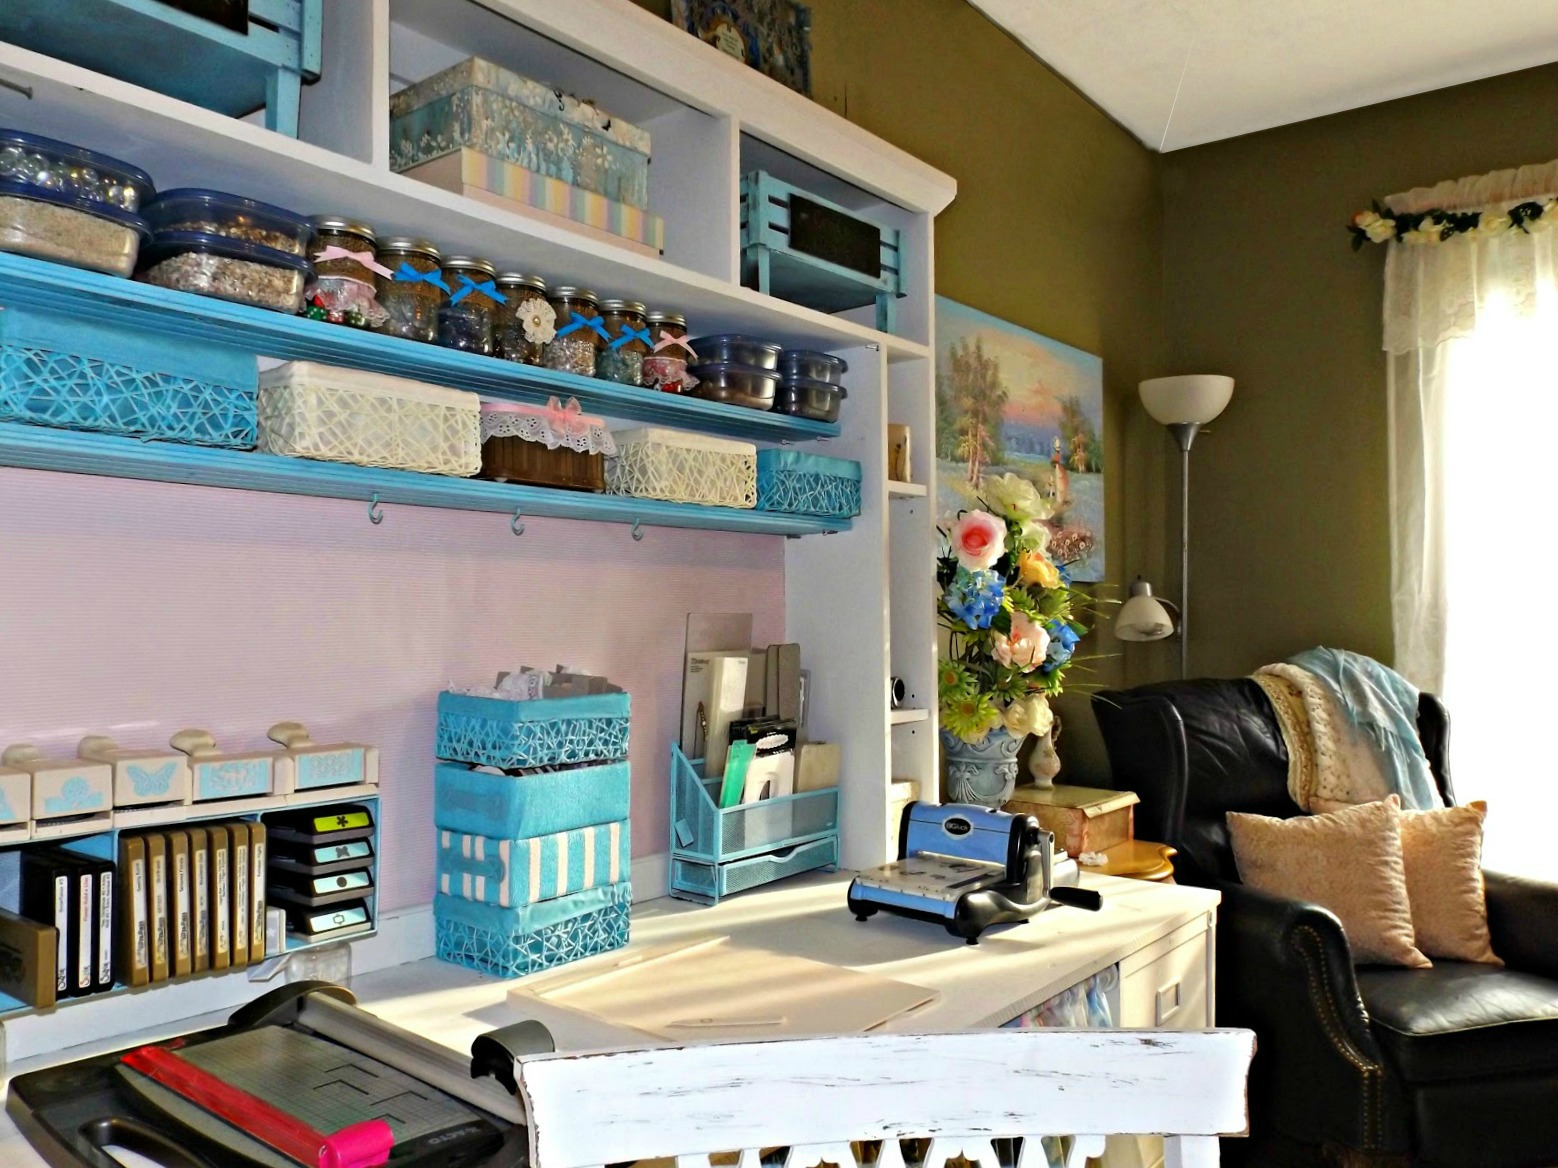
    I got the wallpaper from Goodwill about a year and a half ago and finally found a use for it, but you can use anything to add some color or pattern to a piece of furniture, including fabric, scrapbook paper or stencils. Goodwill often has brand new wallpaper rolls for around one dollar. I paid $0.86 for mine.

    I also added pink bows and labels to some of my cloth bins.
    I got the bins at Family Dollar for a total of $24.00.

    To be able to use the nightstands and not have to do anything to them I placed them together on the other side of the room between the windows. I liked their antique look with the painted flowers on the drawers and did not want to paint over them.
    Although I would have preferred to have them in separate spots, they work nicely together with a board on top to make one continuous surface. I even added a small shelf to the back to add another level. The drawers hold holiday themed embellishments and odds and ends that didn't have a place before. I can store my large plastic jars of flowers on top and this gives me a little area to decorate.
     
      To detract the eye from the fact that I used a window valance to cover the board I layered doilies in different patterns and colors.

    To give the area height I added a stylish mirror
     to the wall behind the stands that I painted white, (the mirror was an ugly fake looking gold before). This helps bounce light around, as well, for taking photos. 
     
    My furniture looks better together now and by building up I made the most of my space. I also have a lot of hidden storage, hence all the fabric. :) Now the shelf unit and my desk look like they belong together. 
    The white curtains on the bottom of the shelves match the curtains on the windows. 

    Money saving tip: To make them I took one large curtain and cut it in half. Then I measured the length I needed and cut the tops off both halves leaving room to make the hem for the rod.

     6. Not everything needs to be exposed to remember you have it
     
    A recurring statement I read/heard online was,
    "If I don't see it, I won't use it".

    These were crafters speaking about how they need things to be exposed so they don't forget about what they have. It's a misleading statement if taken as advice. The only way you will forget about something is if you're not well organized. In fact that is a great queue that you need to improve when you're forgetting you have something. Being truly organized means you know at all times, exactly what you have and where it is.
     
     If you live in an "organized mess" like I did, you probably will forget that you have it.
     
     So what did I do the first time I "organized" my space? I took what they said as advice and exposed everything I could.

    That was a HUGE mistake!!!
     
    In reality it really doesn't work well that way.
    A bunch of different and exposed craft materials together not only make a room feel cluttered and closed in, but displaying everything can actually have the opposite effect. 

    You may end up seeing nothing, at least nothing in particular.
     
    All of those new punches I got were so cool! I just had to see every one of them. All of those embellishments (buttons, beads, ribbon, lace, etc.) were so colorful and pretty I just had to keep them in view like decorations. 
     
    And what did I end up with? This. 
    Not very pretty at all when you put it all together.  
    My room looked more like it belonged to a hoarder than a crafter.

    Now your reason for having everything out may not be exactly the same. I mean it was also convenient to have everything out. At least that is what I told myself, until I was looking through my "organized mess" and couldn't find something that was right in front of my face.
     
    Think about it this way. You may have piles on your office desk of bills, junk mail, passwords, and so forth. When someone says something negative about it (spouse), you say you know where everything is. You have an "organized mess", 
    BUT who wishes for an organized mess?

    Isn't it much nicer when you walk to your desk and the surface is clean and free of clutter. When you know just by opening a drawer all of your bills are ready to go and you don't have to stare at them or worse, shift them around to get to things. The same applies to a room. Organized messes don't invoke any kind of feeling other than wanting them to go away and they certainly aren't inspiring.
     
    I craft because I like the creativity in making things that attract the eye in a positive way. I like to make pretty things and my room was not pretty.
     
    Solution:
    Only keep some of each item displayed.


    Lets use my paper punches as an example. I don't have a lot of punches, but you can substitute anything here.
     
    I display only the ones I use most often and place the rest in a storage container that is easily accessible and labeled.
     
     
     Instead of my eye randomly searching, it goes right to the labels and now I don't even have to look at the labels when retrieving a container.
     
    Having your craft materials put away removes the "organized mess" and makes it easy to find and retrieve the things you need. It also makes the area more pleasing to look at and be in.
      Crafts you no longer do and extra things you haven't used in ages can be placed in hidden storage.
     
    I went through each item I had until everything had it's space and therefore I knew what I had and where to find it.

    So to everyone watching craft videos for ideas like I did, keep in mind that the individual ideas are great, but together they may create a monster.

    The little joys of finding just the right container and furniture pieces with little to no monetary expense can cloud your judgment if you don't have an overall plan in mind.

      Side Note: I use fabric to cover one of the areas I use often too.
    I use my inks and rubber stamps at least a few times per week, but when I'm not crafting, as my room serves other purposes as well, I don't want to have to look at them and I don't want the inside of the cabinet collecting dust. Just my personal preference.
    My solution was to hang a curtain on a cafe curtain rod that sits in cup-hooks. This way I can easily remove it completely when I'm crafting and cover it up when I'm not. I used old fabric I had. You can repurpose an old tablecloth, bed linens, clothing, whatever you can find or even stitch some different fabrics together to make your own unique cover.
     
     
    Choice is a big deal. Give yourself choices.
     
    I hope answering some of the questions I've received as well as sharing some of the things that I've learned have helped you. They're things that I did not think about initially and I wish I had as it would have saved me the time and energy of doing it wrong the first few times.
    It's not the easiest process to decide what you want and figure out how to make it happen without a lot of money sitting in the bank, but it's very possible with a bit of creativity and it's an exciting and very rewarding experience that will make everyday afterward a good craft day. So put your creativity and eye for great things to work for you and make a space that you love.

    Happy crafting!
    post signature

    Wednesday, November 19, 2014

    Make Your Own Snowflake Decorations

    Hello Everyone!
     
    If you've stopped by for the Sketches4All Challenge Celebration, click here. 
     
    Just a quick post while going through my Christmas decorations. I had forgotten all about this and when I was new to crafting and blogging last year it never even dawned on me to share it. 
     
     
    So here is the link to what I had found through Pinterest last November. They were so cute I had to give it a try.
     
    http://www.fabdiy.com/diy-snowflake-popsicle-ornament/
      
     I decided to do a snowflake theme for my front window. Except for the lit up star, I had done all my decorations in shiny and glittery gold and silver decorations. The popsicle stick snowflakes were so easy to make with just a dab of hot glue on each stick to put them together. Festive and fun!
     
    Happy Crafting!
    post signature

    Tuesday, November 18, 2014

    What's in YOUR Craft Room? Shopping, Ideas and Reviews for Craft Supplies

    Hello everyone!
     
    Did you ever wonder what paper-crafters have in their crafty arsenal? I know I did when I first started out and when I see a project I like the first thing I look for is a supply list at the end of their post. Knowing can be useful for deciding what to add to your own craft room. This is especially true for people starting out or becoming more serious about their craft.
     
    Today I'm sharing what I use to make my projects. I will include videos I've come across on YouTube to show how things work if you are new to crafting and wanting to prepare your craft space. I may throw a product review in here and there as well, but first things first. 

    I'm not connected in any way to the companies whose products I'm speaking of. Actually I wish I was, then maybe I would be getting paid for just sharing products I love or getting free products. :)
     
    I will use Joann Fabrics in my examples, because that is the store I have local to me and can be found in most cities across the country. Michaels is another one of my favorite stores.
     
    To begin, let me share a tip.
    Shopping
      When you're preparing to shop and have a coupon always read the small print. Your best bet is to look for in-store sales or comparison shop online. For example, most of Joann Fabrics coupons state 
     
    "...Offer excludes...all paper-crafting machines, cartridges, dies, printers & accessories;..."

    When I first began crafting I made the mistake of excitedly running into Joann Fabrics wanting to buy my die cutting machine with a coupon just to have this pointed out. To say the least I was very disappointed. If you can't find a good deal in your local craft store there are many GREAT deals online and quite often with free shipping. Doing your homework on pricing can save you quite a bit of money. Money you can spend on other craft goodies.
    I will usually check out ebay first.
     
      
    Cutting Dies
    There are a lot of different brands of cutting dies on the market. I own three different brands of dies so far, Spellbinders, Sizzix, and Impression Obsession.
     
    Spellbinders and Sizzix dies are readily available to buy at just about any craft store. I'm a penny pincher when it comes to my craft supplies so I wait until there is a sale, look for buying programs with rewards and shop online. Scrapbookpal.com has some great prices on their dies. 
     
    I began by purchasing basic shapes and added more intricate dies as I've gone along. It's helpful to have at least a couple of each kind (basic shapes, fancy shapes, borders/edgers, tags/labels, and of course your fun stuff such as flowers, insects and the like.
    With just a couple of each to start out, you can make some beautiful projects. 
     
    Spellbinders Cutting Dies
    A little over half of the dies I own are Spellbinders dies. They are thin, easy to store, come in a wonderful variety of shapes and designs, can be found at excellent prices, are readily available to buy at most craft stores, and cut very well. The main thing that makes them my favorite is that they emboss too which makes each shape look fantastic.
    My ever-growing Spellbinders collection.
     
    Sizzix Cutting Dies  
    I also love Sizzix dies which are becoming more detailed as well as cut a lot of different materials and Sizzix dies come in many different forms and sizes. The thick Sizzix dies not only cut beautifully, but you can cut many layers at the same time. This can be quite useful when mass producing a specific shape for purposes such as, selling die cuts in an online store or making a lot of Christmas cards at once.
    Unlike Spellbinders dies, I can cut thick materials as well which allows me to make things like chipboard die cuts and other thick embellishments for my projects. The downside for Sizzix dies, at least the ones I own, is that they don't emboss, but their cutting ability makes up for it. Also if you don't own the Sizzix Die Cutting Machine, the Sizzix brand dies, except for the wafer dies, probably won't work for you.
     
     
    My collection of Sizzix Dies
     
    What to Keep in Mind
    If your shopping for dies consider how you will use them to layer if you want dimension. Picking shapes that you can use one on top of another is very useful.
    How a new die will work with your existing die-cut collection is another consideration that can be helpful when you just don't know what to get. 
    Choices are wonderful, but with my fixed budget, I've stood in the die isle for hours trying to decide what would be the smartest purchase to make.

    Before you shop do some research. It's difficult to envision how a die cut will look on a project such as a greeting card by just looking at the die. Google handmade cards and look on Pinterest. These should give you an idea of what's new, popular or is just your taste preference. Many of the photos on Pinterest will lead you to the person who made it and very often that person has included a supplies list at the end of his/her post. I did a "Spellbinders dies" search on Pinterest and there I found beautiful examples as well as great tips and techniques.
     
     Note: If you have a die that is just not cutting well, add a shim such as another piece of paper. I just keep adding as needed, but I don't need to do this very often. Since each die cutting machine cuts a little different, even among the same brand, you'll have to find what works for you. 
     
    Which leads me to...
     
    My Die Cutting Machine
    My favorite thing in my craft room is my Sizzix Big Kick which is the exact same thing as the Big Shot. The name difference is just how Sizzix markets it. There are a lot of things that I can do by hand (the hard way), but I canNOT produce the same beautiful things that this machine does. You can cut leaves by hand and they may look good, but a die cutting machine will make them look perfect and most importantly save you a lot of precious time.
     
      So having one of these in my craft room is priceless and is the first thing I would recommend to anyone wanting to get into card-making and other similar paper crafts.
    Video
    Sizzix Big Shot
    https://www.youtube.com/watch?v=hBZcwrTNrYc

    Review
    • Works wonderfully and is well built.
    • Does a fantastic job of embossing.
    • Can be found on ebay for as low as $70.00 instead of the $119.00 or more you see in stores 
    • Works with most brands of dies. In fact I haven't found any dies that I can't safely make work with it. 
    • You can now purchase the machine with the Extended Multipurpose Platform for the price I mentioned above. There are a lot of them out there that don't include the extended platform so make sure you read the fine print about what is included in your purchase.
    • If you have to purchase the extended cutting plates separately they will run you about $20.00, but right now there is an online sale at Joan Fabrics for $11.99 and you'll find sales often.
    •  There is also the Sizzix Big Shot Pro that accepts 12" wide paper and bigger dies are made for it, but it's an investment at around $400.00. I'm quite satisfied with my smaller one, but may get the other down the line for larger projects. 
    • I read a lot of reviews about die cutting machines before I made my purchase and the Big Kick/Shot was the right one for me because it works with most dies and the Multipurpose Platform makes it easy and convenient to use. 
    Embossing Folders 
    Joan Fabrics often has great deals on Darice embossing folders. I've gotten the majority of mine 3 for $5.00 and other times 5 for $10.00. When comparing different brands of embossing folders I have not noticed a difference in any of them.
     
    Note: Something to think about before purchasing embossing folders is your style. 
     
    Example: I love the "Three Snowmen" embossing folder pictured below, but have never used it because I love layers of embellishments on a card too. The embossed image is just too cute to cover up, but too plain on its own for me. So even though I intend to use it I find myself reaching for other embossing folders instead.
     
     The folders that are just patterned are my favorite because they give a nice textural backdrop for a focal point. I've used the flowers, snowflakes, and fancy patterns many times. They produce that extra special touch that can make a card go from drab to fab!
     
    Another thing to keep in mind when it comes to embossing folders is size. It's nice to have a lot of the smaller ones (4.25 x 5.75), but it's great to have a least a couple of large ones. You can cheat a little to make the small ones work for bigger projects, but when you want, for example, a large greeting card to have a flowing background, large embossing folders make it much easier.
     
    My Embossing Folders Collection
    I also have a few Cuttlebug folders. The one I use most of all is the Polka Dot Page which is 5"x12". The large size of it makes card-making easier for me. The other two I bought so my daughter could use them for Valentines Day.
     
    Paper Punches
    I love my paper punches and use them almost every time I craft. I wasn't sure that I would use them once I had my die cutting machine, but they work in a way that my machine won't. You are somewhat inhibited at the length of a die, but not with a paper punch. With a paper punch you can punch as long of a piece of paper as you want.
    So after I began crafting I realized that the two go hand-in-hand and that paper punches are important for creating certain looks. Paper punches are also quite versatile as people are constantly finding new ways to use them. Check out these videos and you'll see what I mean.

    More ways to use Martha Stewart edges punches to create lace paper and rosettes

    Martha Stewart Crafts Punch Around The Page Punches

    Martha Stewart paper punches are a wonderful addition to a craft room, but there are other brand paper punches that are beautiful too. I only own two of the Martha Stewart Border Punch Sets, but I have to say they cut better than the Fiskars brand, squeeze, paper punches and I like the way Martha Stewart punches fold up for storage.
     
    These are a couple of the latest cards I made using one of my Martha Stewart punches for the lacy background.
     
    My second brand of go-to punches is Ek Success. They're very similar to the Martha Stewart punches as they come in many designs, fold closed for storage, and cut very well. Here I mixed punched strips from three different brands of punches, Martha Stewart, Ek Success and Fiskars border/edge punches to decorate a card.
    Punches can also be used to make embellishments.

    Tutorial - Easy Paper Flowers Using EK Success Dahlia Punch

    My Paper Punch Collection
    (I have a few others, but these are the ones I've used most)
     
    One of the most important things in your craft room is the adhesive you use. Honestly I probably have every glue and tape on the market, but there is one I choose to use most of the time and that is my ATG. It's easy to use, has a strong bond, the roll last a long time, it's refillable, and you never have to touch your tape. Also the tape is narrow enough for many small projects.

    I hope this has given you some insight into what I do when looking for supplies as well as helped you determine what you might look for yourself and how to look for it.
    Comments are always delightful and welcomed :)
     Happy Crafting!
    post signature

    Sunday, November 16, 2014

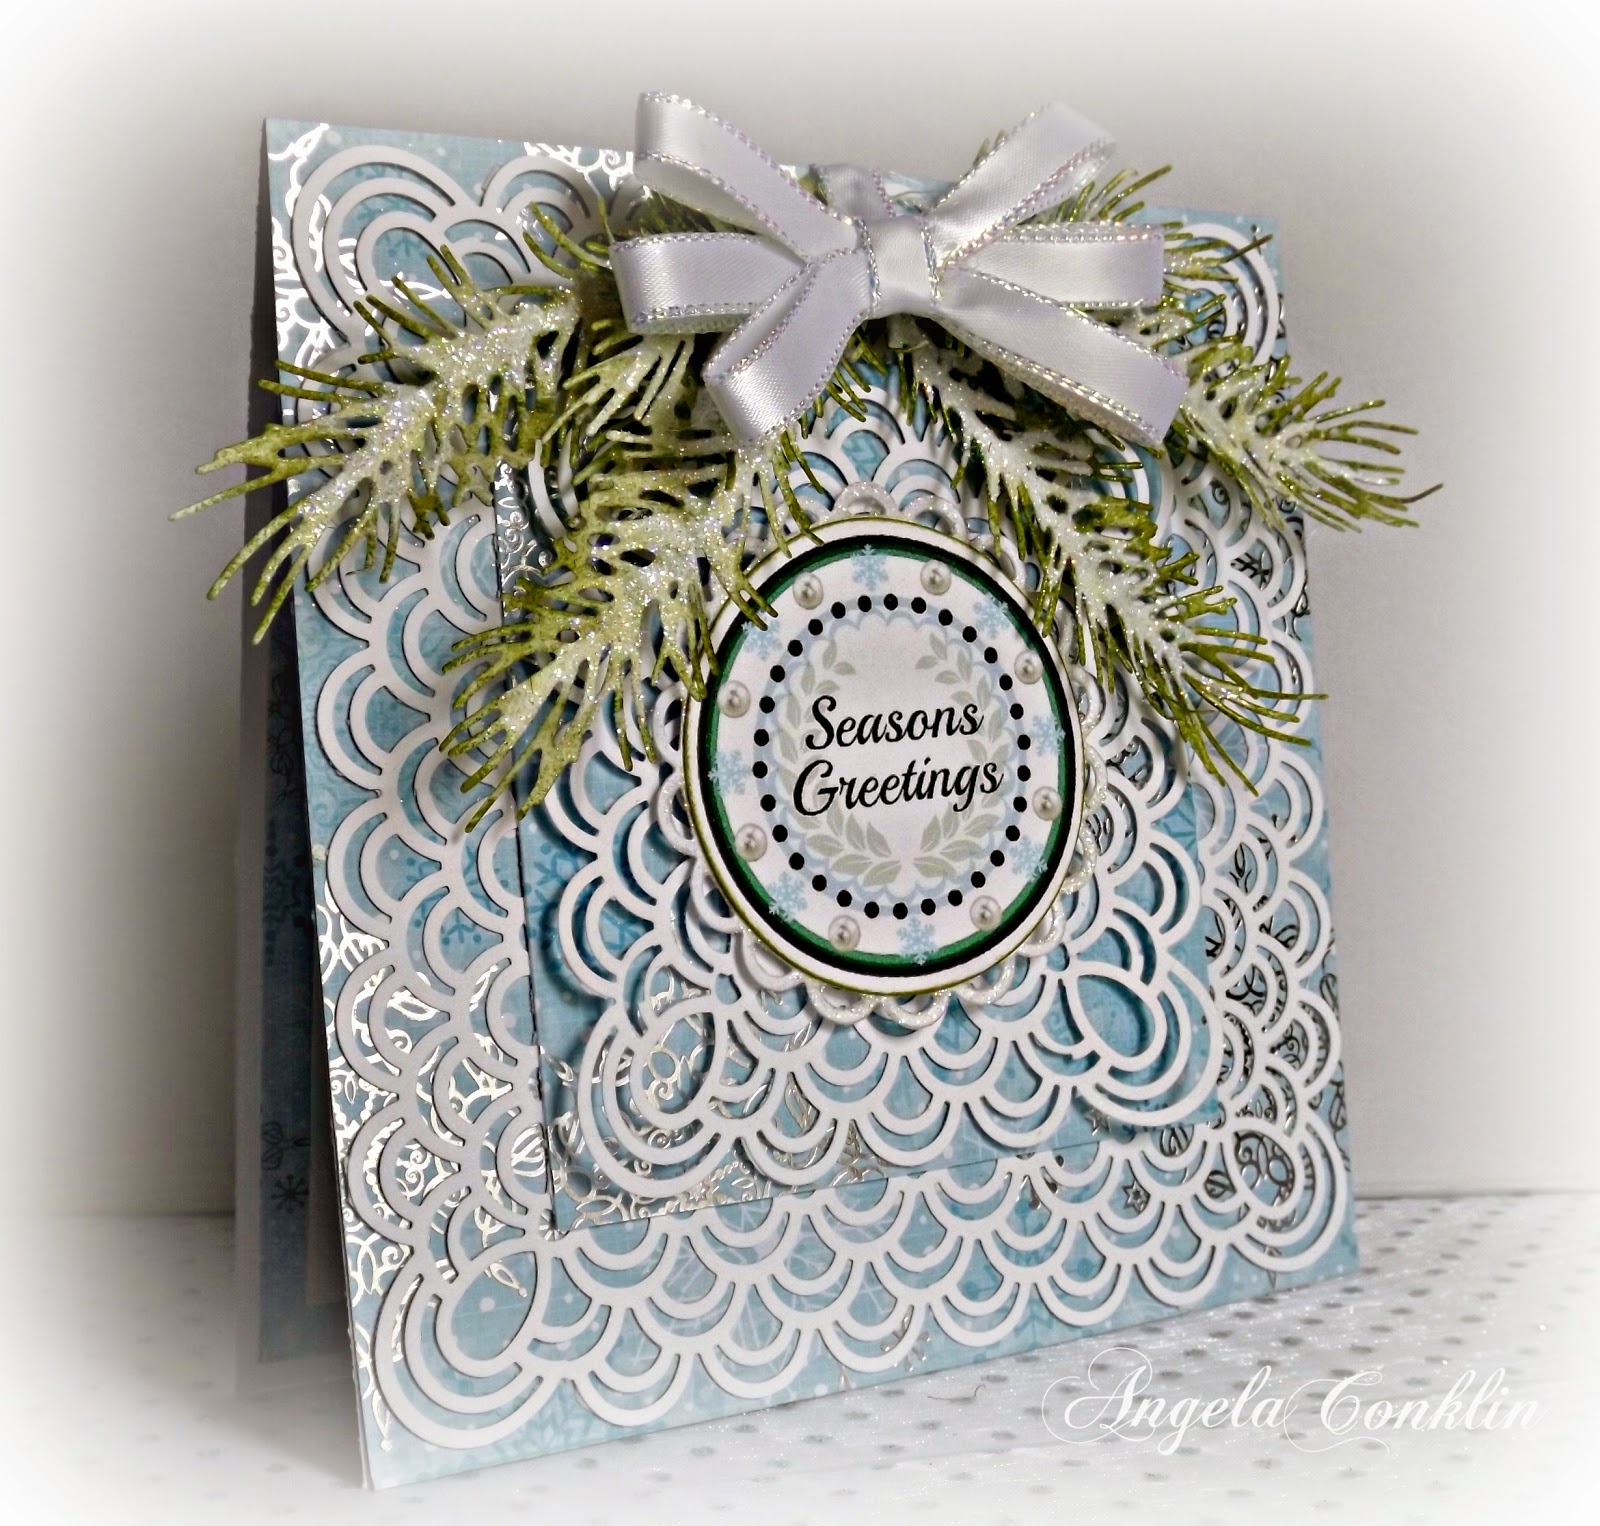
    Handmade Greeting Card - Pine Branch Icy Winter

    Hello everyone!
     
    I think the greeting card I made today is one of my favorites. Now I'm getting to the point of having to decide who gets what Christmas card and honestly that's the hardest part for me. I want to send everyone the best one :)   
     
    For today's card I used the DCWV Winter Solstice Stack. I love this paper stack and this particular paper with its silvery snowflakes on an icy blue background is gorgeous.
     
    To start my card I cut from my patterned blue paper a 6x6 inch piece and 4x4 inch piece. 
     
    I did the same cuts (6x6 inch and 4x4 inch) from white cardstock. Then I used a corner and border punch set to make my lacy paper. 
     
    If you don't know how to do this I've included a tutorial video from YouTube here that I learned the technique from.
     
    Once I had all four pieces of paper (2 blue, 2 white) I adhered them together using blue as the base for each.
    To make my sentiment I used Picmonkey to design it and then printed it out and made the circular cut with a round die. 
    I decided I didn't just want a circle so I cut a lacy circle to place behind it.

    I used glitter on the lacy circle to make it stand out from the background.
     
    I used an Impression Obsessions die to make the pine branches and then colored the branches with ink.
     
    To give the appearance of snow I used white puffy paint and glitter.  
    NOTE: I ran into a problem and had to start over again. My green ink bled into the white puffy paint. So to keep this from happening I used a clear embossing powder over the ink to seal it and then applied the paint and the glitter. This worked perfectly.
     
    After the branches were dry I attached them to my card with hot glue.
     

    I then added a bow and when my card front was finished I added white cardstock for the base of the card and that was it :)
     
    I would love to see your results if you decide to make one!
     
      Supplies


    Happy crafting and thanks for stopping by!

    Friday, November 14, 2014

    Join the Celebration! Sketches4All 5th Anniversary Blog Hop Challenges November 14th- December 31st


    Welcome to the Sketches4all
    5th Year Anniversary Party!!!
    I’m so glad you could join us on the first day of our 5th Year Anniversary Party blog hop!  You will have until December 31, 2014 to hop around and comment on all the awesome projects our Design Team made with gorgeous Christmas digi’s from The Cutting Cafe
    We hope hopping around will inspire you to then come to Sketches4all and join in on all of our 5th Year Anniversary Party Blog Hop Challenges!   We will be offering a new challenge every Monday and Friday until December 12th.  

    You will have from November 14th – December 31st at midnight (PST) to complete the Anniversary Party Blog Hop and the Anniversary Party Blog Hop Challenges and upload your projects on the individual challenges in the Special Events section of the Forum AND in the Photo Gallery at Sketches4all to qualify to win  There will be a First Place Prize, Second Place Prize and a Grand Prize.
    Winners will be announced on January 3rd in the Winner's Circle at Sketches4all.  

    The 2nd place winner will receive a $10 gift certificate to   The Cutting Cafe!  
    To qualify for this prize you must EITHER take part in the blog hop OR do 1 or more of the challenges

    The first place winner will receive:

     1- 4pack of Tim Holtz Mini Distress Ink Pads
    1 - MME Sleigh Bells Ring Paper Accessory Pack
    1- package MME Decorative Tape
    To qualify to win the first place prizes you must comment on all the blogs on the blog hop AND complete at least of the Anniversary Party Challenges.

    And what is the Grand Prize you ask?!  How about a $50 gift certificate 
    to the awesome online scrap store, 
    A Cherry On Top
    and
    The title and bragging rights:
    Queen of the Sketches4all
    2014 Anniversary Party!!!!

    Now I know you are asking, "How do I win the Grand Prize?!?!"  Here is how:

    1.  Hop around to all of the blogs of our design team members.  Follow them and leave a comment.  
    Right away that will get your name in the hat to win this awesome prize!!  
    2.  Join ALL the Anniversary Party Blog Hop challenges at Sketches4all.  
    These challenges will be posted in the Forum under Special Events.  (HERE) every Monday and Friday until December 12th.  This will get your name thrown in the hat to win the Grand prize.

    Here is the order of the hop so you don't get lost along the way:
    Stacy - http://scrapwithstacy.blogspot.com (you are here)

    I decided to do two projects, a layout and a card to help you get inspired! I used a sentiment digi from the Cutting Cafe as the title for my layout and another Cutting Cafe digi for the theme of my card :) 

    I love this sentiment. 

    My card is made from medium turquoise cardstock with an overlay of vellum. I colored the back of the vellum with Tim Holtz Distress Ink in the color Peacock Feathers. I then used an embossing folder to make the small white snowflakes. I love the way vellum turns white when embossed. It doesn't even matter that I had inked the back of it.
    The large snowflakes are also made from cardstock with an overlay of inked vellum.

    Now it's time to hop on over to Karen's blog.

    Thanks for stopping by for the


    post signature

    Wednesday, November 12, 2014

    Christmas Gift Tag - Use Your Tiny Scraps

    Hello everyone!
     
    Since October, when I began making Christmas cards, I have been saving the little strips cut from patterned paper. I wasn't sure what I was going to do with them, but I figured I would keep them around and maybe I would think of something.

    Today I'm sharing how I used them. It feels good not to waste more than I have to and I think the tag turned out really cute.
     
     This is how my gift tag would look if hanging from a present.
     
    To make the background:

    To make the Poinsettia:
     I drew three leaves in different sizes on a piece of cardstock. I started with my largest leaf to get the size flower I wanted. Then I used them as templates to make 5 leaves of each size by tracing around them.
     
    Just a quick rough sketch to show you.
    I made sure to make stems so I could adjust how far or close the leaves are from the center of my flower then I just cut the extra length off. 
     
    Once I was done cutting my leaves I colored them with Tim Holtz Distress inks, first in Victorian Velvet and then in Barn Door. I used two colors so I could get some depth. I also creased my leaves (folded them in half) before applying the second ink so the crease would get less color on it and therefore stand out a little more.
    I hot glued the leaves to a small paper circle and then for the flowering center I placed a dab of hot glue and poured clear beads on it. 
     
    To embellish my tag I made two die cuts with my Spellbinders Medallion 5 die and placed red gems in the center of each.
    It's difficult to see in the photos, but the strips of paper in the background stand out nicely.
    To give my tag a finished edge I edged it in Tim Holtz Distress Ink (Barn Door) and then hot glued a pretty Christmas cord onto it.
     
    The last steps were to add the bows on the bottom corners and the doilies to the back of my tag.
     
    For a final touch I added a white ribbon with glittery edges to the top and slipped it through a red bead.
    The lace at the top was just used to hold it in the correct position for the photo.
     

    Happy Crafting!
    post signature